When I started shooting, I had a penchant for buying budget guns and trying to improve them to compete with much more expensive guns. With some home tweaks, such as trigger jobs and recrowning, a certain level of success could be achieved. The two things I would spend money on would be a good scope, and a stock from Boyds.
While we have access to some great optics in New Zealand, it’s been almost impossible to get a Boyds rifle stock for a long time. With the US$100 export limit on certain firearm-related items, New Zealanders have had to try and buy the cheapest of the stocks on offer, with no upgrades or customisation, or wait for a run-out special that matched their firearm/stock combo. Unfortunately as prices have naturally risen, even the option of squeezing in under $100 has just about disappeared for most items.
Are there any NZ Boyds dealers?
There have also been various businesses in NZ that have had a Boyds dealership at one time or another – but they’ve always been bloody expensive. In many cases, the stocks would have cost more than people had spent on their rifles to begin with – and the options were limited too.
So – we’ve tried to fix this issue.
I’ve long been a fan of Boyds stocks, and you can read about stocks I have used over the years in the product review section of the website. In order to give everyone else access to the same stocks that I’ve really enjoyed using – and at a reasonable cost – we’ve established our own Boyds dealership in NZ.
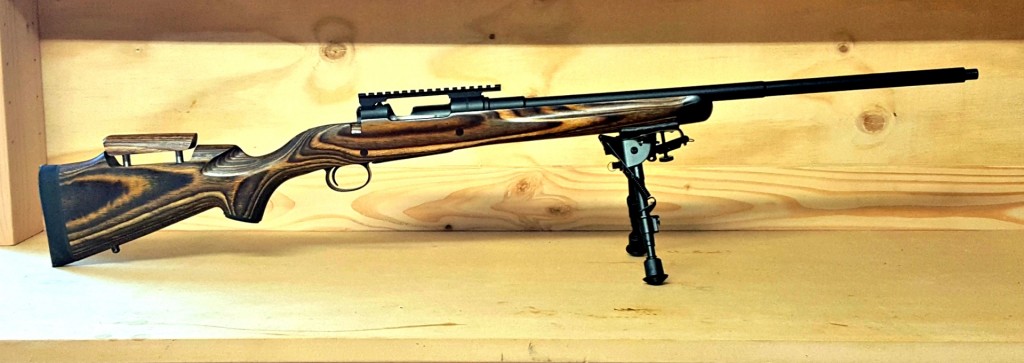
This Swedish Mauser was my second ever Boyds project, in a Prairie Hunter stock.
The Gun Rack and Boyds Hardwood Gunstocks
Yup, you can get any Boyds stock you want, with any customisations. There’s no federal export limit, and you don’t have to pay a retail store half of the deposit of an Auckland 3-bedroom house either. In fact, we can get you a basic Boyds stock, delivered to your door, for around NZ$525. If you want to spend more and get an adjustable comb, custom colours, change the LOP, or whatever, you can do that too. We’re also able to sell the At-One stock, at around NZ$640, delivered.
So, how come we’re able to do this? Well, we can bring in the stocks because we have a federal export licence from the US government, specifically for Boyds stocks. And how do we do it so cheaply? Quite simple. We’re not greedy. We make a very small amount of money on each stock, and that money means I can buy ammo and other bits and pieces to keep this website going. I’m much more interested in bringing something cool to NZ shooters than I am in making a shed load of money.
Removing and disassembling the bolt of a Swedish Mauser is a pretty simple affair and may need to be undertaken for any number of reasons. Most commonly, you’ve picked up a rifle nearing a century in age, and there’s a lot of gunk and crap in there that needs to be cleaned out. The other scenario is that you could be modifying your bolt to cock on close, or reduce lock time with lighter materials and a stronger spring.
Hopefully if the latter is your reason for stripping a Mauser bolt, you’ve inherited or bought a sporter – there are fewer and fewer whole specimens left.
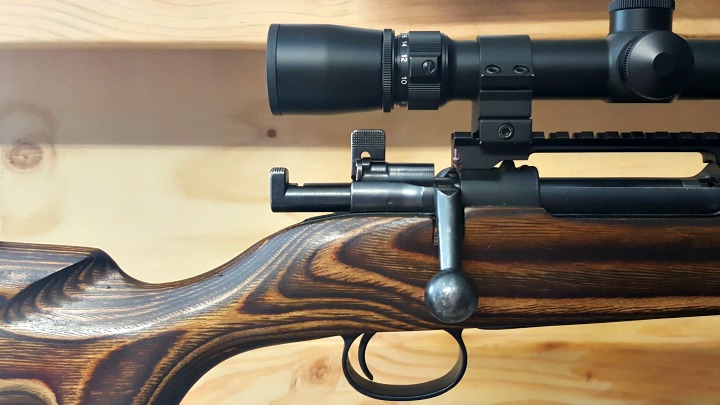
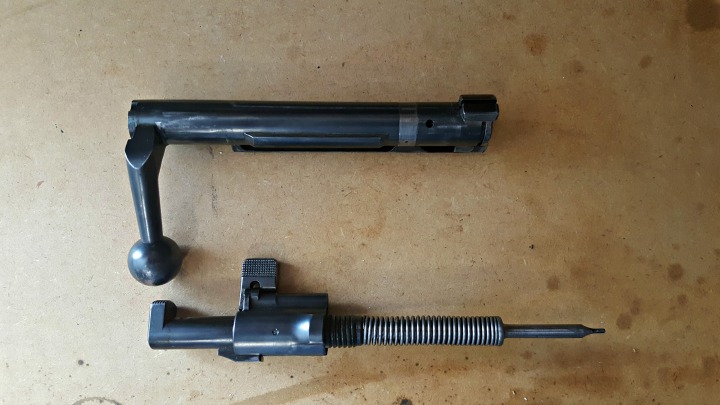
Below are a series of pictures showing how to disassemble a Mauser bolt (small ring, not a K98). If your bolt looks different, don’t fret. This is from a commercial rifle, not a military conversion. It has a blued finish and a bent bolt handle, which thankfully clears my Weaver 44/40 scope, thanks to an EGW 20 MOA rail. If you’re wondering how the extra height affects consistent cheek weld and sight lines, a Boyds stock with adjustable cheek rest helps out there.
Step 1 – Get the firing pin out of the bolt body
After checking the rifle is unloaded, close the bolt fully.Lift the safety lever into the upright position and remove the bolt without lowering the safety. You may need to remove your scope if the safety won’t clear it.The bolt shroud should easily unscrew from the bolt body now. Note the cocking piece is held under spring tension by the safety lever.The firing pin separated from the bolt body. Again, note the spring and firing pin are locked back – if you don’t do the next step carefully, the spring, cocking piece, and firing pin could separate with a fair amount of speed and force.
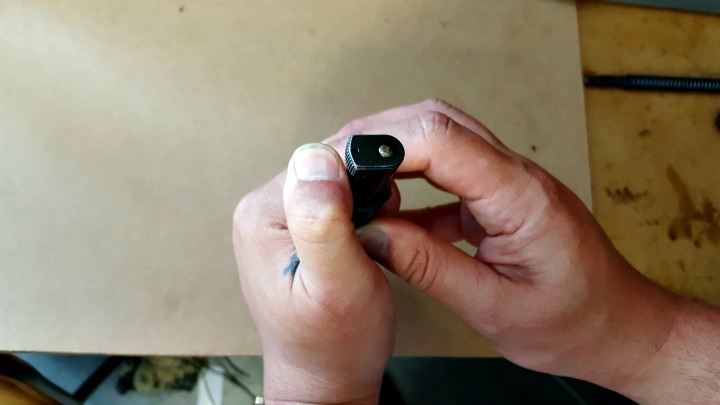
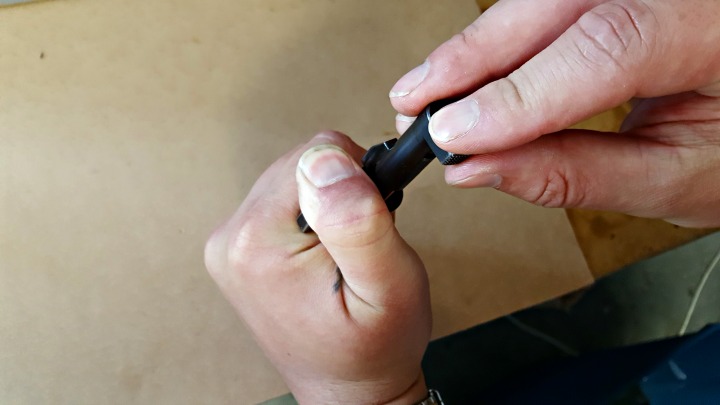
Step 2 – Separate the firing pin from the bolt shroud
Find a hard surface you don’t mind denting. Or, if you have an original stock with brass disc, you can use the indent for this step. With the firing pin against your hard surface, force the bolt shroud downward. The safety lever provides a good amount of purchase.Twist the cocking piece 90 degrees. At this point make sure you have a firm grip on the bolt shroud and firing pin, and slowly release the spring tension to avoid sending pieces flying.Fold the safety lever all the way over and pull it back to separate it from the shroud.Shroud, cocking piece, spring, safety lever, and firing pin.
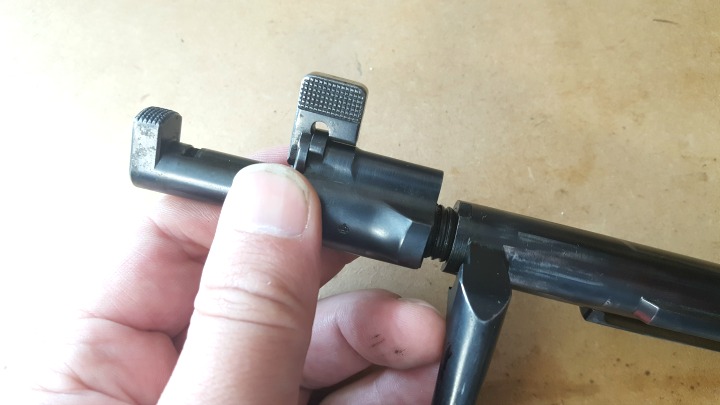
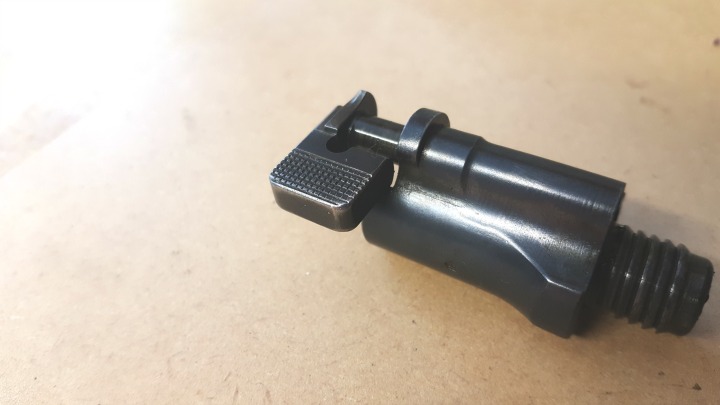
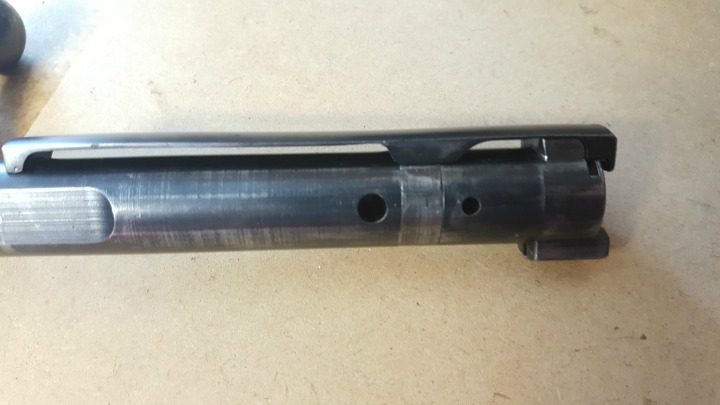
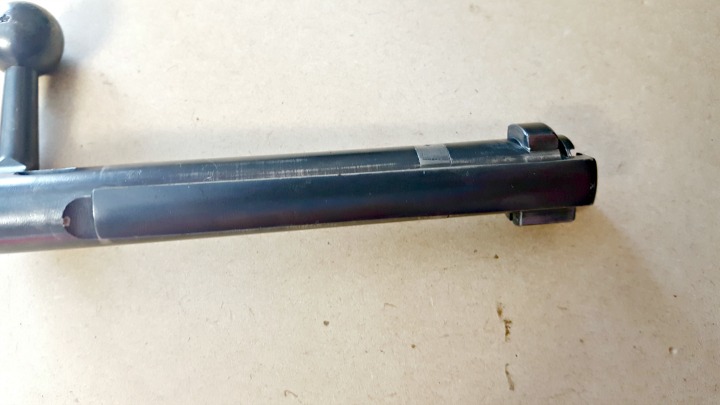
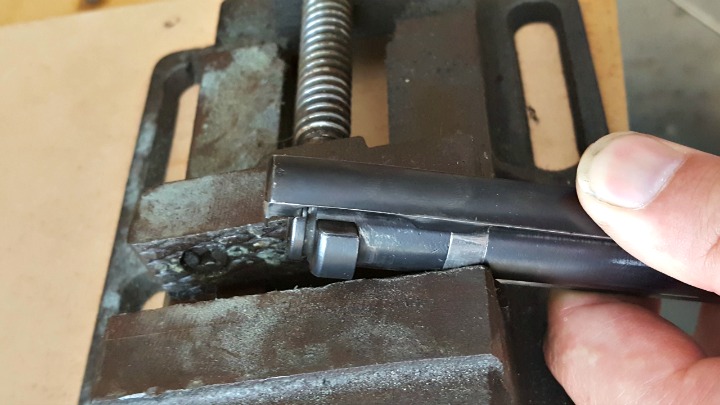
Step 3 – Remove the extractor from the bolt body
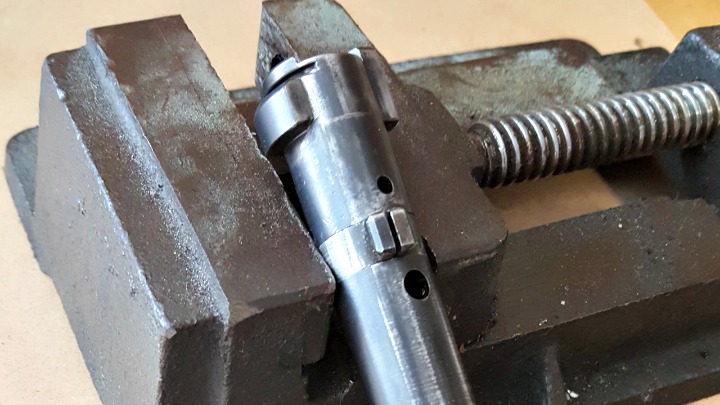
Note the extractor sits in a groove just before the bolt face.Rotate the extractor about 90 degrees so that it exits the notch.Apply downward pressure with your thumb, as you slide the extractor forward. Remember this sweet spot, as you’ll need to apply pressure in the same spot to get the extractor back on.Getting this collar off is easy, but you will stretch it as you do so. A flat screwdriver can be used to pry it open if needed. Getting it back on once it has been taken off is harder, and a vice of some sort will be handy, as you’ll need both hands to get the extractor back on.When reassembling the bolt, getting the extractor onto the collar is probably the hardest bit. If you have locking pliers or a small vice, it shouldn’t be hard to slide the slot on the underside of the extractor onto the collar. Remember where you applied downward pressure to remove the extractor – this is the same spot you need to apply pressure to as you slide it back on.
From here on, the rest of the reassembly is easy, and is simply the reverse of the above.
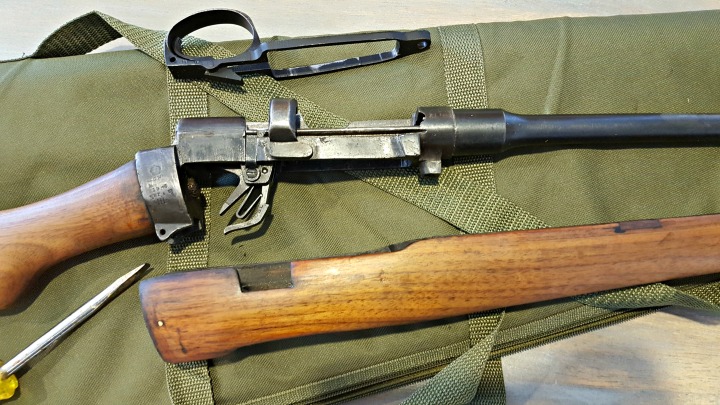
There are two types of Lee-Enfields out there. There are the pristine or refurbished, fully wooded, original-as-they-come investments. And then there are the sporters. These chopped and changed pieces of history make excellent first time hunter’s tools, or the basis of many a project.
We’re going to take a quick look at how to remove and replace (or upgrade) the furniture on your 303, and talk about some of the interesting things you’ll find along the way. Whether you’re building an awesome wildcat, such as a 25-303 or even a 40-303, or just beautifying grandad’s old hunter, I hope the steps in this article are helpful for your project.
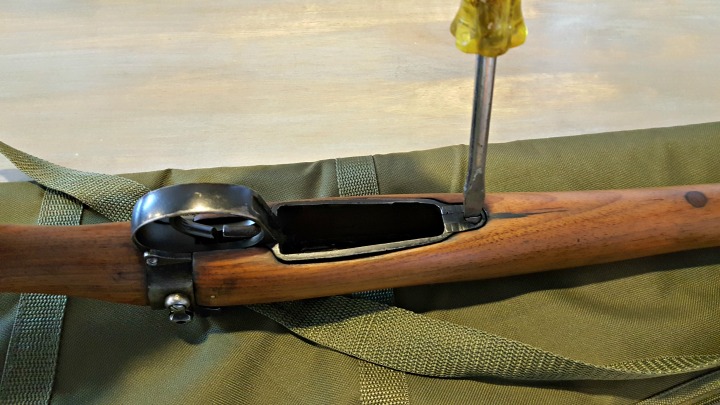
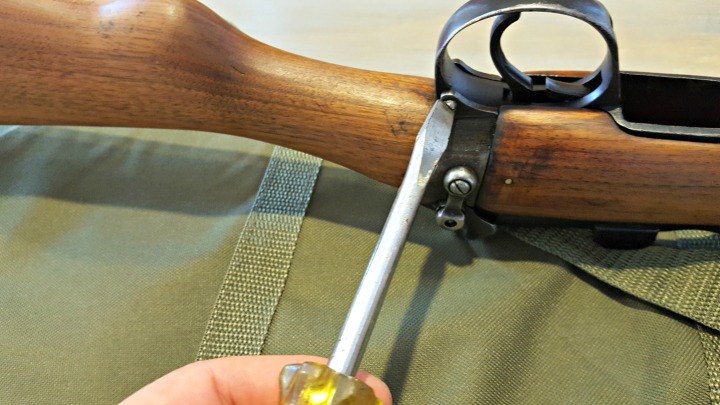
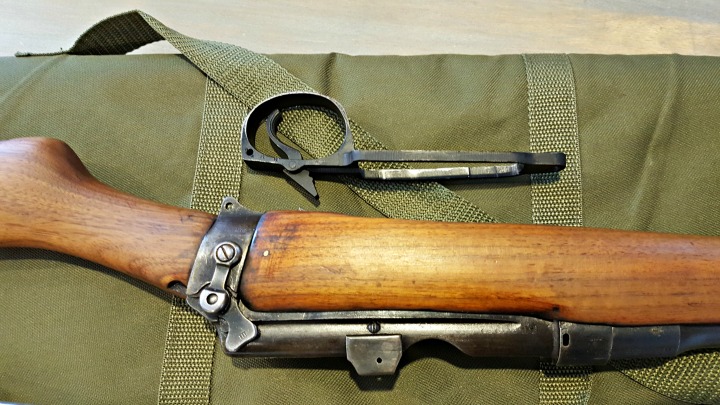
Remove the floor metal
A large flat screwdriver is needed for the single action screw.Remove the screw from behind the trigger guard, which the floor metal hinges on.The floor metal should simply pull away. You may need to jiggle it a bit or get the right angle to slide the attached trigger out.Depending on how your rifle’s been treated over the years, you may need a bit of elbow grease to pull the fore wood off, but it should slide off easily.
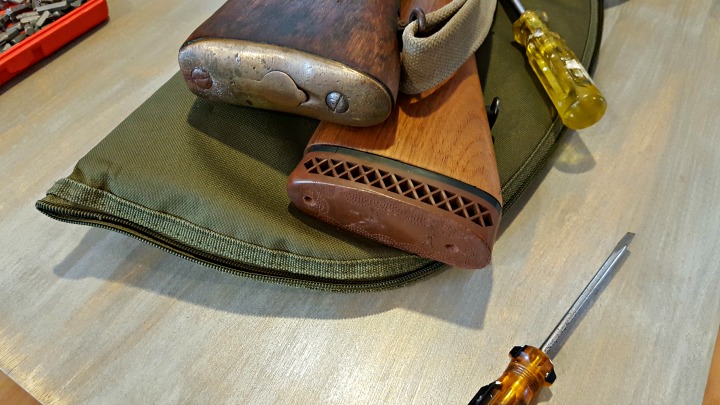
Remove the butt plate or pad
If your rifle still has the brass butt plate, you can skip this next step by prying open the storage trap and removing anything that may be in there (oil bottle, pull through, etc).For rifles with recoil pads on, it’s time to unscrew these. More modern pads will likely require a No 2 Phillips head to remove the screws. Older pads like this are probably secured with a flat head screw.
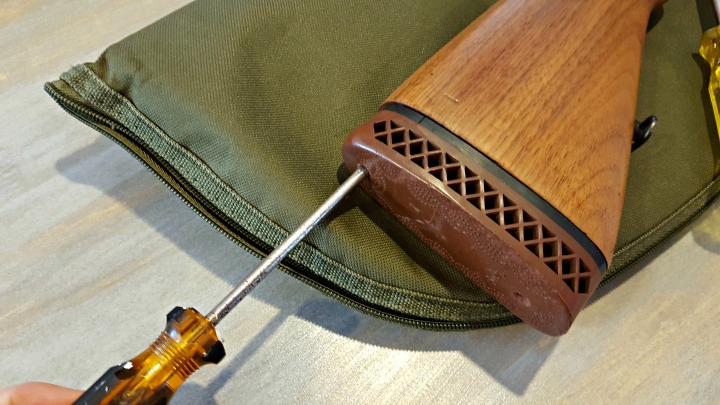
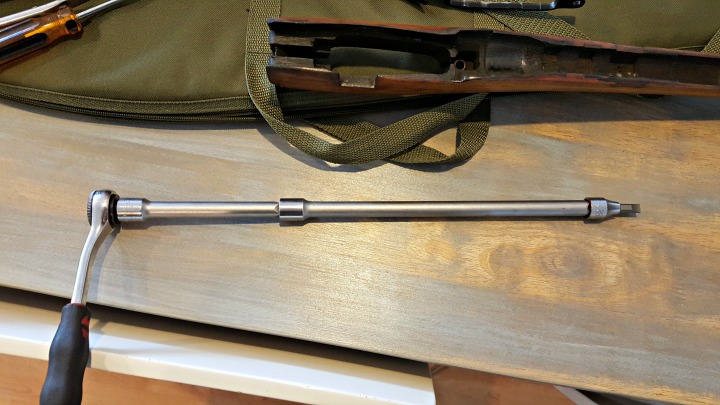
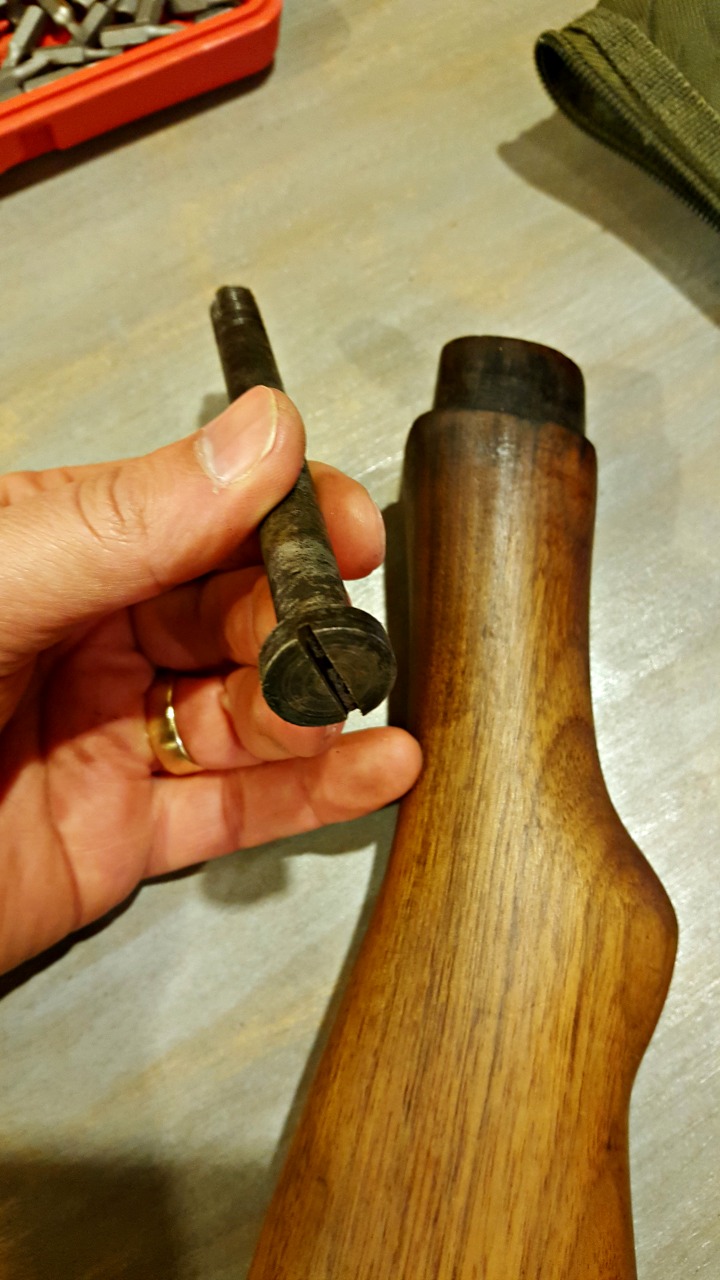
Unscrew the butt stock
The stock is held in place by a retaining bolt similar to that found in common shotgun designs. This means you’ll either need an extra long screwdriver or extended socket driver.The bolt requires a large flat head driver. If your driver continues to turn after the screw should be out, but the wood won’t come off, give the stock a sharp tap. It’s probably held on by years of grease and tension.
Select a stock to replace or upgrade your current furniture
There’s a chance you’re doing a straight swap for reproduction or original SMLE furniture. This could be because you’re replacing a broken stock, or restoring the rifle to its as-issued condition. Firstly, good luck finding furniture for a No 1 Mk iii. I’ve tried. You may as well keep your sporter and buy a whole specimen, because that’s the kind of money you’re looking at shelling out.
On the other hand, you could be looking to upgrade your old beater to something more functional. You do get synthetic Monte Carlo stocks that will lighten your rifle and bring your eye better in-line with a scope, but plastic just doesn’t feel right for these fine old beasts.
I’ve decided my project 303 needs a hardwood solution, and the Boyds laminate Field Design stock got the nod. With the customisation options available, you can create a unique firearm that not only performs better, but is a joy to look at every time you take it out of the safe.
We’ll have a review of the stock itself coming soon, and a detailed write up of the stock upgrade and other improvements to this rifle. In the meantime, below are some steps to take when fitting your new stock.
Fit and finish
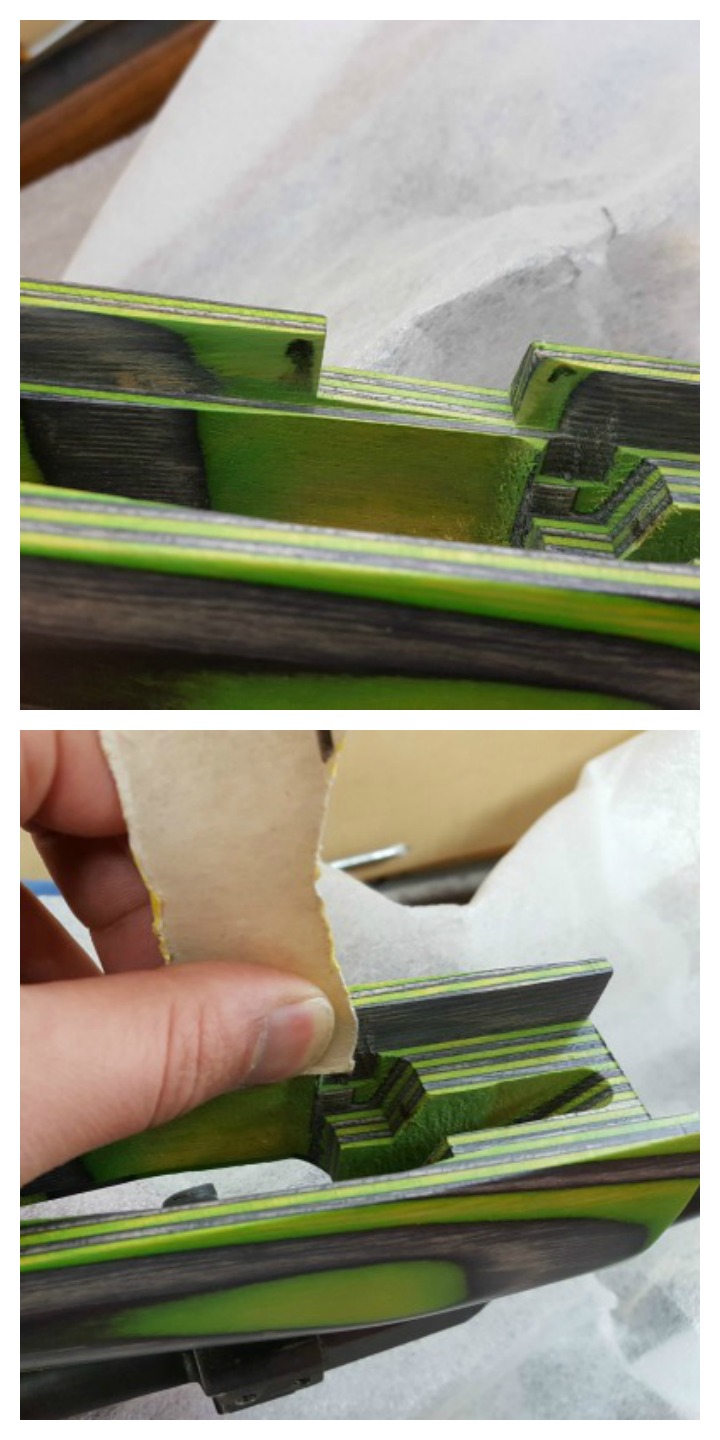
Different iterations of the SMLE will have varying parts that need to be accommodated. There is so much variance in tolerances from arsenal to arsenal, that you’ll be glad if your stock manufacturer has left this last step for you to do yourself.
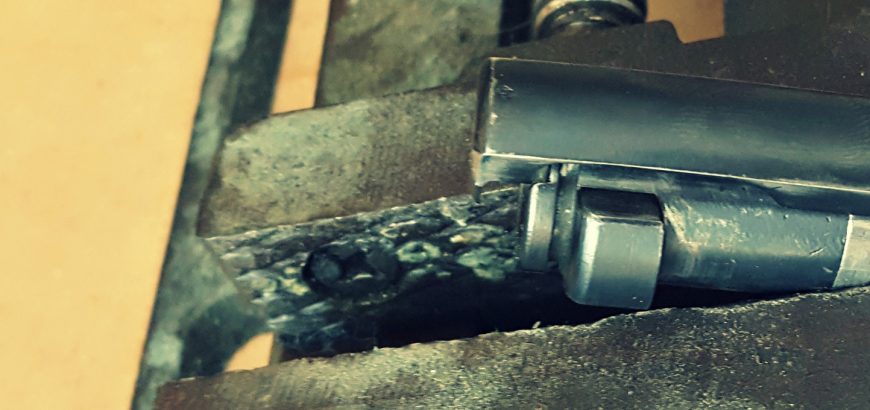
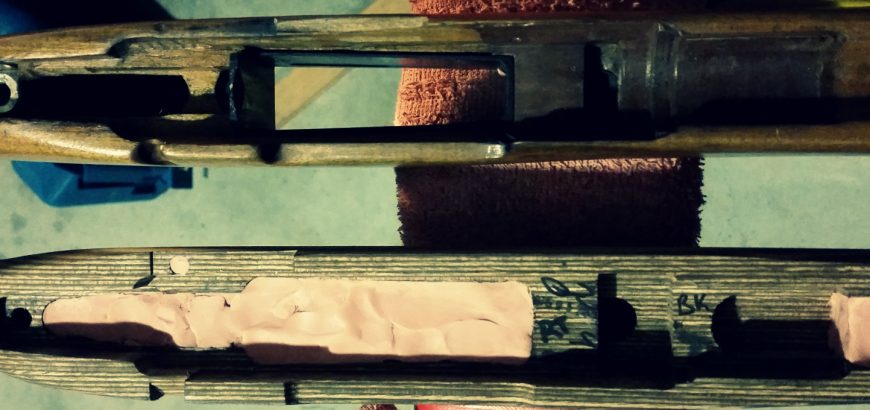
Pictured here is a cutout I had machined by a friend for the rear ring of the action. On the other side of the rifle, the butt stock needs a slight radius to accommodate the safety lever.Engineers/machinists blue or a permanent marker will help you find high spots on your action. Sand down your new stock to suit. An engineer that helped me work on this rifle said “there’s not a single square section on this action”, and he’s absolutely right – war time quality isn’t the greatest.Et voila! There’s still some more work to be done on this rifle, but after reversing the disassembly steps, the stock upgrade will be complete.
First off, an apology to regular readers for the gap in new content recently. It’s been a crazy couple months with a new addition to the family and purchasing our first home too.
Unfortunately my first born needs at least a few more years before he’s of any use as a reloading assistant, but for now he’s definitely entertaining. The reloading bench is also unfortunately far away from being ready, as I’m replacing my entire workshop set up (finally!). So it will take a little while for things to get back to normal, but we do still have a backlog of articles to get through. Here’s what you can expect to see in the coming month and a bit.
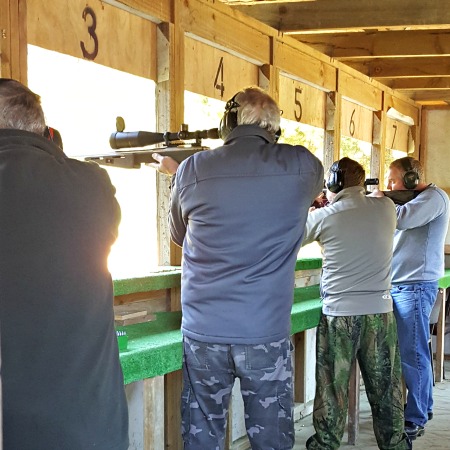
25 metre rapid shoot – always catches you up with your holdover!
2016 NZDA Prize Shoot
This is a shoot I look forward to every year – and it seemed like I had no excuse going in, considering my rifle was successfully and repeatedly printing 6 mm groups… However, my placing was average, and as always I learned something new about being prepared for a competition. Look forward to telling you guys more about the day soon!
Venturing into F-Class
So I tried my hand at F-Class at the Franklin Rifle Club, shooting at 600 yards with some pretty good success. We’ll talk a bit more about F-Class in general, as well as give a little bit of info on the club and other long range destinations around the country.
Putting the finishing touches on a Boyds Field Design stock for my SMLE # 1 Mk iii.
How to replace the stock on an SMLE
The good ol’ .303 is a staple for NZ, Australian and Canadian shooters, and features strongly in militaria collections around the world. However, with the abundance of used and abused SMLEs out there, you’re bound to want to work on one at some point. This article will provide you with a quick look at how to remove and replace the wooden furniture on a sporterised No 1 Mk iii.
Product review: Boyd’s Field Stock for 303 SMLE
So, once you’ve removed the stock of your old .303 beater, you might want to spruce it up with a solid wood laminate stock from Boyds – which is exactly what I did. You can look forward to reading more about this stock – and the cool features available – soon.
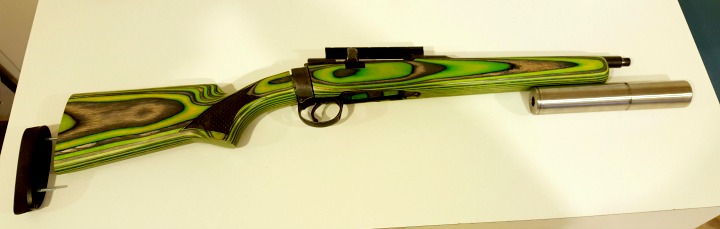
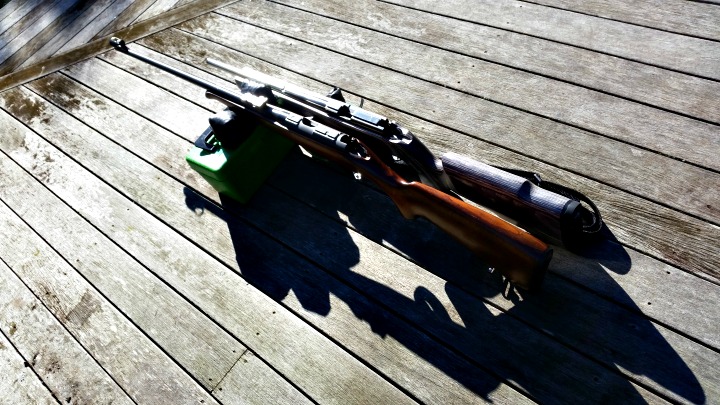
Monster bush build
So, my project .303 didn’t only get brand new furniture from Boyds Gunstocks. It’s also wearing an MAE 6-30 ST suppressor, a Vortex Razor red dot site and is waiting for a fresh coat of Cerakote, when I can tee up a time with Victor from Cerakote NZ. This short-barreled bush build will be shooting subsonic lead and is begging to be taken out pig hunting. More on this monster in the near future.
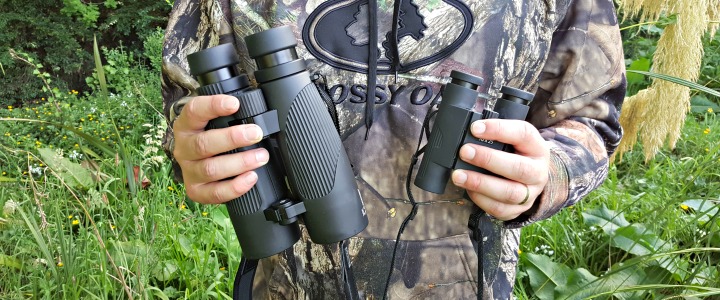
DOCTER binocular reviews
What’s better than one pair of DOCTER binocs? Two! We’ll be taking a look at some more excellent optics from DOCTER, and talking about what to consider when purchasing new glass.
Hmm… which is gonna do the job?
Product review: MDT TAC-21 Chassis for Tikka T3
What could make my Tikka T3 sexier? The TAC-21 chassis from MDT! We’re waiting on some magazines which are on back order, but when those arrive we’ll be taking this chassis out for a proper test drive. It’s already assembled and I’ve had a good amount of time to get a feel for it. I think this is going to make a good mid-range F-Open rig!
Rifle stock bedding and finishing: Part 3
Hey, it’s only been a year since we did part 1 in this series on rifle stock bedding and finishing! Before the end of the year we’ll take a look at the final steps in the process and also some of the excellent stocks available to complete your project.
So, these are some of the bits and pieces to look forward over the coming month and a bit, hope that’s whetted your appetite! Look forward to catching up iwth you on our Facebook and Instagram pages, and of course, right back here with some fresh new articles!
In late June I had a question from Ken in Gisborne about whether or not you could fit a BRNO Model 2E in a JW-15 plastic after market stock. Immediately you probably have two questions.
Why am I only answering this question now; and,
Why would you put a beautiful European-crafted rifle in a cheap, ugly stock?
So, I’ll quickly answer those:
I replied to his email, so don’t you worry!
Ken is unable to obtain an original stock – and I imagine his beautiful rifle is pretty hard to shoot without a stock!
Comparing the JW-15 and BRNO Model 2, you’ll see a lot of similarities, but even more differences.
Easy way to find out stock dimensions
If you ever come up against a similar issue yourself, you may need a quick work around to see if you can do something similar. The other question you often get is “Can you put a CZ 452 in a JW-15 stock?” Usually this comes from people who want a light, farm-ready 22LR, without having to ruin their wood stock or buy a new rifle. FYI, the CZ 452 and BRNO Mod 2E are practically identical. Here’s a nice little write up that someone has done on the BRNO, which saves me repeating a lot of the same points.
Essentially, as with many European brands, there was sharing of parts and designs, and eventually a merger. The rifle was largely unchanged. And the difference between the 2E and the 2 is that the 2E is the luxe version. Nicer stock, etc.
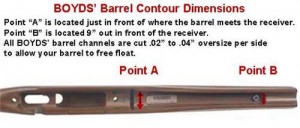
Anyway, I digress. A quick, easy way to confirm barrel and action dimensions for stocks? Head on over to the Boyds’ Gunstocks website. They give you the barrel dimensions and centre to centre measurements between action screws for all their house actions (that they base their aftermarket and OEM stocks on). While you’re there, you may be tempted to buy a whole new Boyds stock, and why not? They’re awesome quality, solid wood and modern designs!
So, using my little cheat, this is what the Boyds website reveals:
Boyds barrel measurements. Image from Boyds’ website.
Barrel Dimensions: Point A = 59/64″ and Point B = 43/64″
Center to Center of Action Screws: 3 25/32″
Over All Length of Part: 31 1/2″
Comes with Boyds’ 1/2″ Rubber Recoil Pad
Other differences
The biggest barrier is the difference in action size.
While my quick cheat above provides a very useful starting point for stock comparison, there are other things to consider as well. When considering a rifle like the JW-15, which is essentially the cost-saving, poor cousin of the BRNO/CZ, you’ll usually get differences in dimensions where changes have been made in the manufacturing process to reduce costs. Often you’ll find this in stamped instead of milled parts, simpler contours, thinner barrels, etc.
Below are some of the basic differences that unfortunately make this stock swap a no-go.
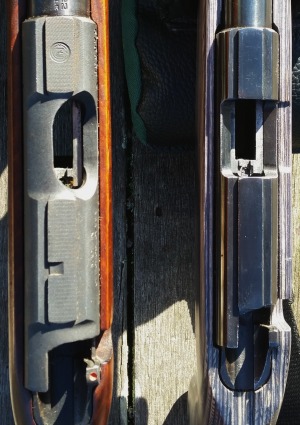
Action shape
The BRNO/CZ action is longer, thicker and circumference and a little bit different where inletting is concerned (this last isn’t the biggest concern in stock swapping, as you can alter inletting). Somehow the Mauser-action origins seem more apparent in the lines of the BRNO, even though the JW-15 has a similar, but simplified, shape.
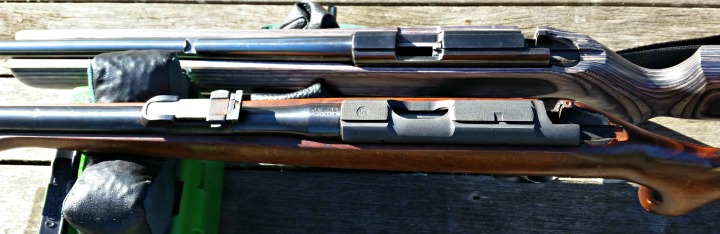
Barrel contour
The Chinese rifle has a much simpler barrel contour, while the Czech rifle follows traditional lines. The thickness of the barrel is a fair bit different, but where it meets the larger action is the biggest difference, as the BRNO barrel swells up to meet the threads.
The BRNO barrel is close to what we’d consider a bull barrel in a modern rifle, and the contour differs significantly to the JW-15.
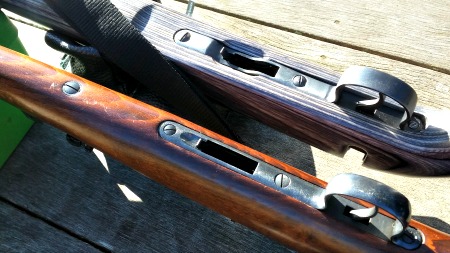
Action screws
Another clever simplification in the Norinco is reducing the amount of screws and metal work by merging the forward action screw with the recoil lug. Looking at the image below you’ll see three screws on the JW-15 and four on the BRNO. The rear screw on both is a wood screw, which secures the trigger guard to the stock.
The next screw forward on both rifles is a simple action screw. In front of the trigger is the last action screw. In the JW-15, this screws up into a recoil lug dovetailed into the action. The BRNO has another screw, independent and forward of the floor metal. This screws up through a steel collar into a recoil lug that forms the hidden part of the rear sight assembly.
Differences in inletting and dimensions are indicated by the presence of fewer screws in the Norinco. Also notice the softer metal the screws are made of.
Bits and pieces
There are various other bits and pieces that differ, such as the mag well and the trigger unit. The trigger in the Model 2E is a fine example of a single stage trigger, with adjustable over-travel, and a clean break around 3 lb. This is streets ahead of the simple, but practical, trigger in the JW-15. These can be toyed with to produce more acceptable results, as detailed in this previous article on JW-15 trigger improvement.
Verdict
If you are considering swapping things up with either of these rifles, an aftermarket stock specific for the JW-15 or BRNO would be far better than trying to adapt one to the other.
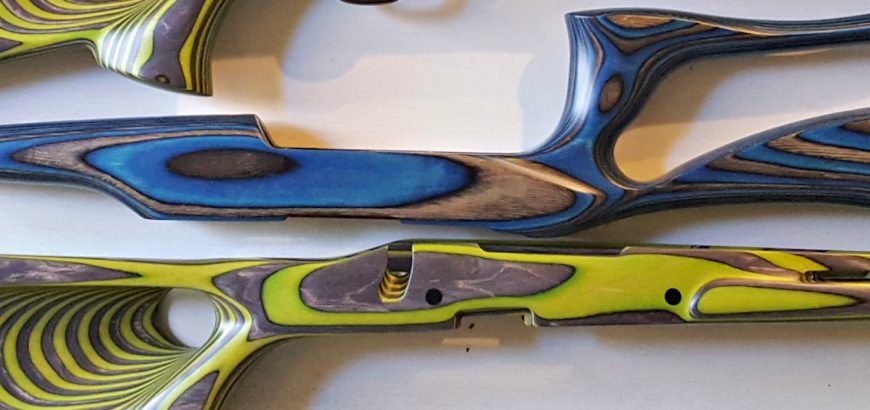
In the first part of this blog series, I looked at the rifle stock I’ve chosen for this project – Boyds Prairie Hunter – as well as the bedding compound I’ll be using – Matchgrade Bedding Compound. In this piece, I’ll go over the initial fitting of the stock, and the bedding process.
Prepping the stock
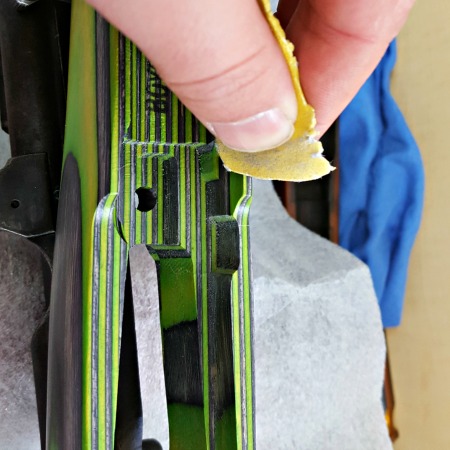
A hacksaw blade gives nice, crisp edges.
Whether you choose to bed your stock or not (you should choose to 99% of the time), your stock may need some prep work. The Prairie Hunter is quite a classic shape, with a nice cheek swell and elegant lines forward of the action. Supplied with sling swivels and a nice butt pad already in place, there’s not much you need to do to get this stock looking great.
Because of my model of rifle, I had to remove material to provide the clearance for the bolt handle. For this reason, my stock was provided unfinished (uncoated). Fortunately, with the bent M38 handle, there wasn’t much to take out. I simply used a hacksaw blade to achieve the angle and depth of of relief needed, and removed the material between the two cuts with a small file, and then some sandpaper. By doing the two cuts on the outside, the relief is quite crisp and even.
Next I had to deal to the plastic nose cap. There are several options you can go for here, ranging from the synthetic (cheapest), through to rosewood and others. Of course, for a more simple appearance and cheaper project, you may choose to exclude this option.
A dremmel makes quick work of evening out the nosecap.
The nose cap and the pistol grip cap where both ground to fit, however, the barrel channel of the nose cap needed some relieving to ensure the barrel is free floating. These caps are obviously produced to allow for common barrel dimensions without having excess clearance, which would look terrible and accumulate dust and grime in the field. So, in this sense, having to clear this out for your particular barrel shape is actually a benefit, as you can ensure you have a free floating barrel, with a minimum of clearance to keep your barrel channel free of any foreign debris. Of course, you’ll want to make sure it matches up nicely with the lines of your stock.
Aside from that, my Boyds stock was good to go. However, as I’m bedding this rifle as well, I chose to leave the final coating of the stock for after the bedding process. This way, any spilled bedding compound or other marks can be easily removed when I do the final sanding before oiling the stock.
Glass bedding the action
The term ‘glass bedding’ comes from the fibreglass-like products that were used in the past to mate barrelled actions to their new homes. Material choice has improved in leaps and bounds, however there are a few prominent bedding systems that seem to have really got it right.
There are a couple that you can find on Brownell’s (if your in the states), or Gun City, Reloaders, Serious Shooters, etc., in New Zealand. However, far and away my most preferred bedding compound is Nathan Foster’s Matchgrade product. It’s easy to use and provides a solid and stable platform on which to achieve repeatable and accurate results with your rifle.
The first time I used this product it came with printed directions, which I have stashed in my drawer somewhere. The second time it came with a basic info sheet and instructions to find the directions online in a PDF. To be honest, I think this is great. It saves on paper and keeps the cost of the product from increasing, but also, it’s so much easier to use your phone to view instructions.
When using your phone or laptop you can use ‘Ctrl + F’ to find exactly what you’re looking for.
In the thick of it
I won’t waste my time repeating Nathan’s instructions, which you can find here, but there are certainly some points to note.
Bedding a rifle is pretty much a one-time job. Undoing a crappy bedding job is an immense amount of work, and the cured product will harden like steel to whatever surface it is on. For this reason, you need to have your barrelled action and the stock completely prepared beforehand.
The Prairie Hunter stock ready to receive a full-length bedding job. You may wish to wrap your stock in plastic to protect its finish.
The stock will need to be dammed up, so the compound doesn’t run through the action screw holes, the mag well or down the barrel channel. The action needs to be protected with masking tape and graphite to ensure it doesn’t end up permanently glued into the stock. You also need to ensure that the bead of bedding compound around the action doesn’t creep over the tang or into the ejection port – trapping the action.
Once you’ve started pouring, there’s pretty much no going back.
You also need to make sure your working space is completely ready for all stages. You need to be able to keep the compound at a reasonable temperature (no problem in this summer heat) for it to cure properly. However, in winter, this can mean heaters, hot water bottles or any number of weird contraptions. I tend to make a tent of sorts over my workplace once complete (it’s hard to shift the rifle to a different area once you have poured the compound), and use a small heater to warm it up.
Now’s the hard part – you need to be patient and wait for it to cure. In the next part of this series we’ll look at getting the rifle out of its mortice, and how to finish the stock up to a beautiful satin sheen.