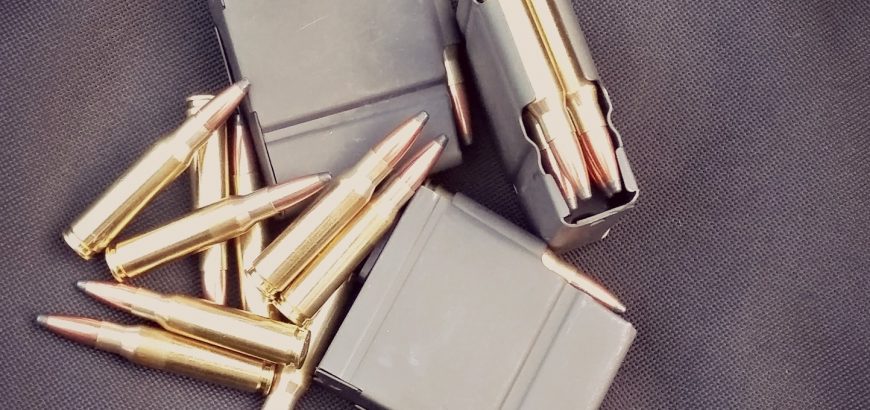
The MI4 or M1A is a mainstay in most military rifle collections, alongside its predecessor the M1 Garand. The M1A even sees frequent use in Heavy Metal classes of 3 Gun competition. The Norinco M305 is a damn good copy of the Springfield M1A (and the newer ones are even better). They’re also 4 or 5 times cheaper than their American cousins.
However, Chinese guns often come dripping in cosmoline, requiring a proper birthday before heading to the range. Even parkerized magazines in sealed bags will be dipped in cosmo to keep rust at bay. If you’ve bought a rifle that’s been stored in an armory for a while, you’ll notice that cosmo and parkerized finishes interact and create a greenish-grey finish. Anyway, I digress…
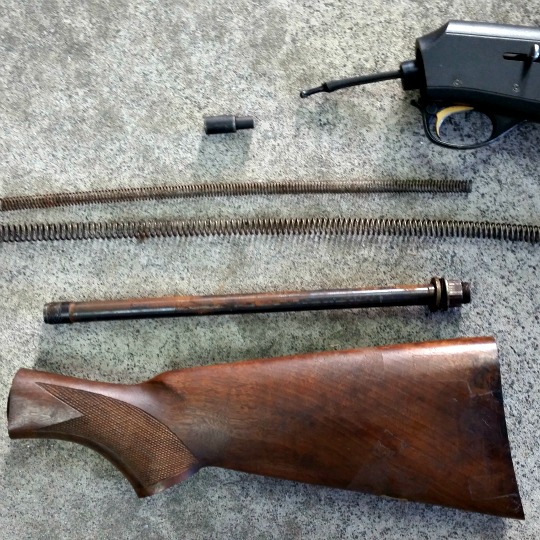
If you’ve bought one of these Chinese knock-offs, chances are you’ve got a magazine or two full of cosmoline. This will mean stiff functioning and potential jams when they get dirty as well, leading to failure to feed situations. Disassembling one of these mags is easy to do, and highly recommended for cleaning purposes.
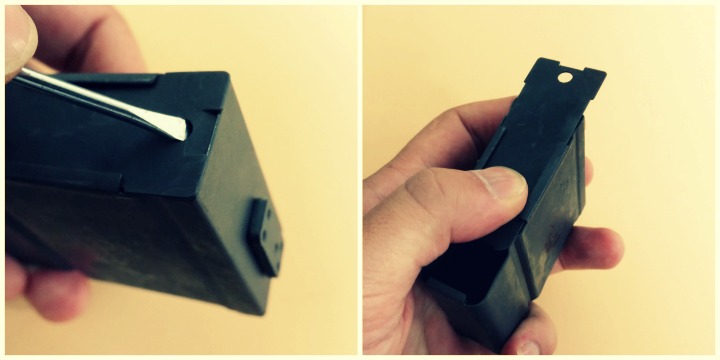
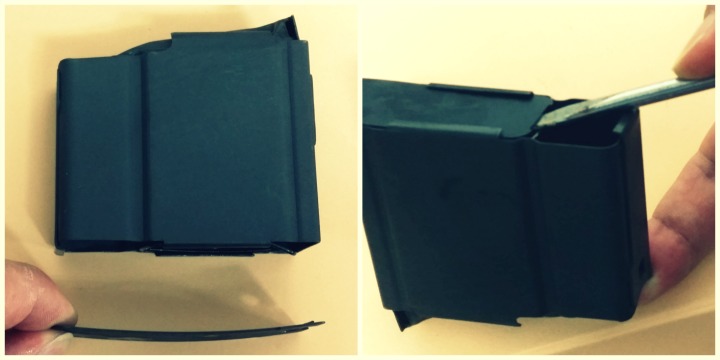
Step 1 – Remove the floor of the magazine
Unlike older magazines like the Lee Enfield’s 10-rounder, where the spring and follower come out of the top of the mag with some wiggling and creative angles, the M305 magazine has a floor plate that can be removed.
A screwdriver or something similar can be used to pry the locking tab up. Once this is over the magazine wall, you can slide the floor of the magazine forward.
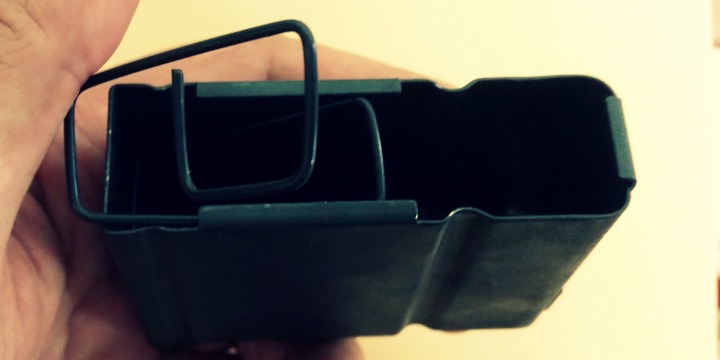
Step 2 – Take it apart
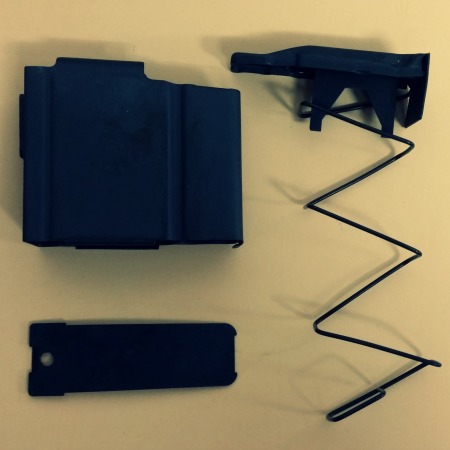
Unlike rimfire magazines, there are no small springs or buttons that leap out at you when you open the magazine up. Once the bottom is removed, you’ll probably find the square spring is pressed against the tabs that were keeping the floor in place.
It’s quite easy to remove the spring by lifting a coil at a time, and then giving the follower a bit of a wiggle to get it out. Take care not to cut yourself, as these mags don’t have the best finish in the world.
The spring shouldn’t jump out at you and there are no small parts to lose.With so few parts, it’s easy to keep track of everything and clean it. Make sure to watch out for sharp edges.
Step 3 – Degrease everything!
Norinco is nothing if not liberal in their application of cosmoline. The preservative gunk is everywhere. Make sure you get your cleaner/degreaser inside and outside the magazine, and over all of the parts you have removed. I personally prefer a degreaser in an aerosol can to make sure I get everywhere. Most of the time I use Wurth’s Industrial Cleaner, which is a citrus-based aerosol, and highly effective.
Give the magazine a good wipe, inside and out, with a clean rag. Again, make sure to watch out for sharp edges – maybe even debur them if necessary.
Step 4 – Oil and reassemble
A bit of lubrication of the spring/follower is not a bad idea. Not enough to get dirt and debris stuck in there, but enough to relieve some of the friction as the follower contacts the walls of the magazine.
With this particular magazine I used some aerosol Ballistol. However, a few drops of Remoil or Hoppes Lubricating Oil would do the trick too.
After you’ve applied some lubricant to the inside of the magazine and put the follower and spring back in, it’s time to close up the floor.
The curved floor metal means you’ll need your screwdriver again to lift it into place. Seal the deal by tapping it closed with a rubber mallet or tap it on your bench.
In the first part of this blog series, I looked at the rifle stock I’ve chosen for this project – Boyds Prairie Hunter – as well as the bedding compound I’ll be using – Matchgrade Bedding Compound. In this piece, I’ll go over the initial fitting of the stock, and the bedding process.
Prepping the stock
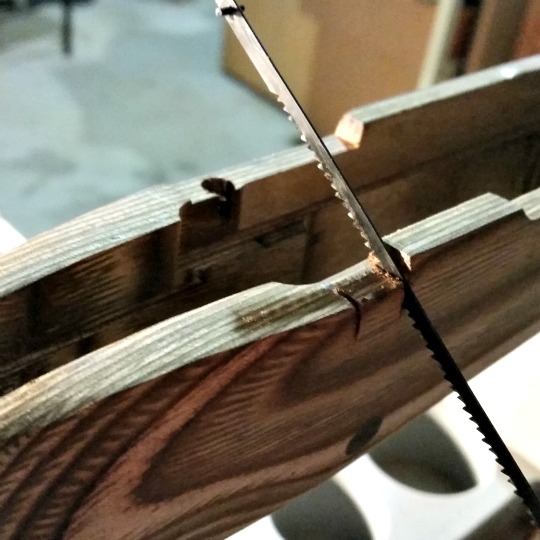
A hacksaw blade gives nice, crisp edges.
Whether you choose to bed your stock or not (you should choose to 99% of the time), your stock may need some prep work. The Prairie Hunter is quite a classic shape, with a nice cheek swell and elegant lines forward of the action. Supplied with sling swivels and a nice butt pad already in place, there’s not much you need to do to get this stock looking great.
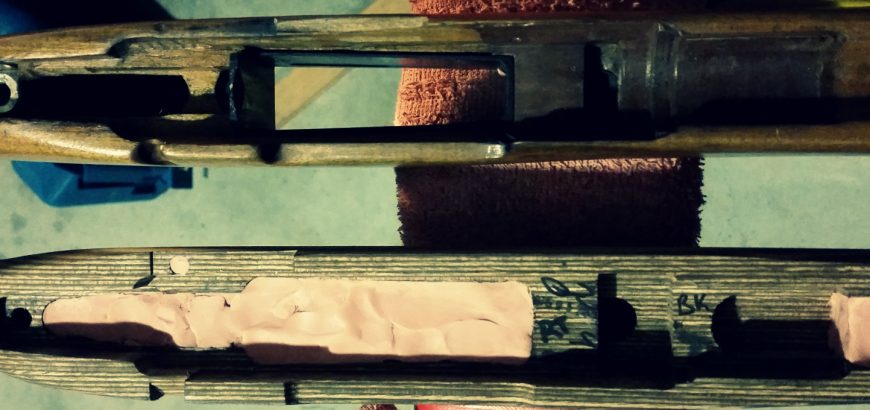
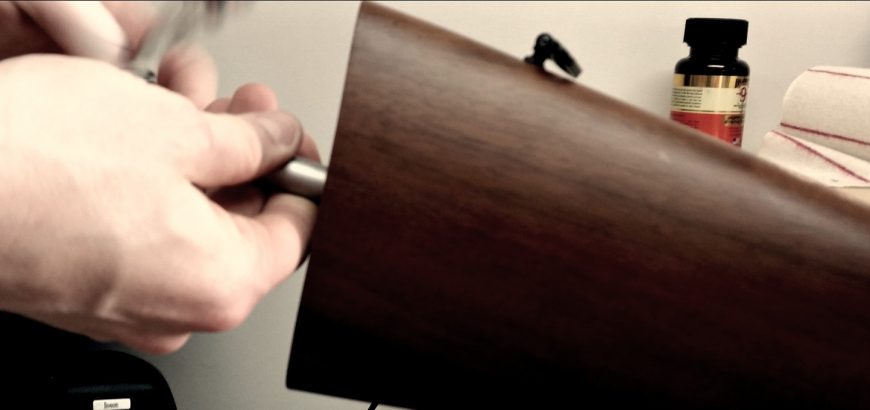
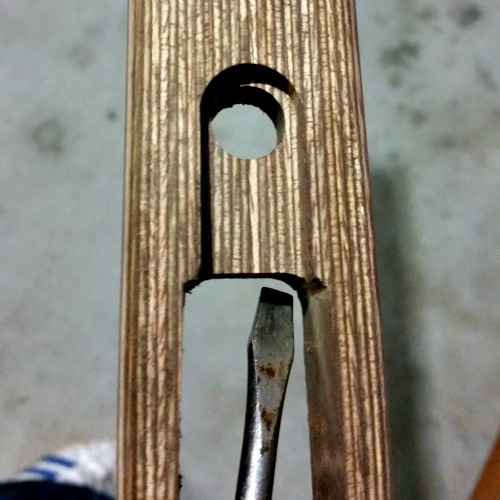
Because of my model of rifle, I had to remove material to provide the clearance for the bolt handle. For this reason, my stock was provided unfinished (uncoated). Fortunately, with the bent M38 handle, there wasn’t much to take out. I simply used a hacksaw blade to achieve the angle and depth of of relief needed, and removed the material between the two cuts with a small file, and then some sandpaper. By doing the two cuts on the outside, the relief is quite crisp and even.
Next I had to deal to the plastic nose cap. There are several options you can go for here, ranging from the synthetic (cheapest), through to rosewood and others. Of course, for a more simple appearance and cheaper project, you may choose to exclude this option.
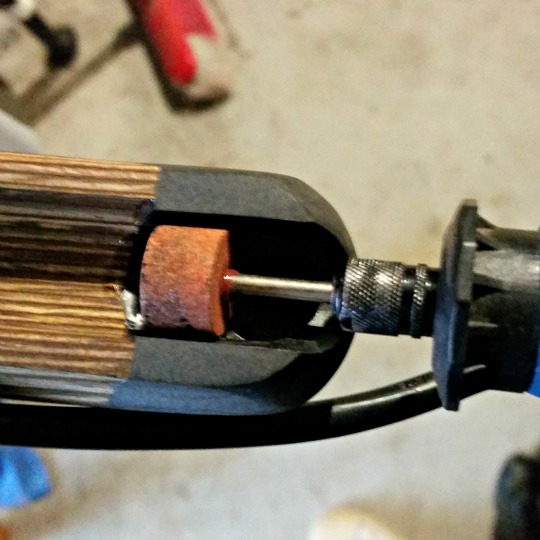
A dremmel makes quick work of evening out the nosecap.
The nose cap and the pistol grip cap where both ground to fit, however, the barrel channel of the nose cap needed some relieving to ensure the barrel is free floating. These caps are obviously produced to allow for common barrel dimensions without having excess clearance, which would look terrible and accumulate dust and grime in the field. So, in this sense, having to clear this out for your particular barrel shape is actually a benefit, as you can ensure you have a free floating barrel, with a minimum of clearance to keep your barrel channel free of any foreign debris. Of course, you’ll want to make sure it matches up nicely with the lines of your stock.
Aside from that, my Boyds stock was good to go. However, as I’m bedding this rifle as well, I chose to leave the final coating of the stock for after the bedding process. This way, any spilled bedding compound or other marks can be easily removed when I do the final sanding before oiling the stock.
Glass bedding the action
The term ‘glass bedding’ comes from the fibreglass-like products that were used in the past to mate barrelled actions to their new homes. Material choice has improved in leaps and bounds, however there are a few prominent bedding systems that seem to have really got it right.
There are a couple that you can find on Brownell’s (if your in the states), or Gun City, Reloaders, Serious Shooters, etc., in New Zealand. However, far and away my most preferred bedding compound is Nathan Foster’s Matchgrade product. It’s easy to use and provides a solid and stable platform on which to achieve repeatable and accurate results with your rifle.
The first time I used this product it came with printed directions, which I have stashed in my drawer somewhere. The second time it came with a basic info sheet and instructions to find the directions online in a PDF. To be honest, I think this is great. It saves on paper and keeps the cost of the product from increasing, but also, it’s so much easier to use your phone to view instructions.
When using your phone or laptop you can use ‘Ctrl + F’ to find exactly what you’re looking for.
In the thick of it
I won’t waste my time repeating Nathan’s instructions, which you can find here, but there are certainly some points to note.
Bedding a rifle is pretty much a one-time job. Undoing a crappy bedding job is an immense amount of work, and the cured product will harden like steel to whatever surface it is on. For this reason, you need to have your barrelled action and the stock completely prepared beforehand.
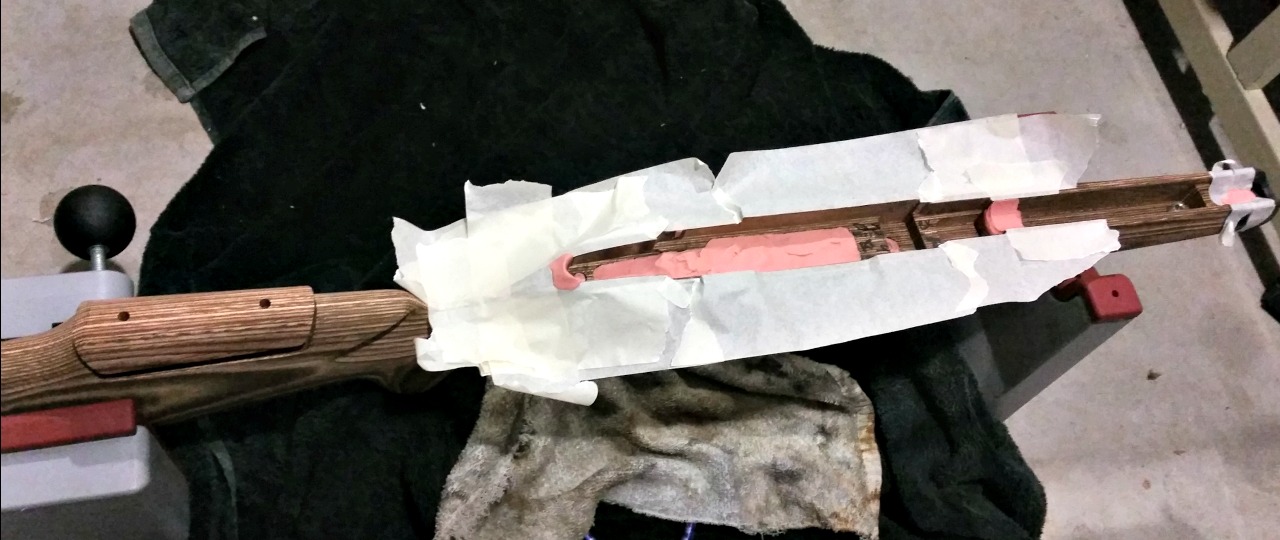
The Prairie Hunter stock ready to receive a full-length bedding job. You may wish to wrap your stock in plastic to protect its finish.
The stock will need to be dammed up, so the compound doesn’t run through the action screw holes, the mag well or down the barrel channel. The action needs to be protected with masking tape and graphite to ensure it doesn’t end up permanently glued into the stock. You also need to ensure that the bead of bedding compound around the action doesn’t creep over the tang or into the ejection port – trapping the action.
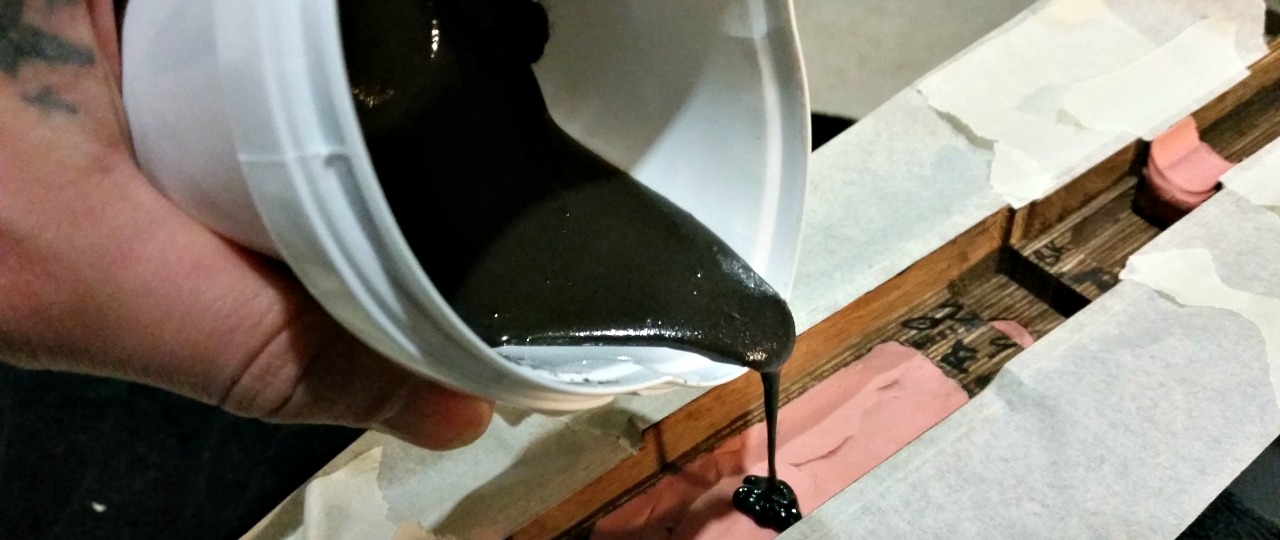
Once you’ve started pouring, there’s pretty much no going back.
You also need to make sure your working space is completely ready for all stages. You need to be able to keep the compound at a reasonable temperature (no problem in this summer heat) for it to cure properly. However, in winter, this can mean heaters, hot water bottles or any number of weird contraptions. I tend to make a tent of sorts over my workplace once complete (it’s hard to shift the rifle to a different area once you have poured the compound), and use a small heater to warm it up.
Now’s the hard part – you need to be patient and wait for it to cure. In the next part of this series we’ll look at getting the rifle out of its mortice, and how to finish the stock up to a beautiful satin sheen.
Like most Kiwi blokes, I have a tendency to tinker in the garage. My two favourite interests at this time in my life are my assorted collection of long arms and my 1980 Triumph TR7 DHC. Both of which I work on just about whenever I get the chance.
I love my guns, but sometimes this little convertible steals the show.
However, being a mere mortal, I can’t dedicate myself to both equally and often have to choose how I spend my time (or dollars). Fortunately for me, my wife enjoys shooting and riding in the convertible, so I don’t have to work too hard on that front.
As much as it pains me to admit it, I do sometimes prefer my car to my guns. And here’s why:
My car always has something to work on
God bless British Leyland, but they didn’t make the most reliable/simple/functional vehicles. While I may finish a project rifle or find the perfect cast projectile load, I may never finish working on the ol’ Triumph.
Great resource for anyone looking to cast lead projectiles for the venerable 7.62×39 – especially for the SKS.http://castboolits.gunloads.com/showthread.php?13453-Practical-Dope-on-the-7-62X39
Most of my shooting friends would know a little bit about cars, or have some sort of mechanical tendency. At the very least, they all have driver’s licenses and vehicles. We have plenty to talk about and share.
Give these to a mechanic and you might get a blank stare in return.
Most of my car enthusiast friends know very little about firearms, don’t have licenses and couldn’t begin to relate to the joy a cloverleaf group or the rush of a clean, ethical kill.
Also, they’d wear out my car knowledge in 20 mins if we tried to have an exhaustive conversation about anything.
Car stuff is easier to buy
It’s right there in the header. Anyone can buy me some bit or bob for my car. Easy Christmas presents. Not everyone can buy me ammunition or import semi-auto rifle parts.
Having said that, there are easy gifts for shooters.
But, in terms of ease of purchasing… There are two car part stores in a 5 min radius of my house. There are also at least half-a-dozen mechanics, a VTNZ and several hardware stores that carry useful automotive stuff.
There is one gun store in that radius. It also happens to be the only camping and outdoor store as well.w
Testing
If I modify my rifle, I have to wait for a weekend or time off work to head down to a range. For rimfire, it’s not so bad – 5 mins away is the Howick Rifle Range, where I shoot with HSSRC. However, for centrefire rifles, I have to travel at least 45 mins.
To test any modification to the car, I can drive down the street. I can even test drive it to the shooting range! And no one will complain if I turn the engine over on the weekend. Test firing a rifle would be a slightly different story.
If I had a range like this in my back yard, I may divide my time slightly differently.
To add insult to injury, if I forget anything at home for my range trip, or if the modification turns out to be unsuccessful or needs reworking, I have to drive all the way home to fix it and wait another week to test it again!
To be honest, I love both hobbies equally. They’re as expensive as each other and both give me a chance to clear my head and work on something with my hands. Both hobbies result in great stories of hit and miss, and allow plenty of opportunity to geek out in stores and online.
Well it’s been a great break, with some awesome weather to get outdoors around the country. One thing that’s true every year is that people make goals to join the gym or eat better, especially after the Christmas splurge. It usually takes the form of “New year = New you” or #newyearsresolution #fit2016 #caloriebattle if you’re particularly young and annoying.
There are some parallels for shooters. Not all of us are lucky enough to have a Christmas budget that literally allows for a new rifle, so we’ll have to make do with the weary barrels, actions and stocks that we already have. Just like the once-a-year gym bunnies, this means squeezing maximum performance out of what can be old and tired equipment.
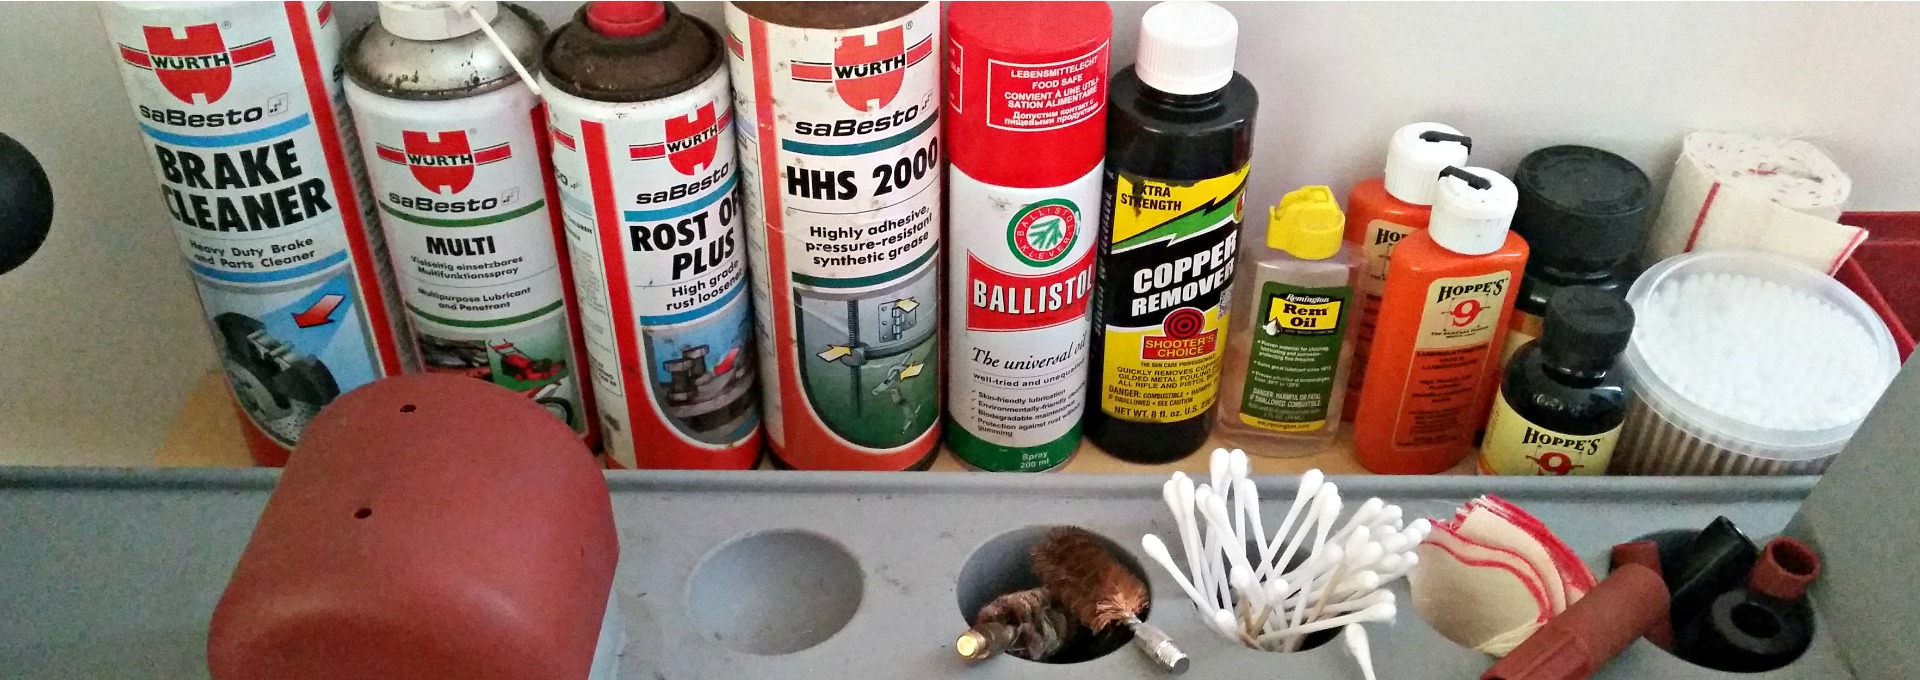
One of the best ways to do this is to ensure good cleaning habits. By maintaining your rifle or shotgun properly, you’ll extend barrel life, ward off rust and stay accurate for longer. Here are a few cleaning tips for a better 2016.
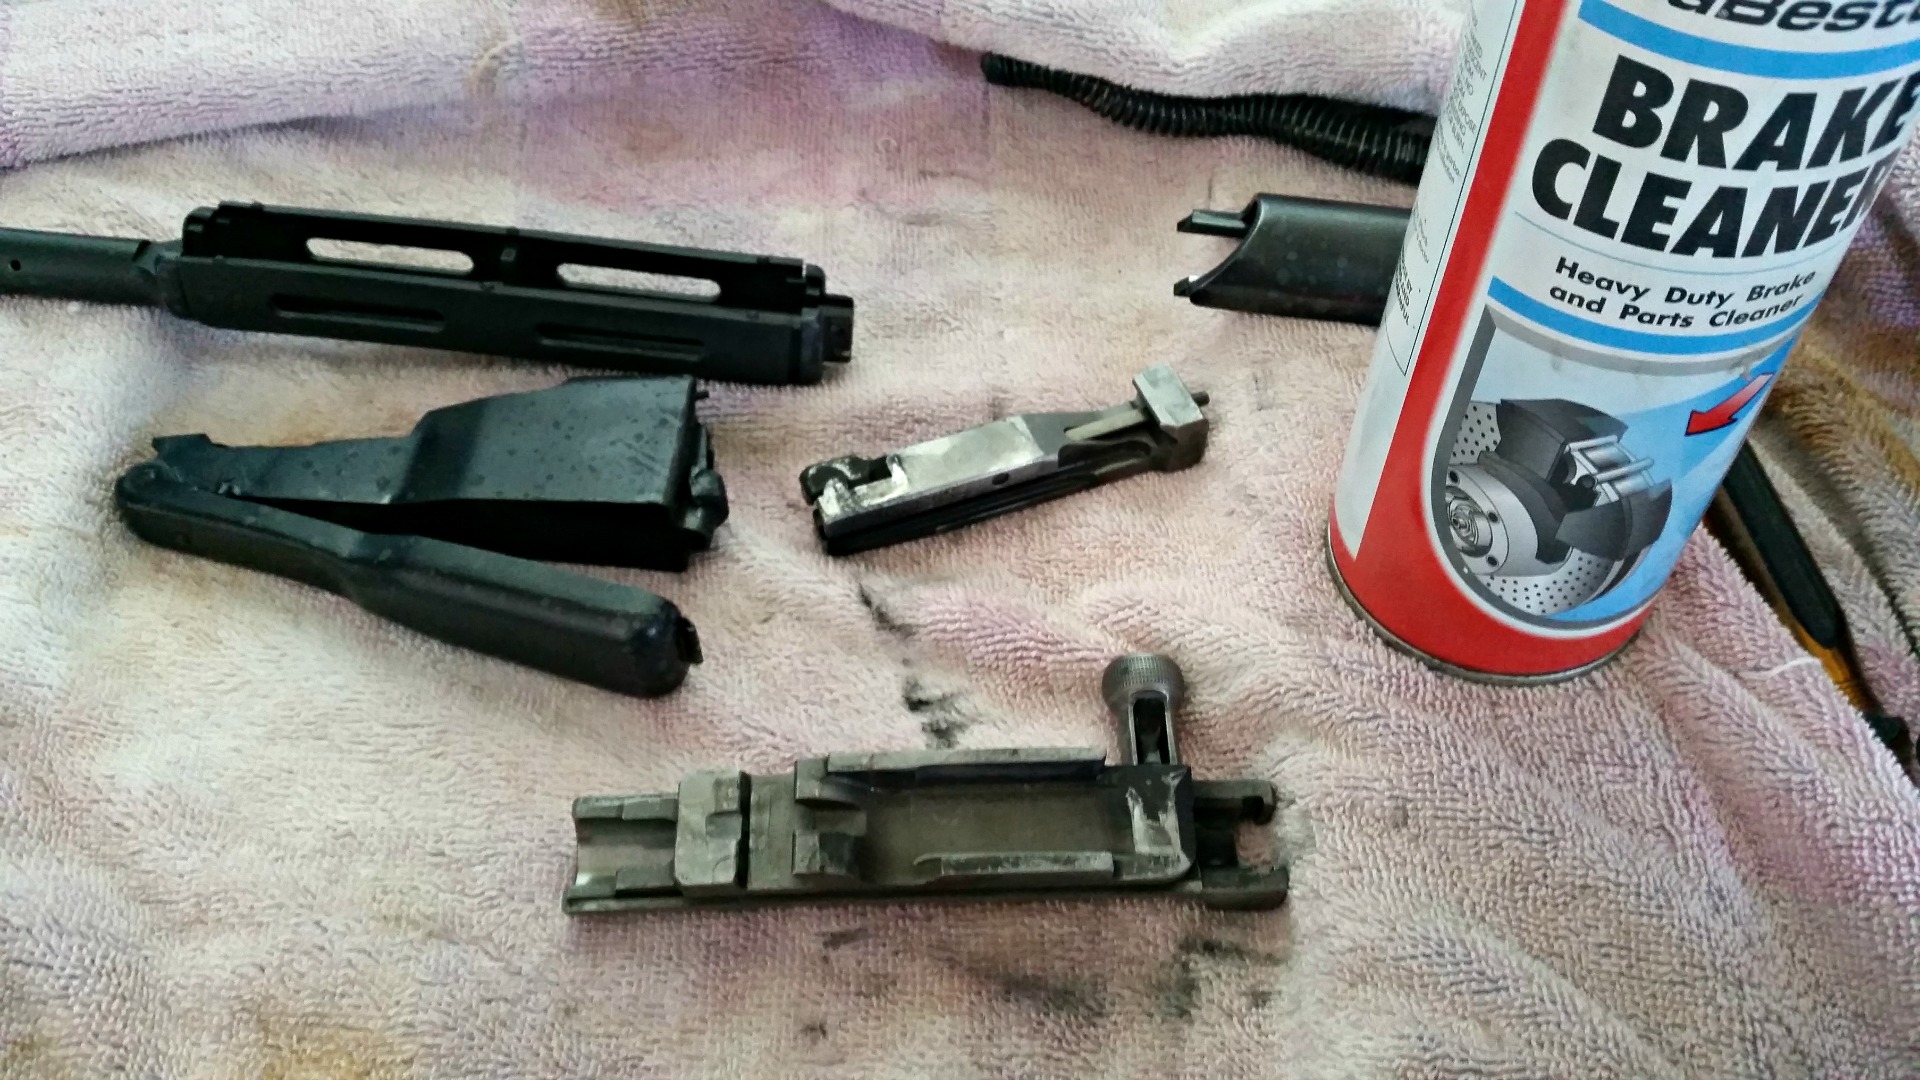
Strip down semi-autos
While you might clean the barrel and even the chamber and action of your AR or AK after every range trip, stripping it down and giving it a birthday a few times a year can lead to improved reliability.
A surprising amount of gunk builds up in gas tubes, magazines, under selectors and safeties and even in the nooks and crannies of stocks.
Once you’ve broken down your rifle into its various components, you might cringe at the amount of expensive gun-cleaning product you’re going to have to use to get it ship-shape. My personal recommendation is to use less-expensive cleaners to do the grunt worker. Cleaner-degreasers work well. My favourites are those that are citrus based. Otherwise, a good move is a parts cleaner, such as automotive brake cleaner. Whatever you do use, make sure it’s safe on the materials it will come in contact with. Otherwise, your cheap fix may become very expensive.
Parts cleaners can make for better-functioning weapons.
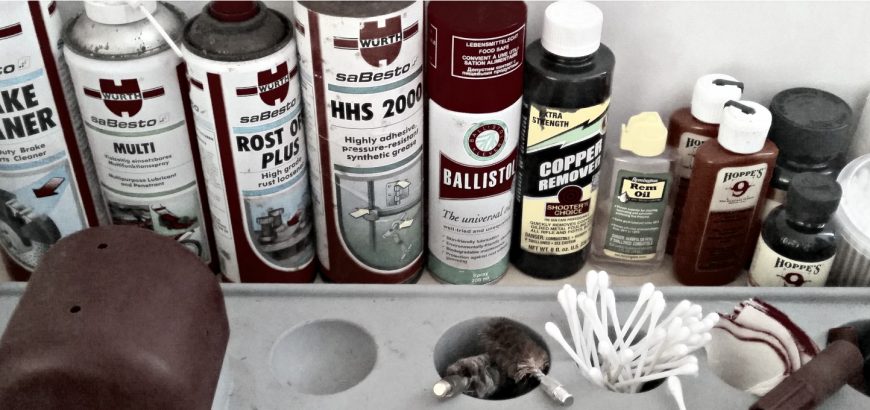
Use a bore cleaner and a copper remover
If you’re not too particular about your cleaning, you may not realise that these are in fact two different things. A bore cleaner is great for getting out powder and debris, while a copper remover helps get rid of fouling that can destroy accuracy.
A good cleaning routine makes use of both. I also like to run a wet patch of bore cleaner through my regularly used guns before storing them, and running a dry patch through before shooting them. You’ll be surprised out how much dirt it will lift. I would not recommend doing the same with a copper remover – this shouldn’t stay in your bore for more than 10 mins (depending on the strength of the product).
Industrial and gun care products work side by side.
For guns like my Lee Enfield .303, which doesn’t get used as often, the final patch I run through is wet with lubricating oil. It can be a proper gun lubricating oil, or a safe industrial equivalent. Lubricating oil has a high viscosity and clings to metal. This oil won’t drip down into the action, but will stay in the barrel, keeping the lands and grooves free of rust.
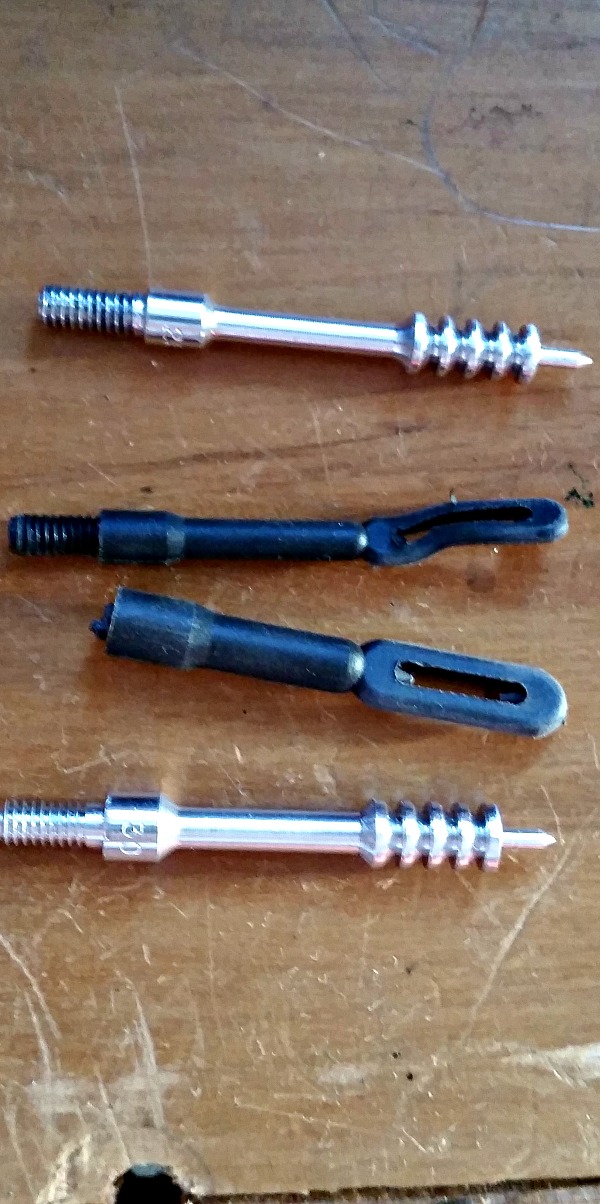
Buy a one-piece cleaning rod
Cheap cleaning kits are all good for getting started, and pull-throughs are great for a quick clean in the field. However, if you’re serious about breathing new life into an old rifle, a one-piece rod should be on your shopping list.
Cleaning more often or more vigorously means more wear and tear on your cleaning apparatus. Aluminium and bronze-alloy rods ten to become weak around the threaded joins, and will eventually snap – especially if you use a larger patch for a more thorough clean and have to push quite hard.
A stainless steel rod with a freely rotating handle is a good bet – even better if it has a plastic coating to prevent damage to your breech or muzzle from ‘enthusiastic cleaning’. A multi-calibre stainless steel rod of solid construction can be had for about the same price as a cleaning kit with a multi-part, aluminium rod for a single calibre.
Plastic jags are a good temporary measure, but I wouldn’t rely on them.
Spend some money on jags
Cleaning jags may seem like a waste of money if you’re relying on the plastic ones that come with cleaning rods or kits, but they do make all the difference. Not only can you buy metal jags specifically designed to remove copper fouling for your specific calibre, but they’re also much less likely to snap or bend under force.
Use a guide for your cleaning rod
Rod/bore guides do several things to help you out, and cost very little. For between $30 and $100 you’ll get a decent guide with adapters that can be used across several/most calibres.
The benefits of a bore guide are as follows:
Keep solvents off your stock finish
Keep debris and solvents out of your action and mag well
Guiding the rod into the bore eliminates unwanted wear on the chamber
The guide keeps the rod straight, helping reduce stress on the rod, which could cause it to bend or snap
If you are serious about getting more use out of your rifle between cleans or a more accuracy for your time behind the cleaning rod, you may have to spend a small amount of money on the right tools for the job. In the end you’ll find that setting up your cleaning bench effectively is well worth it. Here’s to a 2016 full of shooting (and just enough cleaning)!
If you’re more familiar with the build of a bolt action rifle, removing a shotgun stock can be puzzling at first. No obvious action screws and a bunch of stuff hidden inside. Here’s a quick run down on replacing a shotgun stock.
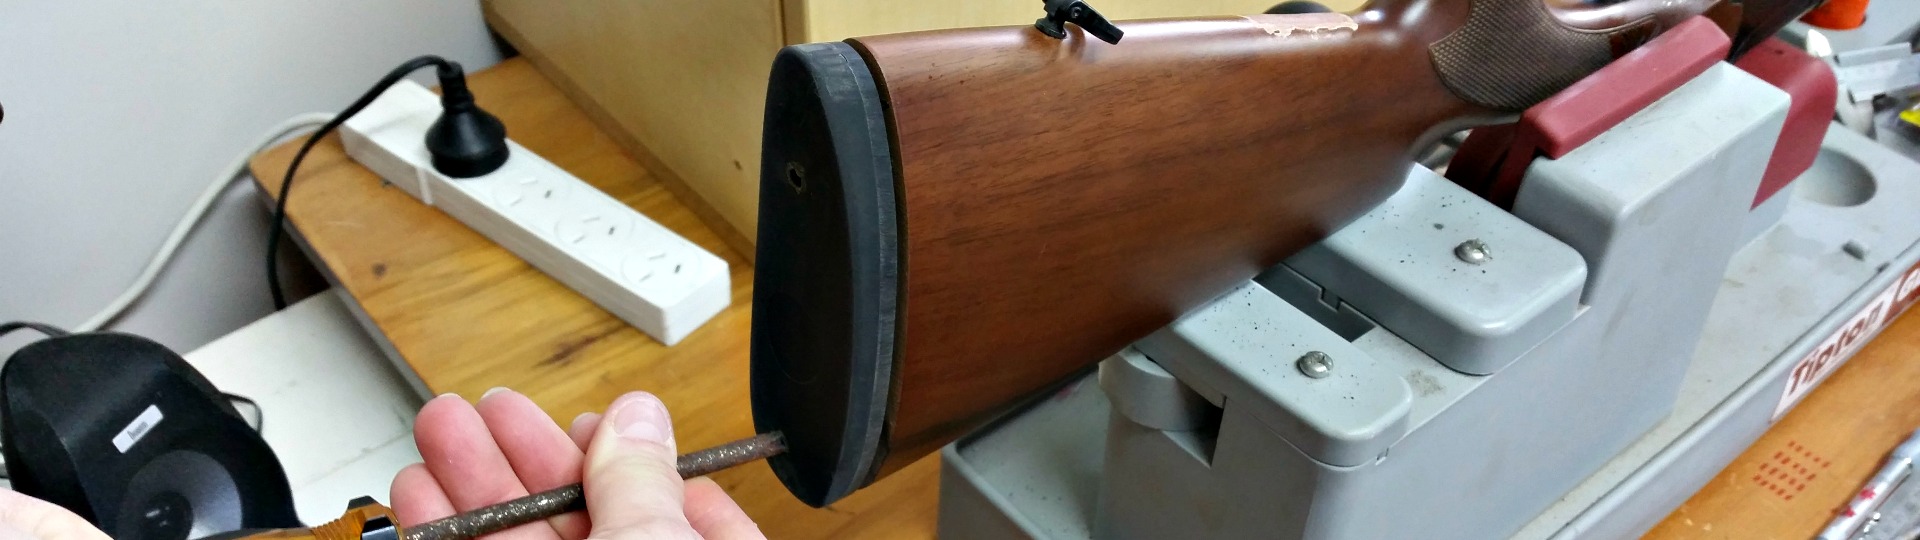
Step one: Remove the recoil pad
The reason you can’t see any action screws holding the wood to the metal is that you have one long bolt hidden in the buttstock that keeps it all together. Removing the recoil pad will reveal a hole in the centre of the stock, through which you can access that bolt.
A Phillips head screwdriver is usually the tool for the job.
If the screws holding your recoil pad to the stock are hidden in the rubber and you can’t see what tool to use, try a Phillips head screw driver. Most manufacturers still use these.
What’s missing from this SKB? You’ll never know if you weren’t paying attention in the first place.
Step two: Remove the stock bolt
These are usually pretty easy to remove, and all you need is a socket wrench with appropriate extensions and the correct size socket. Trial and error will help you find the right socket size, as each firearm is different.
Because these bolts are not overly tight, the slight differences between imperial and metric should not be too much trouble.
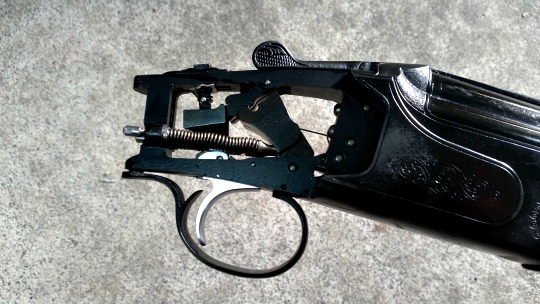
CAUTION: If you’re working on a semi-automatic shotgun, there are a lot of parts (including springs) that will shoot out if you do not hold the stock and action together and carefully remove the bolt and other pieces. Watch how they come out, as you’ll have to put it back together.
Step three: Do whatever it is you were going to do
This is the part where you clean your action, replace your stock, repair any cracks, or whatever it is that motivated you to remove the stock in the first place.
Step four. Reassemble
Putting it all back together is pretty simple, especially for U/O, SxS and pump-action shotguns. If you’re working on a semi for the first time, I hope you paid attention when you took all the bits and pieces out, or you may end up with a click but no bang the next time you go out shooting.
There may be some fining up to do at this point. If you’ve replaced your buttstock, you may have to grind the old recoil pad down to size, or you might want to use some sawdust, stain and oil to fill up fine gaps between the action and the replacement stock (if necessary).
This Hatsan Optima O/U got a good clean while the stock was off for replacement.
Step five: Function test
With an empty chamber or dummy rounds (snap caps), test the firearm for function. This means loading, firing and unloading. This is the time you want to find out about it. Not in the blind or on the range.
Sometimes you find a winning combination. Something that just works for you. This has been my experience with the Prairie Hunter rifle stock from Boyds, combined with my 1943 Husqvarna Mauser – a dream come true. What makes this such an epic combination? There are several factors that combine to make this gun incredibly shootable, but for now, let’s look at the fancy piece of wood it’s sitting in.
The looks
The old Mauser looks perfectly at home on the range in its Prairie Hunter stock.
The Prairie Hunter is a good looking stock, no doubt about it. The first time this rifle was on the range in its new configuration, an old time shooter said “such a pretty stock for such an old rifle!” And he wasn’t the only one. Laminates are known for being hardy, heavy and beautiful in an age of synthetic rifle stocks.
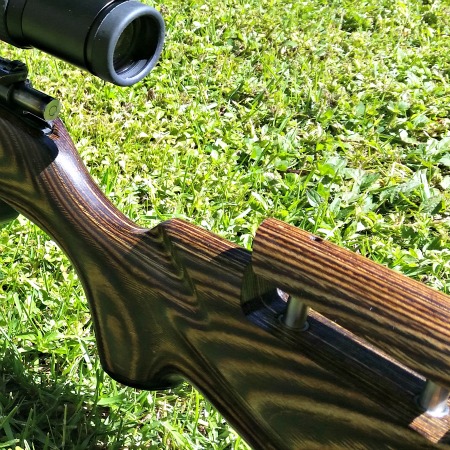
In the looks department, this stock was certainly helped along. Boyds provided this specimen with a nice, thick Limbsaver recoil pad and synthetic caps for the nose and grip. What adds to both the functionality and visual appeal of the rifle, is an adjustable cheek piece. The adjustments are made from the top, with an allen wrench, which means no adjustment knobs on the side of the rifle.
Full profile picture of the Boyds Prairie Hunter stock with adjustable cheek rest. This picture is here especially for Zach.
Final fitting needed
Boyds does advise that their stocks are made to their house actions (imagine how many actions they have!), so final fitting may be needed for your rifle. For this particular project, I received my stock in ‘unfinished’ condition. This means a final sanding and some polyurethane are needed. The reason for this, is that old Mausers come with several different bolt configurations, depending on the life they’ve had. This means that the channel that the bolt handle fits into should be determined by the end user, depending on their particular model. With a bit of work to do, Boyds doesn’t send you a finished stock, that you will then have to cut into and sand down anyway. Makes sense.
Some relieving of material was needed at the front of the mag well.
The bolt handle notching was easily done, and is covered in my series of articles on bedding and finishing stocks. With this particular stock, I found that the floor metal was a couple millimetres further back than I needed it to be. All I needed to do was to relieve some material from the front end of the mag well to get the metal sitting where it should, and mating up to the action.
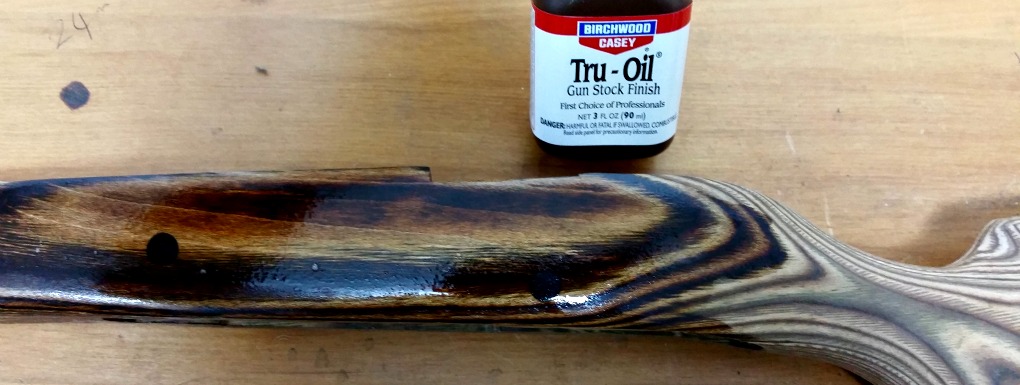
I chose to bed my action, which was a bit more work still, and instead of polyurethane, I opted for a hand-rubbed finish, using Birchwood Casey Tru-Oil and Stock Sheen and Conditioner. The oil even gave a nice gloss to the plastic bits on the stock as well. Learn my lesson without doing the hard yards though, tape off the recoil pad if it’s rubbery. The oil will make this super sticky, and you will get all sorts of fluff on your butt pad for a while. You will eventually be able to rub it all off.
The Tru-Oil immediately brings out the character in the laminate.
Performance
Oh what a joy. I couldn’t be happier.
And that’s not sarcasm!
The 6.5×55 is not known to have heavy recoil, but if you have a shortened barrel and sporterised stock, you feel every bit of it. Having purchased this rifle second-hand with the intention of restoring it, I was happy enough with the home-made sporter stock, but it was certainly made for a shorter person, and the lightweight nature of it didn’t do much to tame the kick of the old service round.
The extra weight associated with the laminate stock meant all sorts of recoil-reduction. I would definitely recommend going for this or a walnut stock over most of the synthetic options out there. The normal-person-sized length of pull also helped, along with the 1″ recoil pad. Don’t get me wrong, the stock isn’t overly heavy either. With a hollowed out barrel channel for free-floating and weight reduction, the balance and weight is nice. Most of the heft is around and behind the action – where you need it most.
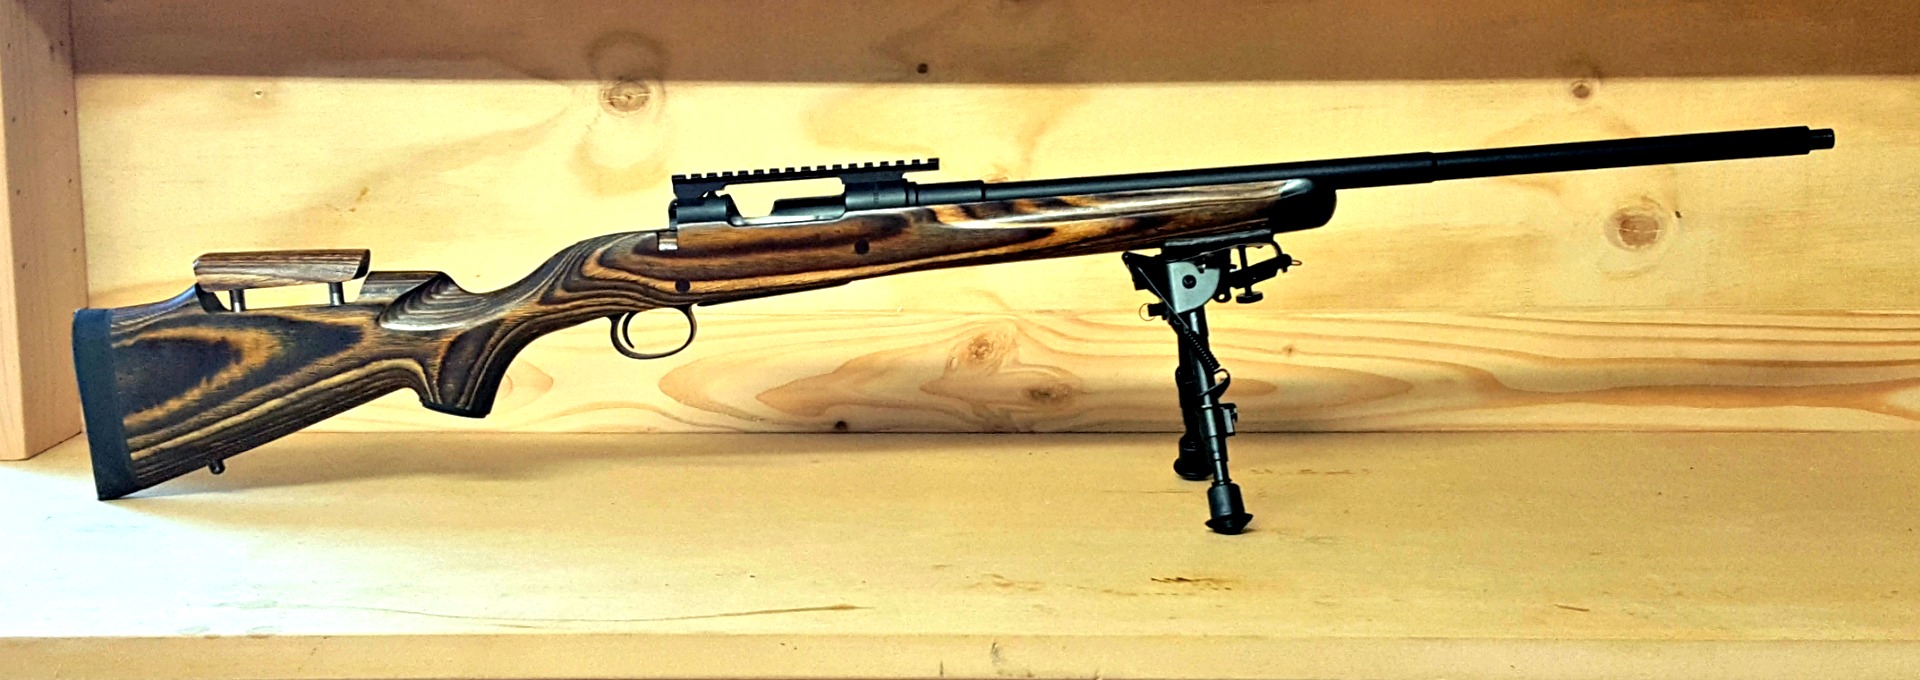
Tall scope mounts are no problem with the adjustable cheek rest.
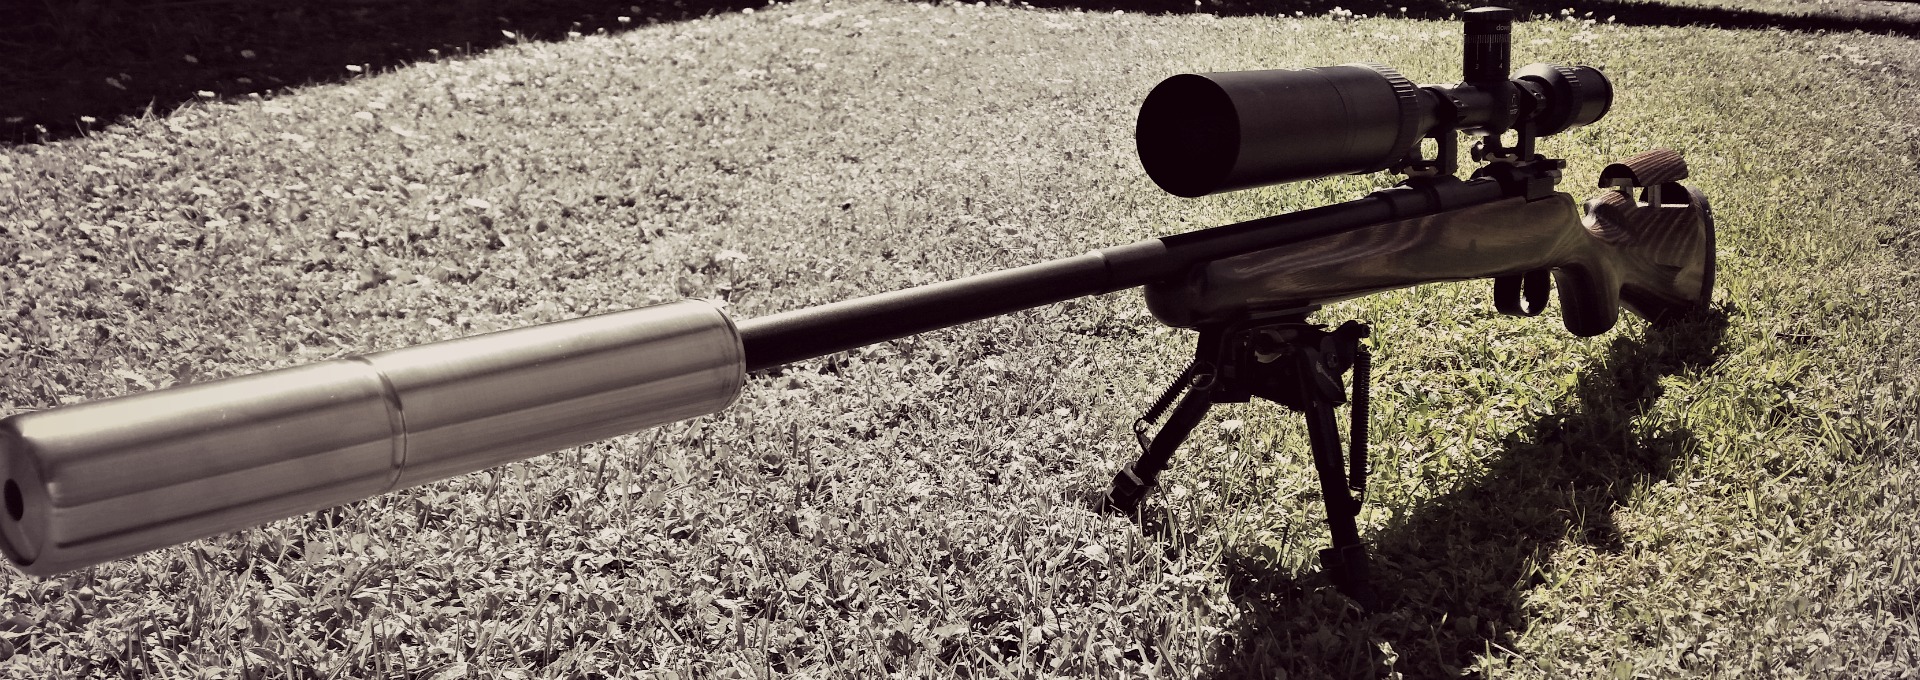
Combining this with my MAE 6-30 ST suppressor, recoil concerns are now a thing of the past. So much so, that I can shoot off the bipod with my off-hand under the grip as a stabiliser, instead of holding down the fore end to stop myself getting a scope in the face, as I had to do with the synthetic-stocked Mossberg ATR a month or so ago.
Shooting with this configuration and my wife’s Vortex 4-12X Diamondback with BDC reticle, my wife and I were hitting 9’s and 10’s at the 300 metre Swiss Club shoot a couple weeks ago – even a 10.1! And this is with factory loads (Norma-Sierra 144gr).
Adjustable cheek rest
One of the major selling points of the configuration I now have is the adjustable cheek piece on the Boyds stock, and I would highly recommend this option on the next stock you buy. Below are a few of the reasons I love this feature:
easily adjust for different users and eye-relief
raise your line-of-sight for scopes that are mounted high due to large optic bells, iron sights or bolt handle clearance
quickly lower the cheek piece when needed for cleaning rod access
ensure proper cheek-weld to maintain repeatable, accurate shot placement
Overall impressions
There is a lot to be said for keeping old military rifles in their original condition. However, if you’ve bought yourself a bit of a project, or inherited a less-than-perfect specimen, a great place to start with your customisation efforts is a replacement stock from Boyds.
You can get a stock that is more suited to varminting, target-shooting or tactical-style precision matches than the military wood. These old stocks were made to be shot with full winter clothing, and to be light as well. As such, they transfer a lot of recoil to a normal-size shooter. You can also help your sweet Swede look as good as it shoots. With a nice-looking stock, like the one I have in a Nutmeg finish, you won’t feel out of place next to the Howas and Tikkas on the range.
The Boyds stock completes the set up, along with an MAE suppressor and BOLD Trigger unit.
Bear in mind, when you order a stock from Boyds and you are not in the States, you have to keep your order under $100 to avoid costly permits which make the process impossible. If you or someone you know is making a trip to the USA, take advantage. Or get friends and family over there to help you out. Worst case scenario, you can still get an amazing stock, but you may have to forego some of the bells and whistles.