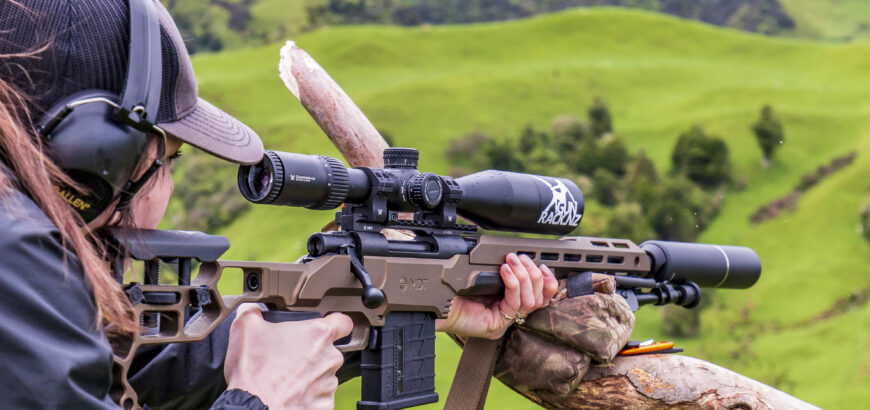
If you’re interested in competitive or long range shooting, you’ve probably heard the term “PRS” or noticed the preponderance of new shooting gear aimed at the “precision shooting” market. If you want to understand a bit more about what this is all about, and how you might be able to get involved, this article is a short primer on what is available and happening in New Zealand. We’ll do some follow up articles on what gear you need, basic skills to practice, etc., so keep an eye out for those.
What is PRS?
Precision or practical rifle competitions are not all “PRS Matches”. The PRS (Precision Rifle Series) is a trademarked, sanctioned series of matches in the USA, in which some of the best precision shooters in the world compete. It has developed over the years, and the level of competition and the equipment used has changed dramatically. There are PRS affiliated organisations around the world, notably Australia, South Africa and recently New Zealand.
In a PRS or PRS-style match, you would expect to have around 8 – 10 stages (small courses of fire within the overall match) in a one day match, with varying challenges to test different aspects of your shooting ability. Two day matches are more prevalent overseas and will probably feature more and more in the NZ scene. Two-day matches that have been run locally tend to be the same overall match course of fire, but day two might be .223 only, or some other variation.
Each stage will have a description which will tell you what targets you need to engage, and how you need to engage them – you don’t need to know this stuff in advance. You will also be given a time limit for each stage. If you’re new to the game, concentrate on making good hits instead of trying to be fast. You’ll have more fun if you hit steel, and it will be easier to operate safely and smoothly if you take your time.
What kind of shooting should you expect?
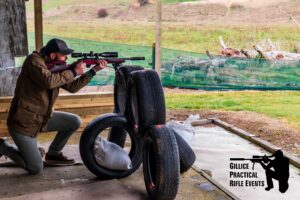
Precision shooting has developed largely around “square ranges”, which lends itself to man-made props, rather than using natural terrain or obstacles
Generally speaking, you would be engaging steel plate targets from 200m out to 700 / 800m, with the occasional long range stage over the 1000m mark. Some dedicated long range events stretch this out further.
Your shooting position is usually built around using a prop or obstacle for support, and you might have to “build and break” several positions on the same prop or multiple props and engage a single target or multiple targets.
There are occasionally prone stages, which would usually be long range stages or stages with a complex order of fire. Some match directors do offer a more prone focused match, whereas others might be more heavy on the positional / prop side of things. Unsupported positional shooting is not very common, but can be expected.
Does this sound like a bit much? Don’t worry. At every match in New Zealand you will find that you will be put in a squad with experienced competitors who are happy to help you out, guide you through the day, and probably even lend you a bit of gear if you need it.
What is Field Shooting?
Field shooting is similar in ways to PRS-style matches, but has distinct differences and challenges different aspects of your shooting, gear management, admin and stage management. For an international comparison, it might be considered to be closer to the NRL Hunter series in the USA.
The Precision Rifle Series has largely developed using “flat ranges” or “square ranges”, with a perpendicular firing line, berms and often fixed target distances. This has lent itself to a lot of standardisation of types of props and stages you might encounter, including several “PRS Skills Stages”, which are the same at every match. Given the sheltered and somewhat artificial environment these kinds of ranges have, the sport has revolved around small targets and tight time limits.
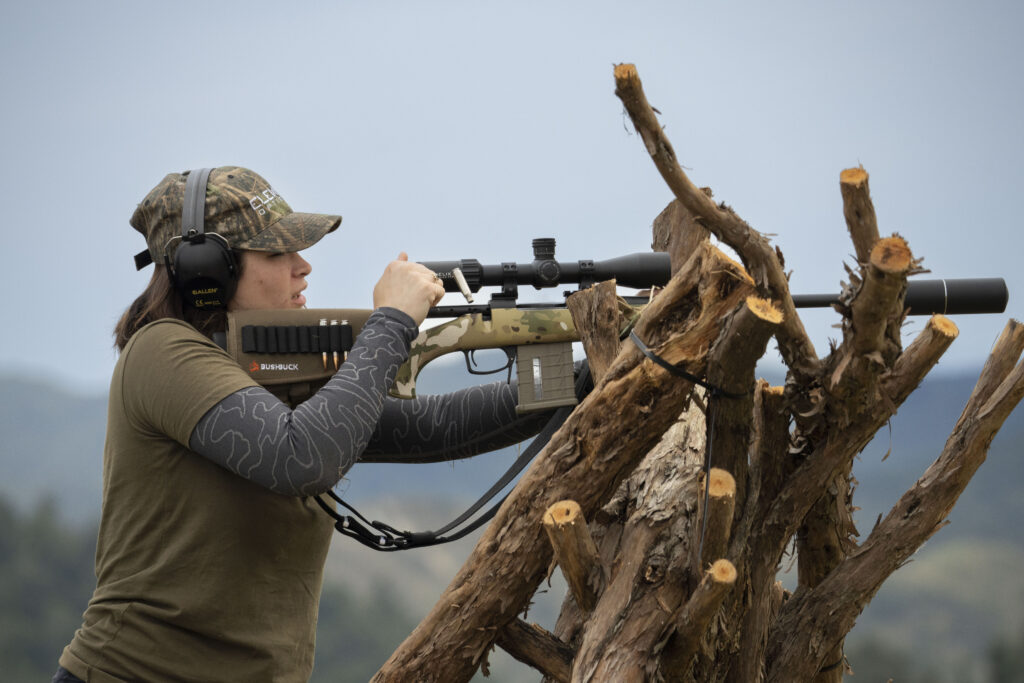
Field matches often take advantage of natural terrain or props. Photo credit Dylan Ackley, featured shooter Kassie Phillips
Now, to be fair, not all PRS matches are like this, and depending on the geographical location in the USA, you might have a much more “field style” match. New Zealand matches are trying to emulate the US and Australian matches, but we are generally shooting on farms, not fixed ranges, so our PRS-style matches might favour the field shooting side of things overall.
So, what is field shooting? How is it different? Field shooting is based around the “practical” side of competitive shooting, rather than the “precision” side. Now, just as precision matches might have the occasional field flavour, the same is true in reverse, and depending on location and match director, you might find a lot of props, small targets and tight time frames.
When we say “practical”, we mean using shooting skills that are beneficial in practical scenarios. For most of us this means hunting or pest control. For our military and law enforcement friends, their skills might be deployed in a more “tactical” scenario when they’re on the job.
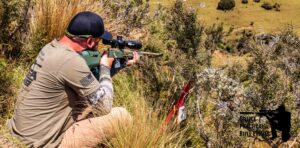
Loopholes and obscured targets are not uncommon, nor is unsupported positional shooting
In field shooting the target sizes and time limits are generally a bit more generous, but the shooting positions are often uncomfortable, improvised, unstable or offer limited visibility of the target(s). This forces you to think on your feet and approach each stage differently, developing a broad set of shooting skills. Precision matches, on the other hand, tend to offer stable props, familiar positions, and somewhat standardised courses of fire, which means you are focusing on a narrower set of skills, but you might become much more proficient at them over time.
There is a lot of crossover between these two styles of shooting, and you’ll often find the same competitors at both types of events. If you start investing in rifles and gear for one, you’ll be able to shoot the other as well. A lot of the same sills will translate across both sports equally well, such as focusing on your natural point of aim, building a solid position, squaring up to your rifle, etc.
If you’re keen on getting into this game, you will shoot in interesting conditions, see some gorgeous country, develop great friendships, and ultimately become a better shooter.
In the next article we’ll talk about how to find local matches and who to follow in NZ for updates on the sport and related content.
New Zealand is a land of practically unlimited hunting opportunities – for those who know where to look and how to get there. However, if you live in suburbia, or you’re new to hunting, it can be really hard to get into it and pick up the skills you need to be confident going out solo. It was for this very reason that I took my wife, Kassie, to Muddy Waters to hunt her first deer.
Getting there
Muddy Waters is about 35 mins north west of Whanganui. We travelled from Pukekohe, and total drive time was 5 hours 45 mins, with the best rest stops along SH4 being Otorohanga, Te Kuiti, Taumaranui or Whanganui if you need the luxuries of a bigger town (fast food, petrol station, etc). Although you’re driving south, you do end up going west and then north again, as the location is up a road that has no northern access. This ends up being one of the great features of the block , as it is hemmed in by native bush and other large farms, with no encroaching suburbs or human population. All this means better conditions for the fallow deer that the Whanganui region is known for.
Your last 25 mins or so are on a metaled road with lots of twists and turns, so take it easy, you’re almost there
The Muddy Waters experience
I’ve been to Muddy Waters a few times now, but when I took Kassie there it was my first time there too. The GPS took us a little past the gate, and we backtracked and found our way. We drove down to the woolshed, where we met Hamish and discussed our plan for the hunt. With a little bit of daylight left, it was decided that the best course of action was to do a quick sight in / zero check, settle in for the night, and hit the hills in the morning.
Kassie was shooting my Tikka 6.5×55, which you may have seen a few times on our social media pages or in other articles on this website. We had just switched to ELD-M handloads, as they had only been out a couple years at this point. I was shooting a sporterised Swedish Mauser in 6.5×55 as well, shooting factory Federal ammo.
I checked zero on a kill-zone sized steel gong at 200 metres, as I hadn’t used the ammo before. This zero-checking exercise is also Hamish’s opportunity to identify how comfortable a shooter is taking a reasonable hunting shot. When I put a couple rounds on target, Hamish said “Oh, you guys can shoot, that’s going to make my life a bit easier”.
Kassie then immediately showed her skill, as she stacked two rounds on top of each other, sparks flying off the steel in the fading light. “Oh shit, you can really shoot!” Hamish exclaimed. Yeah, I was a proud husband at this point… Zeros confirmed, we packed away the rifles and saved the rest of our ammo.
If you’re driving from further afield, like us, you may want to pay the bit extra to stay the night and be fresh for your hunt (or your drive home). The woolshed has a bunk house attached, with four bunks, a reasonable kitchen facility and a shower and toilet. After a quick packed dinner, a couple beers and plenty of yarns, we turned in to get some rest.
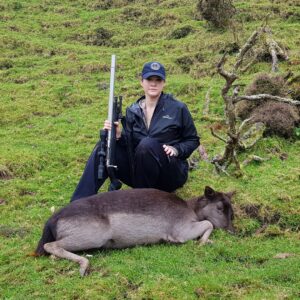
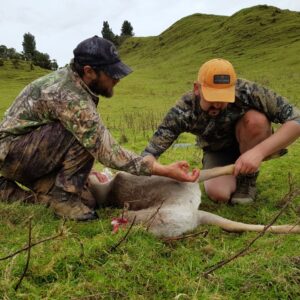
Kassie with the fully suppressed Tikka 6.5×55 and her first deer – a well-conditioned doe
Being early June, the crisp weather and short daylight hours meant deer would likely be out grazing most of the day, catching sun where possible. We ambled out after a coffee, without too much pressure on time, and took a quick ride in the side-by-side to the back of the block to start scouting around. I couldn’t believe how many deer were around, and we passed some beautiful looking bucks, but we were there for a meat hunt, not a trophy animal.
It’s easy to forget how much elevation you’ve gained from sea level, but on a clear day the views from the hilltops are outstanding. You can see all the way to snowcapped peaks of Ruapehu in one direction, and out to the sea on the west coast in the other.
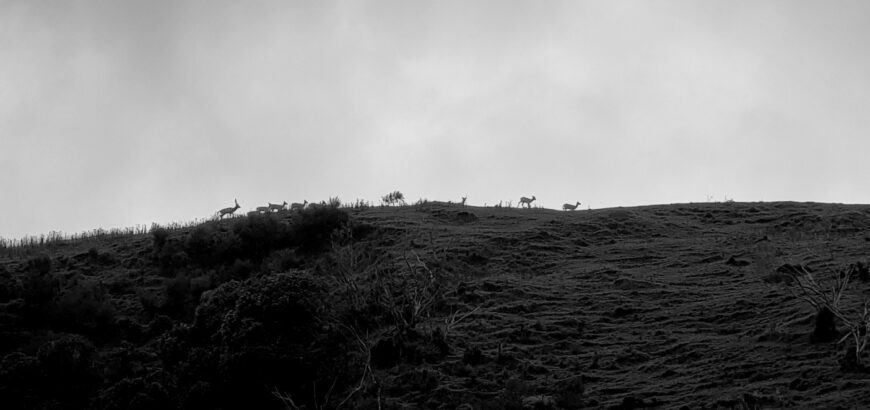
After leaving the vehicle we walked a winding track, up and down ridges and gullies, keeping the bush edge largely on our left. After a while we reached the area we had planned to hunt, and passing through the gate we were told it was time to keep quiet and load up our rifle magazines. From here it wasn’t long before Hamish indicated to get low. We started to crouch and move into position, looking into the next valley. Luckily we had the wind in our favour, as the mob of deer ahead of us started to move up towards us and to our left, but at a steady, walking pace – definitely not spooked.
As we were on the side of a hill, with the slope going up to our right, there was no way to get a comfortable prone position. Kassie quietly got into a sitting position, and took a clean shoulder / heart shot on a nice fat doe at 180 metres. Hamish did mention afterwards it’s not the kind of shot he would usually advocate a beginner hunter taking (in terms of distance and position), but having seen her shoot the night before, he was confident in her ability.
I, on the other hand, managed to do the exact opposite. We left Kassie’s doe to peak over the top of the hill we were sitting on, and Hamish pointed out a scrubby looking buck. “Bro, that’s a cull – take him out”. I was stoked to get to take a shot at my first buck, considering we had paid for 2x meat animals, so this was a bit of a bonus.
Maybe it was the nerves, maybe it was something else, but I pulled the shot left and instead of hitting him in the chest (he was facing us), my round broke his rear right leg. He dropped for a half second and started running / limping off. What was a relatively easy 100 metre shot, quickly turned into trying to dispatch a running deer at over 200 metres, as he rounded a hill and broke line of sight.
This shot was not a good one, and ended up leading to chasing a wounded animal. Not my finest moment
Having lost confidence in my rifle, and not wanting to go back to my pack for more ammo, I grabbed the Tikka off Kassie, and Hamish and I went after the wounded animal. I had a sick feeling in my gut, thinking the poor thing would end up caught caught on a fence, or slowly wasting away, so I was deeply encouraged when Hamish spotted a tiny drop of blood and a piece of shattered bone. At this point it had been about 10 minutes or so, and I was worried we may not see the buck again.
We climbed to the top of a nearby hill to get a better vantage, and we continuously scanned the area where we thought he may have broken for the bush edge. It had now been about 15 or 20 minutes, and I was almost certain the deer had made it to the bush and disappeared. Trying to find it in there was not going to be any fun.
Out of the corner of my eye, I picked up on some asymmetric movement, it was the limping gait of the buck that gave away its position, as it was perfectly camouflaged against a backdrop of felled trees. My heart was racing again, as he was less than 100 metres from entering the bush and dropping over a ridge, where we would have struggled to find him. Feeling more confident in my rifle, but still doubting myself, I took a few deep breaths and pulled the trigger on the 285 metre downhill shot. The buck dropped on the spot, the projectile having gone through half of his body and dumping a huge amount of energy before coming to a stop inside the front right shoulder.
This was the first animal I had not killed cleanly (and so far the only one – fingers crossed), and I was so fortunate to have a good guide with tracking ability, patience and sound advice. I was feeling elated at having shot my first buck, regaining the animal, and also having pulled off a decent shot after such a shocker. We talked through what had happened as we walked back to where Kassie was waiting.
Wrapping up
Now it was time to retrieve and gut our two animals – we were taking them out skin on, to protect the meat on the long ride home, before dropping them off for processing at Counties Custom Killing in Bombay. Hamish guided us through his technique of gutting a deer, which has been refined on hundreds of hunts, and is still the way I gut deer today. Being a fairly new hunter myself, this was invaluable to learn.
Kassie was first up and got stuck in, making a bit of a face when she was elbows deep in the body cavity. She was determined to do the whole job herself, and did well. We stuck the heart up in a nearby tree, and then Hamish and Kassie carried the deer out to the track, where we could get it later on the side-by-side.
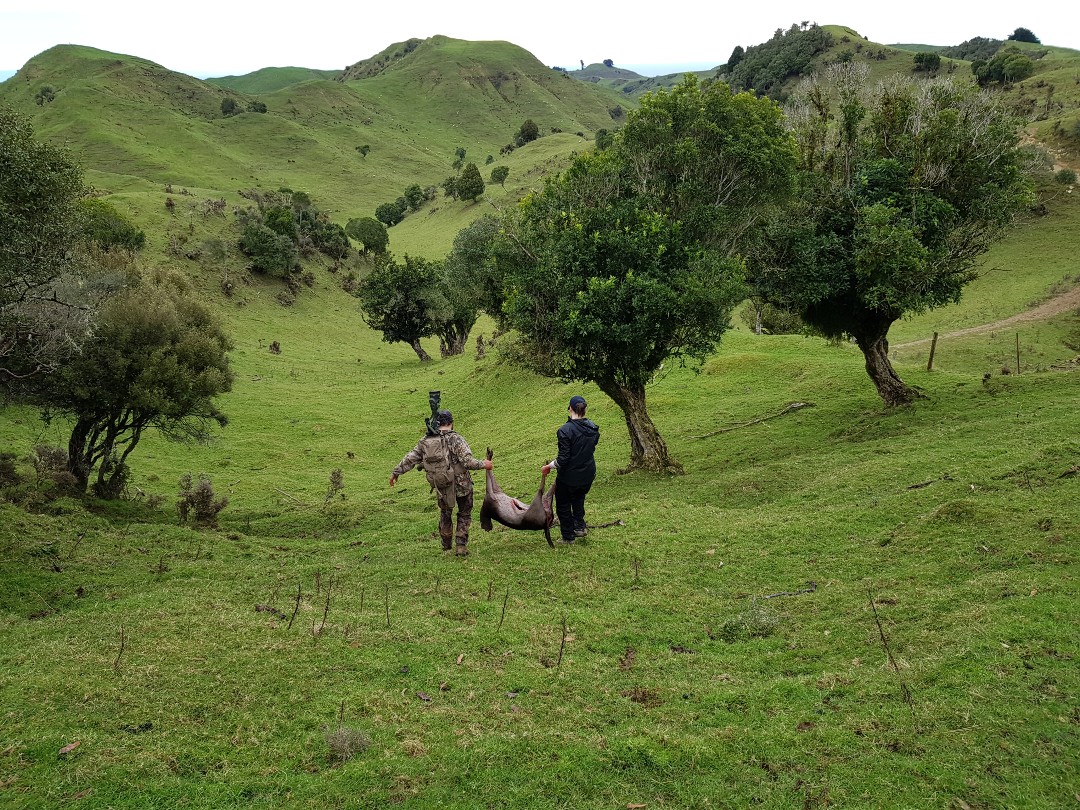
A helping hand for a quick carry down to the trackGlad we caught up with him in the end. The shot was downhill as the buck was walking away from us, so went in from the top of the ribs and passed through the vitals and into the shoulder
After getting the vehicle and loading up Kassie’s deer and the rifles, we drove over to where my buck was and it was my turn. Having watched and listened to Hamish’s instructions on the first deer, I tried to incorporate as many of his tips and tricks as possible, and we quickly finished up with our second deer ready to go. I was really impressed when I used my rangefinder from the deer to our position on the hill and found it to be almost exactly the range Hamish had given me when I took the shot. Hamish’s range estimation was done with pure skill and knowledge of the land, so that was a very good indication of just how good a guide he is.
Returning to the woolshed, we hung the deer up in a cool store while we washed up and got ready to go. It was barely past lunch time, and we’d had a full hunting experience – the benefit of having a great guide, with local knowledge. The ride home seemed shorter than the trip down, as we chatted about what went right, and what went wrong, and what delicious small goods and steak cuts we were going to get done. If I’m honest, it wasn’t too long before Kassie fell asleep in the passenger seat, but I was in my own world anyway, thinking about the next time I’d get back there.
It’s been a while
Hamish describing the feel of a windpipe, and how to pull it through
This was three and a half years ago, and I’ve gone back a few times since, once to take my younger brothers out for a hunt, once to stock up the freezer, and most recently for the Crosshairs ELR course, held on the same property. Unfortunately 2021 hasn’t been the best year for getting out and about hunting, but I feel like I need to make another trip down that way soon…
Are there really that many deer?
Yes. There are bloody heaps. Manawatu-Whanganui has a fallow deer problem like northern Taranaki has a goat problem. If you go out with Hamish, you will likely pass multiple animals just getting to the spot you want to start your hunt from.
Are fallow deer good for first time hunters?
Yes, fallow are a great animal to hunt for your first time. They are a fair bit smaller than red deer, so are easy to process and / or carry out, especially if you are learning or getting fit. Unlike other deer species in New Zealand they almost exclusively eat grass. This means they are often considered to be the best tasting venison, so you can share your hard-earned kai with non-hunters without them turning their nose up at a gamey flavour. Or not. You’re probably not going to want to share…
Having such a predictable diet also makes them easier to locate when hunting, if you know the local terrain and likely feed spots.
Once you’ve picked up some knowledge and head out on your own, fallow is a great target species, often found at the boundaries of DOC land and farms (be careful to be on the right side of the fence).
Is Muddy Waters only for beginner hunters?
Not at all. It’s a really good environment to learn in, and especially to pick up hunting skills if you haven’t had the opportunity to do this with friends and family. However, it’s equally good for more advanced hunters to have a casual meat hunt with some mates, or if you want to nab a trophy buck.
Given that the hunting is so good, you can also use the opportunity to test your equipment out for harder missions, or tick off bucket list activities. For example, a couple years ago I took my longest range shot on a deer at Muddy Waters, and this year Graeme from Taranaki Long Range Shooting achieved his goal of taking down a deer with an original condition Lee Enfield No1 MkIII.
Muddy Waters can also accommodate very accessible hunting, so if a long hike is something that is difficult for you for whatever reason, this could be a prime way to get into hunting.
Is Muddy Waters fair chase hunting?
Absolutely. While you have very high odds, due to the sheer number of animals in the area, it is up to you to hunt and shoot effectively. The deer are not fenced in, and migrate freely between the native bush, the beef and sheep farm Muddy Waters is located on, and the neighbouring properties too. Free range, fair chase, ethical hunting.
Hamish maintains a really good line of genetics in the herd by culling out animals which may not have the best coats or antlers – these animals are targeted for meat hunts. So even though the animals are not a farmed herd, they do benefit from superior genetics surviving multiple seasons, which means you can call up Hamish and talk about a hunt for a prime trophy buck.
What do I need to hunt at Muddy Waters?
Not much. Take a sleeping bag and pillow if you’re going overnight. Appropriate clothing and footwear (including wet weather gear), food, snacks and water. But otherwise, talk to Hamish about what you want to take. He does have a rifle that can be loaned to clients if you don’t have your own, or want to take a new hunter with you.
How do I book a hunt and what does it cost?
You can reach Hamish on the Muddy Waters Facebook page, or by email to enquire about bookings and pricing. At time of writing there is a special rate on meat hunts due to high deer numbers.
The process of annealing brass has interested me from very early on in my reloading journey. There seemed to be some mystique around it, and only the most hardcore of reloaders really did it. I must confess that I was clearly never hardcore enough and am only now, many years on, beginning to anneal myself. For this reason I thought it would be a good opportunity for me to write an article right from the start of my annealing journey so that those who are interested can learn with me as I go.
Why anneal brass?
To start with, for those who have no idea what I’m talking about, in layman’s terms brass is a soft metal, each time we work a brass case (that may be sizing it, expansion as it is fired, or contraction as it cools and is ejected) the brass becomes more and more “work hardened”. Without trying to oversimplify it too much annealing is the process of heating the brass case neck to a very specific temperature in order to “soften it” back to its natural state.
There are a few benefits of this, firstly it means we can try and achieve a more consistent neck tension, by ensuring we have a consistent start point between reloads. This in turn affects pressures and ultimately potentially affects accuracy. It also extends the life of the case due to the fact that as cases become more and more work hardened they eventually become brittle and split.
It is important to note here that we only want to anneal the case neck and shoulder, we do not want to be softening the case body or base – doing so could be dangerous.
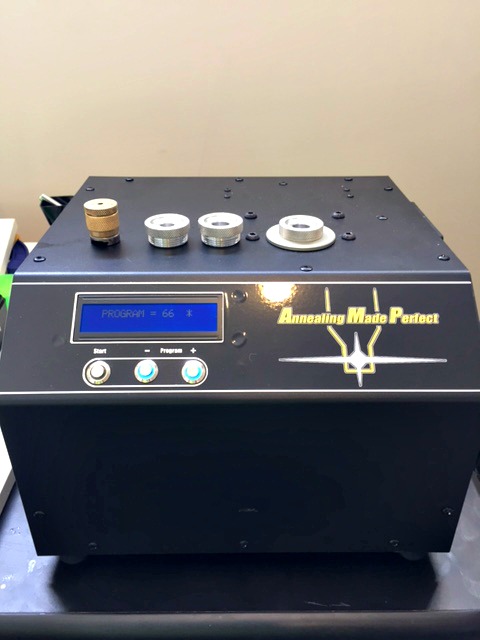
“Annealing Made Perfect” – a pretty bold claim. Does it live up to the name?
How is brass annealed?
There are a couple of main ways brass is annealed by reloaders, One of the most common ways is by using a temperature sensitive product which is painted on the inside of the case neck, the case neck is the rotated through a flame (most commonly a gas blowtorch) or cases are partially submerged in a water bath leaving the necks exposed and blowtorched, until the temperature sensitive paint shows the case has reached optimum temperature. There are a few different methods and machines available that follow this basic process which for many reloaders works OK, or at least they believe it to. But there are a number of variables with this process to consider. Firstly ambient temperature and gas levels will both affect the temperature of the flame. Distance from the flame, angle of flame, time spent in the flame, case calibre, brass thickness, brass type and brand will all have an impact. This many variables, combined with having to use an open flame blowtorch in the house are really what prevented me from getting into annealing sooner.
Then a couple of years ago I came across a product “Annealing Made Perfect”, which I didn’t realise at the time was made in New Zealand. What the guys at AMP were doing seemed to be quite different to the above process and while I wasn’t an early adopter I started keeping more and more of an eye on the reviews and coverage of the guys at “AMP” while I continued to expand my knowledge of annealing and reloading in general.
The process that the AMP machine uses differs in that it uses a magnetic field to pass the brass through in order to create heat, because this magnetic field is electronically controlled it gives the potential for far greater temperature and time control as well as greater consistency and repeatability than the common method of using a gas flame. This method has allowed the guys at AMP to test many combinations of calibre, brass type, brand, thickness, etc., to create an extensive database and various programs within their machine for each type of brass. You are not reliant on using temperature sensitive paint and adjusting everything to get it just right, you now have the ability of selecting the right program and pushing the start button.
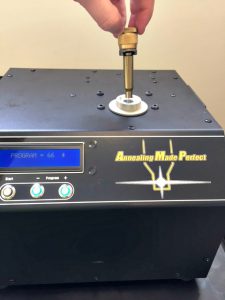
AMP machine with pilots and shellholder.
Another really great service that the guys at AMP offer, and, in fact, recommend, is you send them samples of your own brass and they will test it in their laboratory to identify its unique properties and they will let you know the perfect settings. This service is completely free, and is intended to get you, the customer, the best achievable result. This type of service to me really signals the values of the company and their intent to work with the reloading community rather than just selling them a product.
They have also included a USB port on the side of the machine, and computer link cable in an effort to future proof the machine, in the event of any updates AMP will provide these to be downloaded onto the machine, ensuring your unit is not going to be redundant in a year’s time.
Getting started with the AMP machine
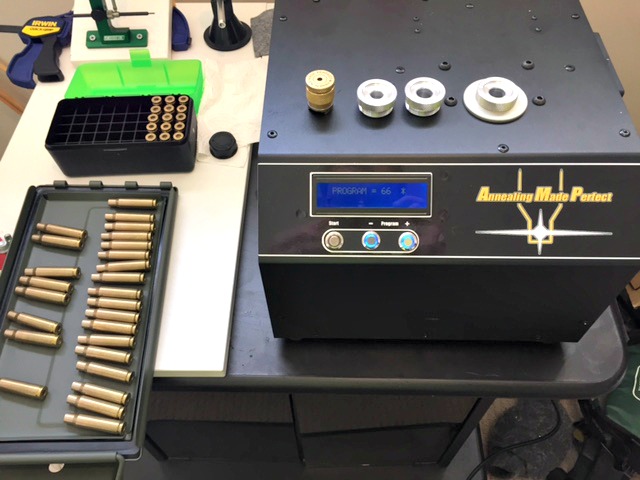
I have recently been lucky enough to get my grubby little hands on an AMP machine to do some testing with, while as said above I haven’t had any experience with the blowtorch methods of annealing and therefore can’t compare the two, I am able to compare annealed vs un-annealed loads.
The first thing I noticed when I opened the box was the thought that has gone into it all, the machine was very well packed, as were the accessories. The user manual was incredibly simple, even for those of us who never read user manuals (Lots of step by step pictures). Realistically, it is so simple that it could even be compressed into one page.
Setting up the machine took all of 2 minutes, literally to take it out of the box, screw in the little rubber feet, plug in the power cord, and you’re ready to start annealing.
A quick check on the Annealing Made Perfect website settings section, selecting my calibre and brass brand from the dropdown list, and I was told what pilot number, and setting number to use.
You’ll be ready to anneal in a matter of minutes – it doesn’t get easier than that!
The Pilots are semi calibre specific (many calibres may use the same pilot i.e .243/7mm-o8/308 use the same pilot, but it will depend on what calibres you load as to what pilots you will need), and they simply screw into the top of the machine to hold the brass at the optimum height.
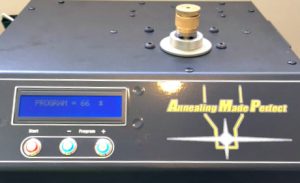
The machine has 3 buttons on the front, a “+” button, a “–“ button and a “start” button. Simply press the “+” or “-“ button until the LCD screen shows the correct setting for your brass, place a case into your shell holder (the shell holder is used to handle the hot brass), drop the brass into the hole on the top of the machine and press the start button.
The start button will glow red for a short time (depending on brass and setting this time will vary, but likely to be around 3-4 seconds), and you’re done, pull the brass out using the shell holder being careful not to burn yourself on the extremely hot case and drop it into a metal tray or container.
The start button glows red while the operation is underway.
It really couldn’t be more simple and the part I like the most about this machine is it repeatability. With other methods I have seen, people tend to set up their machines for a single calibre. They were often reluctant to change, as doing so would mean a lot of setup to try and recreate the same results next time. It also meant people would do big batch runs of brass as the setup involved and lack of repeatability meant that small runs became an annoyance. With the AMP machine you could literally anneal one piece of brass, then a week later anneal another and the results would be the same. This seemed like a definite benefit to me as it allows me to anneal between each reload, and not have to save large number of brass up each time to get very consistent results.
Are there any downsides?
I will highlight that the two potential issues that some people may find with this machine-
The first is that it anneals one piece of brass at a time, and unlike some other systems which use an automated hopper type setup you have to manually insert and remove each piece of brass. Personally this isn’t a problem for me as I am annealing my brass after each shoot, so I am only doing 30ish pieces at a time. This is taking me less than 10 minutes in front of the TV to do and personally the benefits of this system over others outweigh this slight negative. But for those people who want to stockpile their brass and anneal it in a large batch AMP are currently working on a robotic system and case feeder to insert the brass and remove it, so you can set it and do something else, The system is not currently available, but there are videos on their Facebook page showing progress so far and I can’t imagine it will be too long until we see these out for delivery. The new robotic unit will fit existing AMP Machines.
The other thing I have seen people comment on is the “Thermal Cut Out”. Again for my application I don’t see any real problem here but I know that it comes up a little from time to time, so I thought I should address it. The machine is naturally going to get hot – its purpose is to produce heat after all! AMP have done a great job of addressing this and the machine is built with a number of internal fans (these fans are very quiet and for the most part do the job, with the outside of the machine remaining cool to the touch).
AMP have also built into the software a thermal cut out which monitors the internal temperature of the machine and if it reaches high levels it will place the unit into a cooldown mode where it will essentially stop annealing brass and run the fans until the temperature is reduced. Depending on the program / cartridge you are running AMP indicate this may be between 50-200 cases. The most I have put through nonstop in one hit was around a hundred 6.5 Creedmoor cases running program 53 and I did not reach this cut out, in fact the unit still felt very cool to the touch and the air being blown from the fans also felt cool. Once again I now anneal my brass after each shoot, so after my initial annealing of my existing brass stockpiles I won’t be doing any overly large batch runs so this isn’t a problem for me at all, in fact its quite comforting to know that the machine has this protection feature built in.
Testing the annealed cases
Now I guess you are all wondering, does it work? Well again I’m not a scientist by any means, so I urge you to do your own research in general, but I will say that I recently did a test comparing both annealed (through the AMP machine) and un-annealed loads in a newly broken in 308 build. The loads were essentially the same however there were TWO variables that potentially both impacted the test.
One set of loads was Annealed and one was Not Annealed.
The set that was Annealed were the 10 cases I had with most uniform neck wall thickness, and the set that was not annealed was the next most uniform 10 cases.
Both sets were selected from brass which had around 10 firings through them and were the 20 most uniform (neck wall thickness) cases of 150 measured.
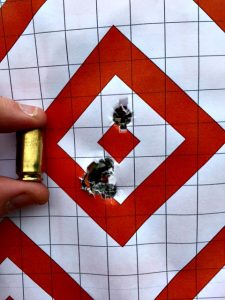
This is the annealed group. One cold bore shot and then 9 in the same hole. 9mm case for scale.
Measuring both sets of loads through a Magnetospeed Chronograph, the Standard Deviation of the 10 loads which were Not Annealed was 16.4. The Standard Deviation of the Annealed set was 9.4. The groupings of both sets at 100m was very good (one ragged hole, excluding a cold bore shot with each set) and I could not in fairness distinguish between sets, except for a single flyer on the Not Annealed set which while I don’t believe it was the result of shooter error, I can’t rule that out.
How important the Standard Deviation reduction is depends on you and what you are doing with the load. Both sets (Annealed an Non Annealed) would have happily taken down game out a long way, but for ringing steel or punching paper or shooting out at distance the reduction in SD (and ultimately grouping size/vertical dispersion) could well be worth it.
Overall, this is a great piece of kit. I plan to continue to update this article as I go and the machine is tested with as many calibres, brands and environments as I can. In the meantime, in New Zealand machines can be purchased from Serious Shooters in Auckland, and international purchasers can see their local stockists on the AMP website.
[Editor’s note: If you enjoyed reading this article from Chris (or any of his others), you may like tofollow Chris on Facebook]
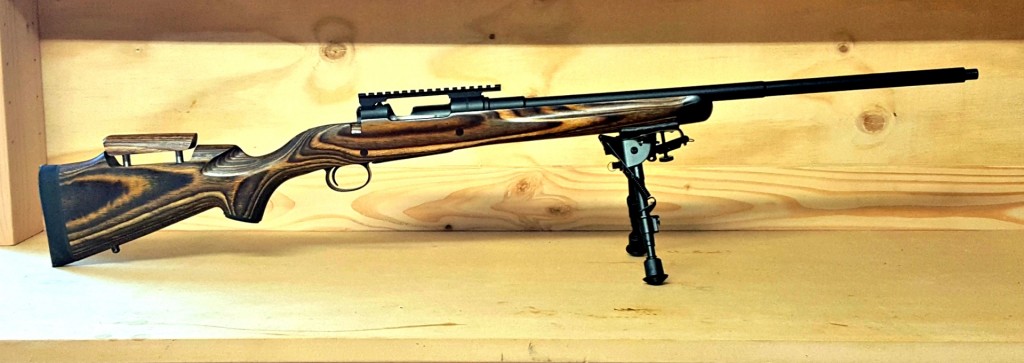
When I started shooting, I had a penchant for buying budget guns and trying to improve them to compete with much more expensive guns. With some home tweaks, such as trigger jobs and recrowning, a certain level of success could be achieved. The two things I would spend money on would be a good scope, and a stock from Boyds.
While we have access to some great optics in New Zealand, it’s been almost impossible to get a Boyds rifle stock for a long time. With the US$100 export limit on certain firearm-related items, New Zealanders have had to try and buy the cheapest of the stocks on offer, with no upgrades or customisation, or wait for a run-out special that matched their firearm/stock combo. Unfortunately as prices have naturally risen, even the option of squeezing in under $100 has just about disappeared for most items.
Are there any NZ Boyds dealers?
There have also been various businesses in NZ that have had a Boyds dealership at one time or another – but they’ve always been bloody expensive. In many cases, the stocks would have cost more than people had spent on their rifles to begin with – and the options were limited too.
So – we’ve tried to fix this issue.
I’ve long been a fan of Boyds stocks, and you can read about stocks I have used over the years in the product review section of the website. In order to give everyone else access to the same stocks that I’ve really enjoyed using – and at a reasonable cost – we’ve established our own Boyds dealership in NZ.
This Swedish Mauser was my second ever Boyds project, in a Prairie Hunter stock.
The Gun Rack and Boyds Hardwood Gunstocks
Yup, you can get any Boyds stock you want, with any customisations. There’s no federal export limit, and you don’t have to pay a retail store half of the deposit of an Auckland 3-bedroom house either. In fact, we can get you a basic Boyds stock, delivered to your door, for around NZ$525. If you want to spend more and get an adjustable comb, custom colours, change the LOP, or whatever, you can do that too. We’re also able to sell the At-One stock, at around NZ$640, delivered.
So, how come we’re able to do this? Well, we can bring in the stocks because we have a federal export licence from the US government, specifically for Boyds stocks. And how do we do it so cheaply? Quite simple. We’re not greedy. We make a very small amount of money on each stock, and that money means I can buy ammo and other bits and pieces to keep this website going. I’m much more interested in bringing something cool to NZ shooters than I am in making a shed load of money.
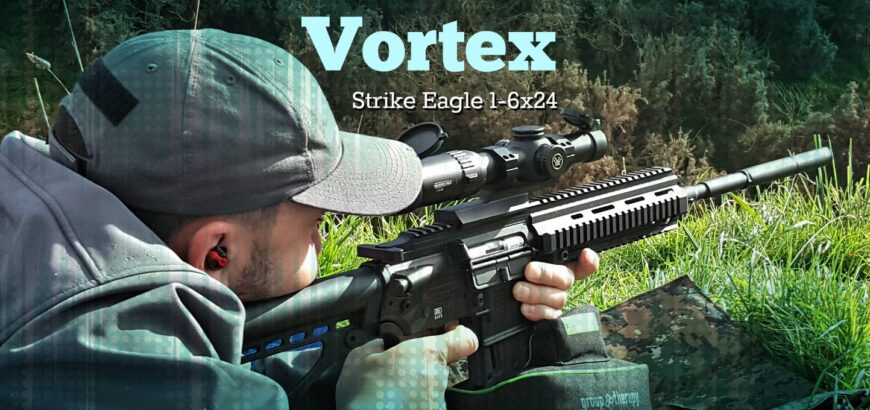
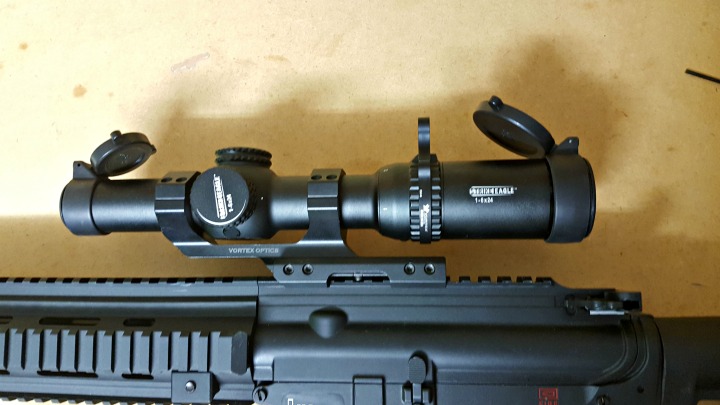
In a market saturated by black rifle parts and accessories, is there room to stand out? The Vortex Strike Eagle has been around for a couple years, and it has certainly carved its niche in the landscape of optics for the ubiquitous AR-15. So, what sets this scope apart?
Image credit: Vortex
The reticle
Really, to gain traction in the glass game these days, you need to be offering innovative sighting systems. It wasn’t too long ago that grid reticles weren’t even a thing. Now, most long range shooters wouldn’t look past them for practical or tactical style shooting competitions. With the Strike Eagle, Vortex went the other direction, tending towards the simple and easy to use.
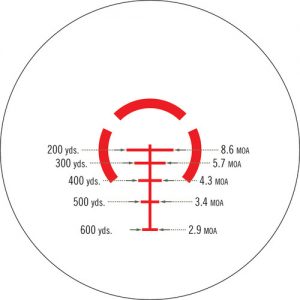
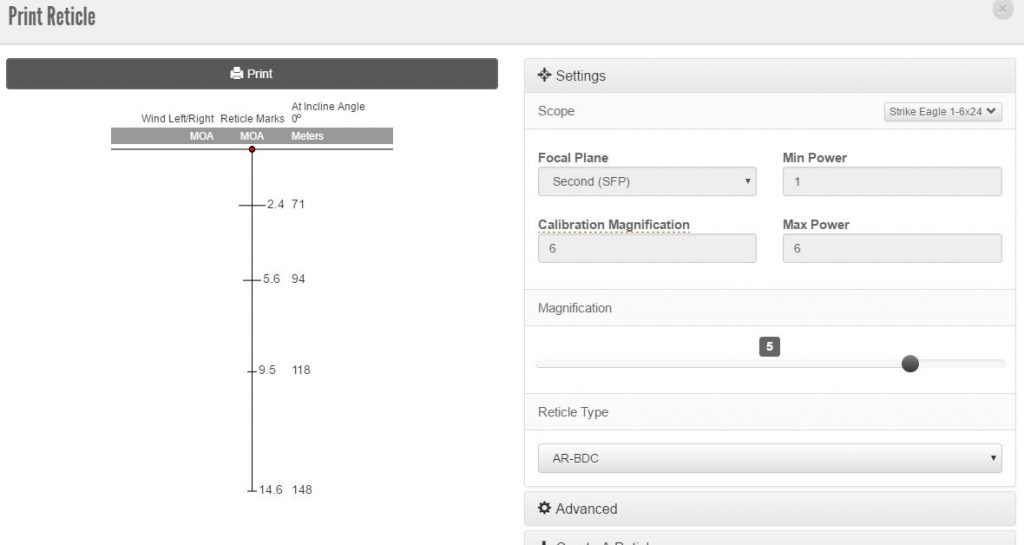
The AR-BDC (AR Ballistic Drop Reticle) is designed to give easy elevation holdover using common .233/5.56 loadings. With a 50 yard zero, the crosshair is good to use from 20 yards through 200 yards, on any magnification setting. On 6 power (top of magnification range), the hashmarks equate to a holdover for 300, 400, 500 and 600 yards.
This makes for very fast shooting for competitions such as IPSC or 3 Gun, and combined with a switchview throw lever, extremely quick transitions from near to long-range targets can be achieved, without relying on a secondary optic or BUS (back up sights). Another feature which aids quick target acquisition is the halo that surrounds the crosshair, drawing your eye to the centre of the reticle.
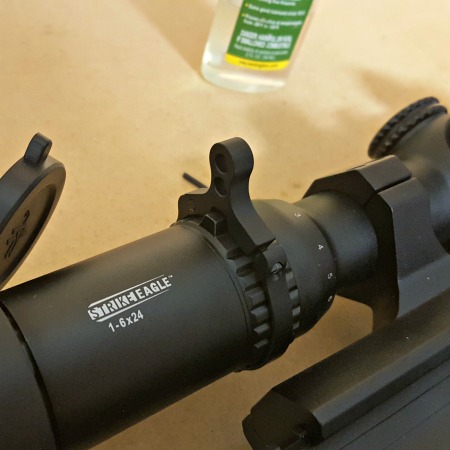
A Vortex V-4 Switchview Throw Lever is installed in literally a minute, and makes your life so much easier.
There is a newer version of the Strike Eagle, which comes with a 1-8x magnification range and the AR-BDC 2 reticle, which follows the general principals discussed above. It also, however, has holdover notches for 5 and 10 mph winds, again, aiding quick decision-making while engaged in a course of fire.
What if I’m not shooting .223 Rem?
One of the wonderful things about the AR platform is its versatile and modular nature. As such, many of you will likely have an AR-10 or AR-15 in a different calibre, and the AR-BDC hasn’t got you all giddy yet. Well, the manual for the reticle does include drops for your average .308 Win load. And if you’re getting more exotic than that, you can easily use the Vortex LRBC (Long Range Ballistic Calculator) to work out drops for your specific rifle and ammunition.
I’ve been using the Strike Eagle 1-6×24 on my .22LR trainer, which is a Carl Walther produced HK416D. By plugging in my ballistic data for CCI standard ammo (which I verified with a chronograph), I was able to find my drops on the various hashes in the reticle. In preparing for the PSNZ22 practical rimfire shoot, which had known distances of 40 m to 150 m, I zeroed at 50 m and used the LRBC to produce the below reticle image.
The Vortex LRBC web app is incredibly useful for figuring out drops and wind holds, and can give you traditional drop charts or reticle images such as the above.
As you can see I had a pretty good holdover for 70, 95, 120 and 150 metres on the 5x setting. Getting used to the magnification settings (or writing them down) you could actually get quite a precise drop on a specific hashmark by change your zoom level.
Outstanding features
There are a few nice extras that help to keep this scope top of mind when considering an optic for ‘run and gun’ style comps. The included flip caps mean you don’t have to worry about losing or forgetting a bikini style scope cover. It also adds to the ‘tactical’ look that many strive for with their black rifles.
Also included is an illuminated reticle, with 11 brightness settings. Sure, this isn’t anything new, but it’s well thought out. The dial is on the side of the sccope, rather than near the ocular bell. This means you hardly have to lift your head to see the setting you are selecting.
I don’t often make use of illuminated reticles (black targets at extended ranges probably being a notable exception, with my Viper PST), but I found this one particularly useful for the inaugural PSNZ22 shoot, which was shot in overcast conditions in pouring rain. I mean, bucketing down at some points. Having the illuminated reticle on very bright setting (it was still daylight after all), I was able to easily pick up on the subtensions and holdover, despite shooting against black or dull targets, obscured by rain.
Speaking of rain, if you get it on your scope lenses – don’t try and blow it off with your mouth before you shoot. You’ll just fog up the glass for a few seconds, which is very disorientating. And I did it twice!
Build quality
The Strike Eagle is exactly what you pay for. The glass is not the same quality as the Vortex long range scopes, but you don’t need it to be for this style of shooting. The construction is solid, yet refined. Not to mention, backed by the Vortex unlimited lifetime warranty. Did I mention the rain before? Because, damn, did it rain! The Strike Eagle 1-6×24 held up its end of the bargain, delivering outstanding reliability, and has done so on several trips since.
The turrets are capped – so if you’re wanting the ultimate tacticool sniper rifle scope laser sight with external tactical tactile turrets, this might not be the one for you. However, if you’re interested in shooting quickly from a defined zero while holding over at known or ranges, this scope will fit the bill, without the risk of bumping your turrets while throwing your gun around the course.
A cantilever mount with 2 inch offset assures correct eye relief and proper alignment of the 30 mm tube.
The negatives
When I first looked at the Strike Eagle, one of the other writers from the blog noted that when they had seen one in-store, the 1x magnification setting, was actually smaller than normal vision – in otherwise less than 1x. I was concerned about this and wrote to Vortex, and they pointed out that eye relief can make a difference in this department. After playing with the eye-relief adjustment ring, I found the perfect spot, and the magnification was true to what it said on the dial. So, not a negative, but something to keep an eye out for (pun intended).
There was one negative. I found the battery cap on the illumination knob wanted to unscrew when I manipulated the dial in the same direction as the thread. This may have been a missed thread on my scope in particular, or it could be something to watch out for when checking out the scope for yourself. Either way, I did not feel it was a big enough deal to try and send back for repair or replacement. In fact, if I just grasp the dial by the body of the knob, rather than near the edge, there’s no problem.
It’s inconvenient if you’re trying to maneuver yourself and your firearm quickly – it’s just one more thing to be mindful of. However, as I mentioned above, Vortex have the best warranty in the business, so if you find yourself with a part that doesn’t feel quite right, don’t be lazy like me – ask them to fix it, and they will.
Overall impression
Ten out of ten, would buy again. Yes, there are ‘better’ AR optics out there. You could have a very sophisticated piece of equipment, or you could go rugged and basic, I’m sure you could find something that beats the Strike Eagle in one way or another. However, I personally think that very few optics deliver in all the ways this Vortex unit does, and at the same price point.
If you want a reliable and easy to use scope with great features at a reasonable price, I don’t know what more you could ask for.
Chassis systems have really come to the fore in the past few years, as tactical and precision rifle shooting has gained a larger following. Throw in lots of product innovation and modularity, and you’ve got a recipe for success.
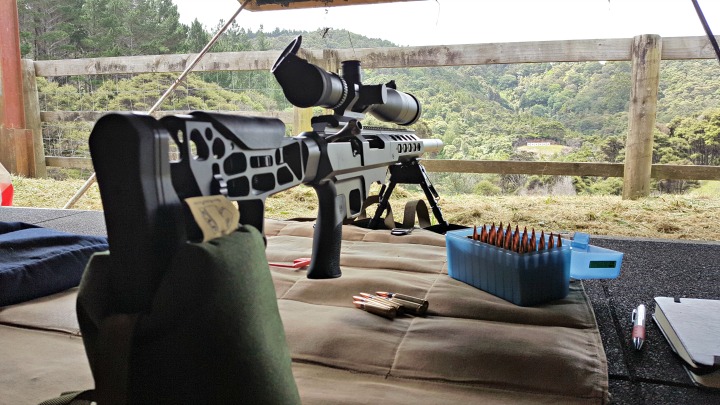
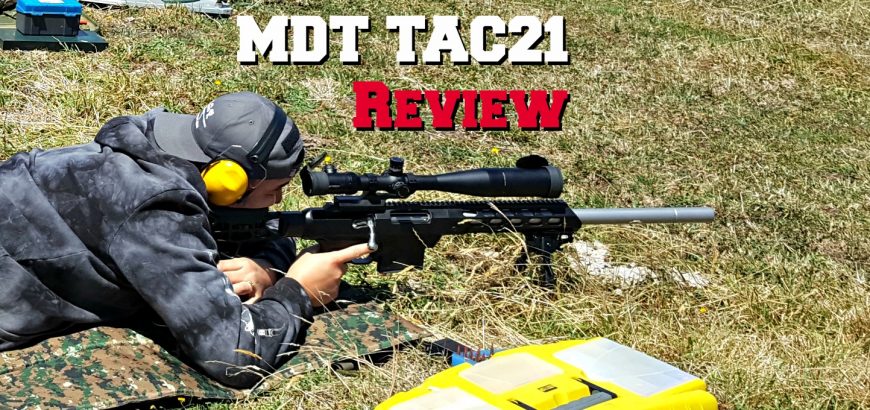
There are three rifles that usually get the royal treatment, and have chassis built for them by most major manufacturers. Namely, the Remington 700, Savage 110, and the Tikka T3(x). The Howa 1500 usually features too. If you’re looking for a chassis for any of these rifles, you’ll have plenty to choose from. Having looked around the market, I decided to to give the TAC21 chassis a go.
The reason the TAC21 really stood out as a potential option for the build I was working on, was that the forend came off as a separate piece, but still had a continuous Picatinny rail. This was particularly important for me, as my Tikka T3 in 6.5×55 has a full over-barrel MAE suppressor that comes right back to the action. It has a 1.26″ OD and would need to be removed after every shoot to get gas residue and powder fouling off the barrel and crown. The TAC21 looked like it was up for the task – and it sure looked a lot easier than taking my rifle out of its standard stock every time I left the range.
The TAC21 by Modular Driven Technologies (MDT). Note the dimensions are for a Remington 700 SA. [Image credit: MDT]So, after deciding on a chassis, MDT offered us one to review. This is always a good sign – when a manufacturer stands by their products enough to let them out into the wild with reviewers! So, after customising my order on the MDT website, it was time to wait for it to be shipped to NZ.
The agony
Nothing is more painful than having a cool new toy come from across the world, and not knowing when it will arrive!
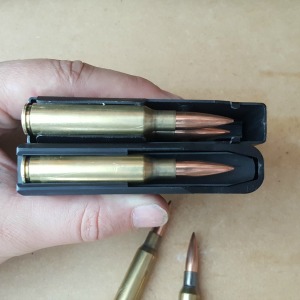
Compounding my dilemma was the fact that it was a Tikka T3 long action. This meant that standard AICS mags would not work, because of the shorter magazine port. MDT makes their own magazines, in metal. They are Cerakoted the same colour as the chassis too. Unfortunately as I placed my order, they were out of stock and back ordered, so I waited “patiently” as they made up some new ones.
When the rifle did arrive, I happily single-loaded for a while, until the magazines were ready.
However, this was all mitigated by the fact that MDT’s staff are perhaps the best human beings on the planet. I judge a company a lot by how they treat their customers, and MDT tops the charts in my books. The only other company that would share that rank would be Vortex. And when it comes to some of the really big bullet and component manufacturers, I can tell you, your concerns are right at the bottom of the pile with them.
You may think I received special treatment as a reviewer and that my experience is not really a true customer experience. Well, the first person I spoke to knew I was a reviewer – the other two people did not. So, I’m comfortable standing by the statement above.
The best day, was when I inquired after progress on the mags, and was told they were a few weeks out still. How was this the best day? The kind lady at MDT offered to send my entire order ASAP, and then expedite the magazines to me when they were available, at no charge.
To which I said ‘Yes’. Very much yes.
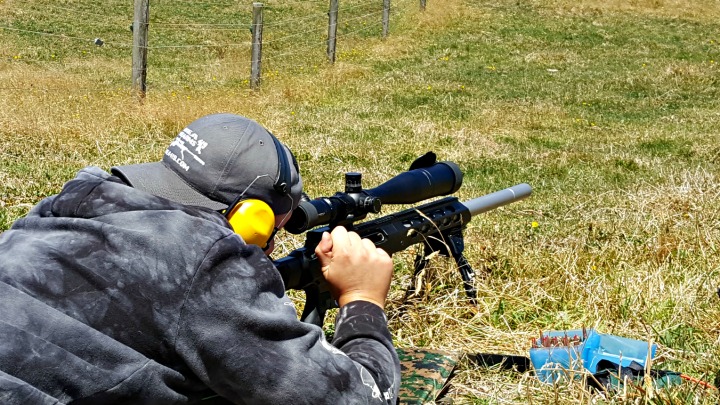
I really wanted to give this chassis a thorough testing, and I didn’t mind single-loading for a month or so if I had to. And I’m glad I did, as this gave me a chance to work through some of the unique aspects of the system, and also take it along to some cool events, such as the Long Range Fundamentals course with Kerry from Precision Shooter.
First impressions
I cannot overstate how excited I was when I opened my package from Canada. But I unfortunately couldn’t use it straight away, as I was sighted in and good to go for my first F-Class shoot. After I attended that shoot with the Franklin Rifle Club at 600 metres, I got home, stripped and cleaned the rifle, and got busy putting it into the TAC21 chassis.
The first thing I noticed was that the solid aluminium chassis and Skeleton Rifle Stock added a good deal of weight. This was ideal for my purposes (an F-Open build), where extra mass means more stability and less felt recoil. If you’re after a lighter chassis system, for more run-and-gun shooting sports, look at the LSS or HS3 chassis by MDT – many of the same benefits as the TAC21, but much lighter by design.
Assembly
I won’t go through how to assemble the product – it’s pretty easy, and there are step-by-step instructions included. There are also some Youtube videos out there if you’re a visual learner.
While I was putting the rifle together I immediately noticed a few points. This chassis is not carelessly designed. There are some very obvious cutouts and reliefs specifically for my Tikka, where a Remington or Savage would have a different layout (bolt stops, safeties, etc.). Instead of finding a way to cookie-cutter design this chassis, they designed it around the actions they wanted to house, and did so with a high degree of accuracy and utility in mind.
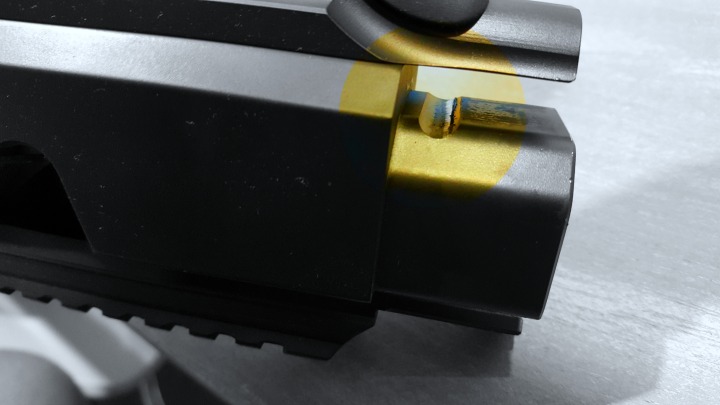
The safety is easily accessible, and there is nowhere for the bolt to hang up. The bolt stop/release has its own little slot in the aluminium housing (they provide a longer retaining pin for this), and there’s even a window cut into the side so you can see your serial number. That last detail impressed me as an extra little bit of thoughtfulness.
The MDT 300 WM metal magazines give you an extra 1 – 2mm to play with.
Other things to note… The Tikka’s free-floating recoil lug has just been upgraded for you. The chassis comes with a steel lug, that is far superior to the soft, aluminium one that comes standard on the T3. You’re also completely replacing your trigger guard and mag well, so this means you can’t use your factory mags. This is no problem though, as the factory magazines are always too small in capacity and never long enough to load out to the lands for you reloaders.
The MDT Tikka T3 LA magazines are solidly constructed out of steel, and designed for cartridges up to .300 WM. You can bend the feed lips to suit your round. I lightly bent the lips on my two magazines to get a grip on my 6.5×55 cartridges. I could have bent them over a bit more, but I found them tight enough that nothing would knock the rounds out unintentionally, and I could get 6 rounds per mag instead of 5. This is ideal for the F-Class shooting that I’ve been doing, where you shoot your 24 rounds in 2 details of 10 scoring shots and 2 sighters. This means only one mag change per detail, rather than the four mag changes I was having to do with the factory magazines.
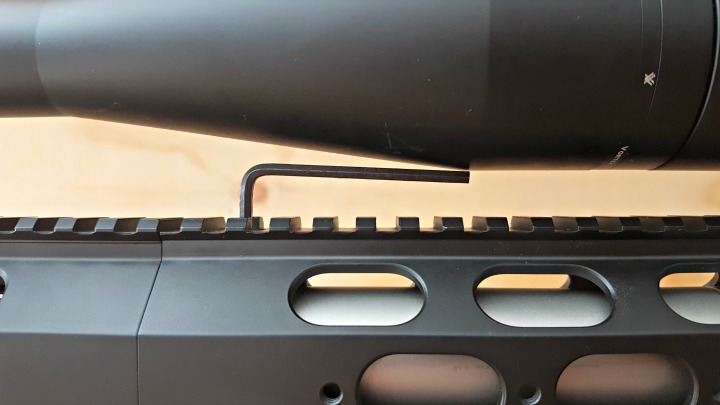
The forend snugged up nicely to the body of the chassis – the offset screw holes helping to lock it in place. The rail on top truly was continuous, with perfect machining. The attachment of the forend is one of only two improvements I could think to make to this design.
The screw in the top rail could be hard to get to, depending on your scope/mount situation. I actually found I could just clear the scope with an allen key and remove the forend when necessary. Although most shooters would not need to remove this piece as often as I would, to clean under the full suppressor.
As I said – just enough space with my setup. Note the screw holes on the side for attachment of 1913 rails.
I would perhaps have done two screws on the diagonal sections between the rail (top) and the sides, rather than have the screw on top. I would rather have four screws to undo, than potentially have to take off my scope if I needed to work on the barrel exterior. However, I am no engineer, and aside from the extra labour and materials that would be required, I couldn’t tell you if my idea for fixing the two pieces together is anywhere near as good as the original design (in terms of robustness, etc.). So, a grain of salt and all that.
The other thing that I think would improve this design (for the Tikka shooters amongst us), would be replacing the bolt stop/release with an aftermarket one that sticks out further. It can be a bit finicky to get the bolt out, but certainly not to the point where I would say it is a flaw in the design. Just an area that could be improved – and perhaps this is an area for the end user to look at.
The Tikka T3 bolt stops differ from calibre to calibre. This allows to Tikka to produce a more uniform action, cutting down costs. I imagine it would be quite an undertaking to design, make and stock all of the possible options. However, if you look around, some machine shops and gunsmiths do make aftermarket versions out of steel or what-have-you, so it could be something to look at if you have fat fingers like me.
Breaking her in
This rifle has become my main centrefire rifle over the past few months, and I’ve enjoyed every minute of it. I did have some frustrations at the start, and we’ll go through how to avoid these yourself.
Scope mounting. If you have a large objective lens (which you likely do if you want a chassis for your shooter), it will not clear the full-length rail on short or standard rings. Unfortunately my Vortex precision-matched rings were 1mm too short to clear the chassis, so I hopped onto the Optics Planet website and set about ordering a one-piece riser, to get some more height.
I was told the riser I wanted was considered an AR-15 part, and therefore couldn’t be exported from the US. Annoying, but rules are rules. They gave me a couple replacement options and I went with a pair of quick detach risers (ironic, as these seem much more suited to an AR, but anyway).
So, I mounted my Vortex Viper PST 6 – 24 X 50, and hit the 100 metre range at Waiuku Pistol Club. I almost cried. My rifle, which was shooting handloads into 0.2 MOA groups was now double grouping and doing just under 1.5 MOA. I felt sick to my stomach at the thought of having to do this review, with such a negative result.
After burning through around 50 rounds of pricey handloads, hearing comments like ‘shooter error’, I was ready to go home. I took the chassis apart to wipe the barrel down and noticed the QD riser at the front had worked loose, and must have been shifting back and forth a minuscule amount under recoil. Feeling like an idiot, but a hopeful idiot, I went home to reload some more rounds and hit the range the following weekend.
Thankfully I have a 2-inch offset cantilever ring mount, provided by Vortex for an upcoming review on their Strike Eagle scope. I switched this in and patiently waited another week to get to the range. With the cantilever mount, the centre of my scope now sat about 2.5″ above the centreline of my bore. Not a major problem, except this will accentuate any user error involving cant. I would suggest getting a bubble level to ensure vertical alignment to the target. If you’re into long range shooting, you probably have one already.
Thanks to Vortex I had an offset mount on hand. Note the height off the barrel.
Another almost negative was that I found the latch that secured the Skeleton Rifle Stock to the chassis to be very stiff. I spoke to MDT and sent them some photos, of where paint had scraped off the housing for the latch’s retaining pin, indicating it was having trouble camming fully over.
This tiny build up from initial use was making it difficult to connect the chassis and stock. It didn’t take long to sort it out though.
The MDT staffer said that a break in period could be expected, as the part was machined to tight tolerances to ensure a tight fit for the life of the rifle/chassis. He offered to send me another latch pin, free of charge, so I could polish down my current one, and use the new one after it had broken in. I said thanks, but no thanks. It wasn’t worth wasting their time and money if it was such a simple solution.
To ‘speed up time’ with my break in period, I gave the latch a couple hard taps with a wooden dowel and a rubber mallet. It now works perfectly.
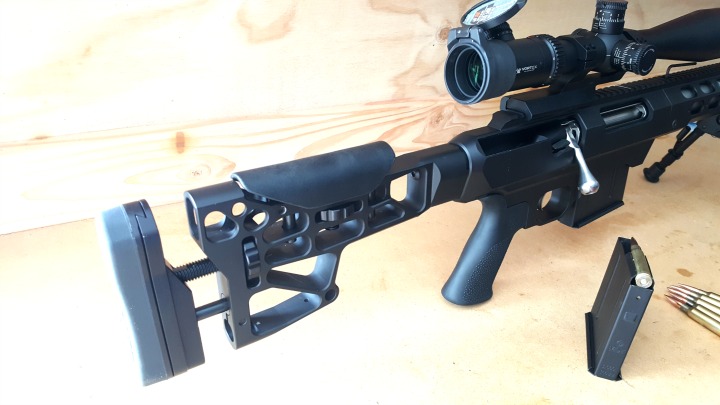
The Skeleton Rifle Stock V4 is heftier than it looks, and features adjustable LOP and comb height. There’s also mounting points for a rail at the bottom, to attached a monopod.
Findings
The TAC21 is designed to take your rifle from factory to precision with very little effort. Bedding is one of the most important aspects of increasing the accuracy of a rifle, and MDT makes this easy. The action only touches the V-bedding in a few spots, and with incredible repeatability and sturdiness. The forend leaves your barrel completely free-floating, for any barrel less than the diameter of the action.
If I had started with an out-of-the-box rifle with factory ammo, I would have expected to see dramatic gains in accuracy. MDT claims up to 28% increase in accuracy, and I can believe that, looking at the design.
Taking an already accurate rifle and putting it into the TAC21 chassis system, what I was looking for was accuracy (repeatability of shot placement – not smallness of group size).
With scope now properly mounted, I was surprised to find there was hardly any POI shift from the 20 MOA Nightforce rail that was mounted to the Tikka action, to the 20 MOA rail integral to the action housing on the MDT chassis. It was literally a couple of clicks to get centre at 100 metres.
With factory ammo, I noticed accuracy was perfect. I had my doubts and expected I might get some shift in POI due to the optic being mounted to the chassis and not the rifle, but the repeatability was there. I had less than a full box of Norma ammo, so didn’t do too much grouping, but did notice a decrease in group size as well, by about 0.1 – 0.2 MOA, down to an average of 0.7 MOA.
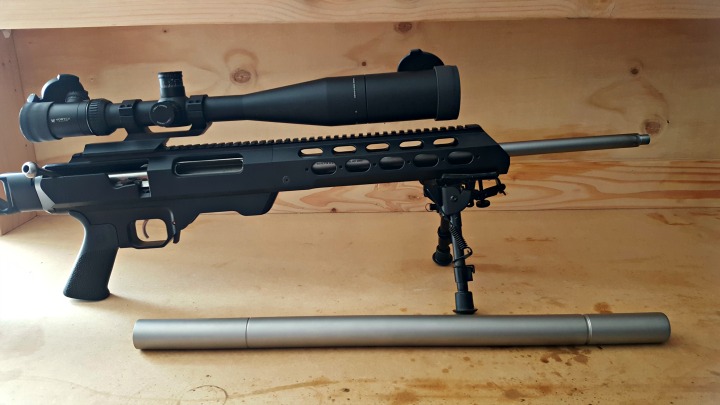
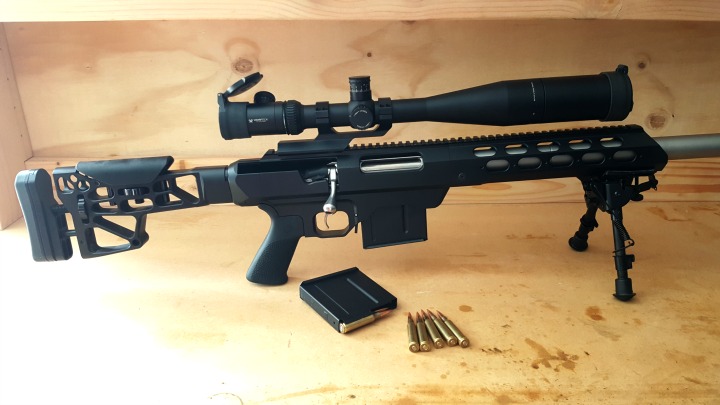
Profile of the MDT TAC21 and Tikka T3.
My personal handload featuring Norma brass, 143 gr Hornady ELD-X projectiles, Federal Gold Match LR primers and ADI AR2208 powder (Varget) was just as repeatable.
As I mentioned before, repeatability was the test here, not smallness of group size. My handloads were tuned specifically to my rifle as it was, and this testing was done with the exact same load, with no further adjustment. It wasn’t shooting 0.2 MOA anymore, but it was shooting a consistent and repeatable 0.6 MOA.
Why did my handload group size increase, while the factory ammo groups decreased in spread? I suspect the bedding of the rifle worked its magic on the factory ammo, which is made to much lower tolerances than my reloads – and therefore could really benefit from the improved bedding.
I suspect my handloads increased in group size because the tension on the action has changed – almost double the torque to secure the action to the aluminium chassis, compared with the factory plastic stock. I imagine this has changed the harmonics somewhat. To reduce my group size again, I could either move my charge weight up or down a small amount, or I could play with seating depth.
Even at 0.6 MOA I was happy to take this rifle out to an 800 metre shoot, and it did quite well. Note if you use a rear bag, the inline stock will be higher off the ground, so you may need a bigger bag.
The latter is now a much more distinct possibility, as I have an extra 1.5mm of mag length to play with. I hope you haven’t got this far into reading this (fairly lengthy) article, and believe the increase in group size is an indication of negative performance on the part of the TAC21 chassis. As mentioned above, this is purely a function of my handloads being tuned to the rifle as it was.
With a bit more time to play around, I expect I’ll get this rifle back down to its 0.2 MOA capability, while enjoying the modularity of the rifle and ergonomic bliss that comes with having the action and butt stock inline. Just quickly, these are the features that I really like about the MDT TAC21:
V-bedding block for increased accuracy and decreased points of contact
Thoughtful design
Included recoil lug
Straight-line design to absorb felt recoil and decrease muzzle flip
Full length top rail – 20 MOA too!
Plenty of places to add a Magpul rail or two for your bipod, monopod, laser, printer, coffee maker, whatever…
Sling swivel stud included for bipods, but easily removable for rail mounted varieties
Excellent finish of hard anodizing plus Cerakote in your preferred colour – I had no marks on the stock after months of use, except for where the QD riser was loose on the top rail, and a couple points in the butt stock attachment area, that are not visible anyway when the rifle is assembled
Huge tolerance for barrel size, meaning you can have straight no-taper barrels, massive muzzle devices, whatever you want
Decent amount of weight for prone shooting and recoil reduction, but light enough to lug around a bit if necessary
It looks fantastic, and your factory rifle can play with the RPRs and HCRs and whatever else is on the firing line
Better magazine options
If you want any more convincing, head along to the MDT website and check out the customer reviews for this product. You will see exactly what I have experienced. Great product, fantastic service, and an all round improvement in your rifle.


![The TAC21 by Modular Driven Technologies (MDT). Note the dimensions are for a Remington 700 SA. [Image credit: MDT]](http://www.gunrack.co.nz/wp-content/uploads/2017/02/TAC21-R700-SA_DIMENSION.jpg)