If you’ve read one of our earlier articles on getting started in PRS-style shooting, or you’ve attended a match or two, you might be considering what rifle you could compete with. I’m hoping to do a few posts on different gear considerations, but this first one will focus around the core of your system – the rifle.
Run what you brung
Don’t correct my grammar, I know “brung” isn’t a word. It just rhymes better. If you are not jumping into your local match because you don’t think you have the right gear, you may be missing an opportunity. If you have a rifle from a different shooting discipline, or even your mountain gun or bush-stalking rifle, bring it along and have a go. As long as your rifle meets the requirement of the shoot (i.e. within any calibre / speed restrictions) and is safe, there are a few reasons you should run it before investing in a new gun.
You don’t know what you don’t know. Once you’ve experienced a few comps or handled and seen other competitors’ rifles, you’ll be able to make a much more informed decision on your first precision rifle purchase – this could save you thousands of dollars, or many hours of heartache and searching the internet for unavailable parts and conversion kits
The sooner you start shooting this style of competition, the sooner you will learn and become more proficient
If you somehow find out this sport isn’t for you (highly unlikely), you won’t have invested time and money in a rifle you won’t use again
So, get stuck in, get to your local match, and start sending rounds down range. Accept the fact that you won’t be as competitive with what you are running (or maybe you will be in a different class / division), and set yourself a goal to learn something from each stage.
Entry level – mid-range
An entry-level rifle is not only a time and money-saver when you get started, but with modern rifles and ammunition standards, might be all you need to be competitive for quite a few years. Climbing the ranks as a shooter is not a gear race (for the most part), and you will find that investment in training, quality ammunition / components, and time behind the trigger, will get you further much faster than buying a gun and scope combo that is more expensive than your car.
If you’re looking for a reasonably priced rifle, the common names in shooting are a good place to start. They have a lot of aftermarket support, which means you will be able to make changes and modifications as you go, such as buying a chassis or finding the right scope base. Generally speaking, you would be looking at Howa (Weatherby Vanguard), Tikka, Ruger, Remington, Bergara or Savage.
Rifles like the Winchester M70, Browning X-Bolt, Mossberg Patriot, Ruger M77 MkII, Ruger American or Savage Axis might all be great platforms to modify, but only to a point. If you have your heart set on one of these for whatever reason, do some research to see if there are sufficient aftermarket offerings to explore down the road. Primarily, this will be around the availability of suitable chassis systems or stocks, scope bases with a bit of cant built in (20 MOA rails, etc), and potentially the ease of changing barrels if you decide you want to rebarrel once you’ve worn out the factory barrel or want to make a change.
Whatever rifle and chassis / stock combo you go with, make sure to consider your magazine system. Having the ability to run 5 or 10 round AICS pattern magazines is almost a requirement for the sport, as you need reliability and (sometimes) a lot of rounds down range really fast. For long action chamberings, your AICS pattern mags will be limited to 3, 5 or 7 rounds in most instances. Generally speaking for practical or precision rifle sports, you want a short action cartridge based on a .308 case.
Back to the rifles we mentioned as good starters, here are some pros and cons:
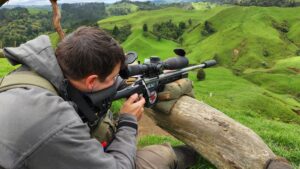
The Howa 1500 is an absolute workhorse and makes a great practical match rifle with its heavy varmint barrel. Photo credit: Simon Gillice / Gillice Practical Rifle Events
Can be purchased as a barreled action without stock, saving on cost of parts you don’t need
Match rifle variants come with a very suitable heavy barrel profile, threaded muzzle and threaded bolt handle with oversized bolt knob
Great aftermarket support from the likes of MDT, KRG, etc
Weight adjustable two-stage trigger
Reliable function in adverse shooting conditions
Best value for money by far
Cons:
AICS compatibility can be limited to certain mags (although this is easily remedied with notching out ahead of the feed ramp – best done by a gunsmith)
Aftermarket options are good, but not as universally supported as the likes of Tikka and Rem 700 actions (e.g. might be harder to find the trigger you want)
Tikka T3x / TAC A1 / CTR
Pros:
Extremely slick action due to tight tolerances, polished finish and unique bolt lug design
Universal action length means changing cartridges down the road is relatively easy, even from short action to long action, etc.
The action is an excellent basis for a semi-custom rifle
TAC A1 comes with a fairly good factory chassis
Excellent aftermarket support by most major brands
TAC A1 and CTR magazines are fantastic in function, reliability and have a short height for a 10 round mag
The T1x 22LR is somewhat compatible with T3x parts and stocks, so a trainer set up replicating your main gun can be achieved
Cons:
With the correct bolt stop, the Tikka is an excellent short or medium length action. If you want to change to a long action or magnum action cartridge in the future (e.g. 300 PRC), the action length can be limiting
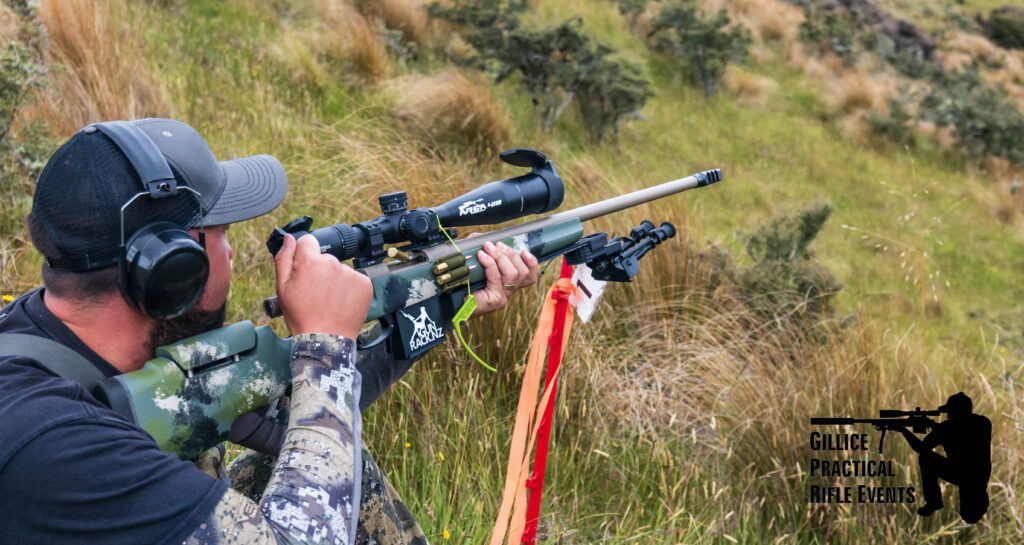
Tom S shooting as part of Team Gun Rack at the Tarata Teams Shoot 2022. The Tikka T3x is a slick action and a great basis for a semi-custom gun
TAC A1 and CTR mags are stupid expensive
T3x variants have very good barrels, but not usually of a profile sufficiently heavy for long strings of fire
Tikka barrels can be hard work to remove, but a good gunsmith will help with this
TAC A1 scope bases are supplied in 0 MOA and are high above the action, so you will want to change this if you change stocks. They are also somewhat difficult to remove (otherwise a good quality!)
A bit on the spendy side
Ruger Precision Rifle (RPR) Short Action
Pros:
An affordable package rifle ready to go (when you compare to adding a chassis to standard rifle)
Later generations keep modernising, e.g. replacing Keymod forends with M-LOK
Limited chamberings, but relevant options for our sport (6.5mm Creedmoor, 6mm Creedmoor, and 308 Win if you don’t like winning)
Accepts a wider variety of magazines than most
Similarly to the Tikka TAC A1, features a variety of AR15 style controls and components
Cons:
Not as refined as the Tikka TAC A1, which is probably the most directly comparable option, but reflective of the price point at 3/4 the street price of the Tikka
You will likely want to replace included items like the grip and muzzle brake
Remington 700 Short Action
Pros:
The “standard” action shape and footprint, due to its prolific nature and saturation of the US market – the best aftermarket options
Most custom actions utilise a Rem 700 footprint, so accessories and stocks can generally be re-used as you upgrade
Training rifles in 22LR such as the Vudoo or Bergara B14R can be equipped with the same accessories and parts to create true trainer systems
System is so well known that there is an endless font of knowledge on trouble shooting or improvement
Lots of “off the shelf” options suitable for precision rifle shooting
Cons:
Varying degrees of quality control and materials / manufacturing over the years, as Remington has had several bankruptcies and new owners. The good ones are good, but it can be hard to know before you spend the money
Bergara is the newest manufacturer on this list, but taps into the existing market presence of the Remington 700 footprint
Bergara B14 HMR Short Action
Pros:
A clone of the Remington 700, but generally higher quality – all of the pros and none of the cons mentioned above
Factory stock is suitable for field style shooting and is a good compromise / cross-over option when considering precision shooting and hunting
Cons:
A bit more expensive – you’re spending Tikka money here
Savage 110 Short Action
Pros:
Very accurate rifles at a good price point
Good chassis options from the factory, made for Savage by MDT
Barrel nut design makes for easy barrel changes in the future – lots of pre-fit barrel options make this a good basis for a semi-custom gun
Cons:
Several variations in bolt release over the years – make sure your action is compatible with aftermarket stocks
Mag release, bolt release and trigger mechanisms can be a bit “fiddly” (might be personal taste, and my bias here)
Aftermarket support is good, but probably not as well supported in the precision rifle game compared to other options on this list
Custom guns
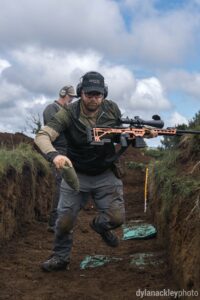
Guns NZ team shooter Graeme running his Curtis Custom Axiom in an MPA set up. Image credit: Dylan Ackley
If you’re looking at the high end of the precision rifle spectrum, you’re likely looking at a “custom” action. Either, you have been in the sport for a while and have a good idea of what you want, or potentially you’re new to the sport, but money is no object and you want the perfect rifle from the outset.
I don’t have much experience with these actions myself, but generally speaking you are buying a Rem 700 SA clone (or variation thereof) which is compatible with Rem 700 accessories and stocks. The action is going to cost around the price of a whole gun from the previous section, and then you have a choice of barrels. Barrel selection in New Zealand is improving dramatically, but prices are still a bit painful, especially if you are shooting a “barrel burner” of a cartridge.
Typical actions in this category would be:
Impact Precision
Lone Peak Arms
Defiance
Big Horn
Curtis Custom
Surgeon
BAT
Barnard (NZ)
Hardy Rifle Engineering (NZ)
Pair your action with a barrel – it’s helpful for getting bullets down range. You’ll probably encounter these names in barrel manufacturers:
Proof Research
Krieger
Bartlein
Criterion
Hawk Hill Custom
Benchmark
True-Flite (NZ)
Hardy Rifle Engineering (NZ)
Vulcan Barrels (NZ)
Conclusion
For most of us shooting precision rifle sports in New Zealand, gear selection is a bit of a journey, and it kind of follows the sequence listed above; start with the whatever you have, then get a dedicated precision gun at an affordable price point, and eventually spend all the money. If you aren’t sure what is right for you, hop in a comment section on Facebook, it’s always full of helpful information. Kidding! Go to a match – see what there is, talk to people, and see what makes sense for you.
You can always contact us for advice on where to purchase gear. We stock some of the above brands ourselves, or can point you in the right direction.
I’ve recently completed a couple rifle builds, and while I was working on them I was on the lookout for a new bipod. I currently run a couple Harris-style bipods that switch between rifles, and one really odd piece of kit that sits on my SKS. I was looking for something different, something better. Top of mind for competition shooting (PRS-style matches) was something like the Harris or Atlas offerings – but then I stumbled on something really unique – Protean Innovations.
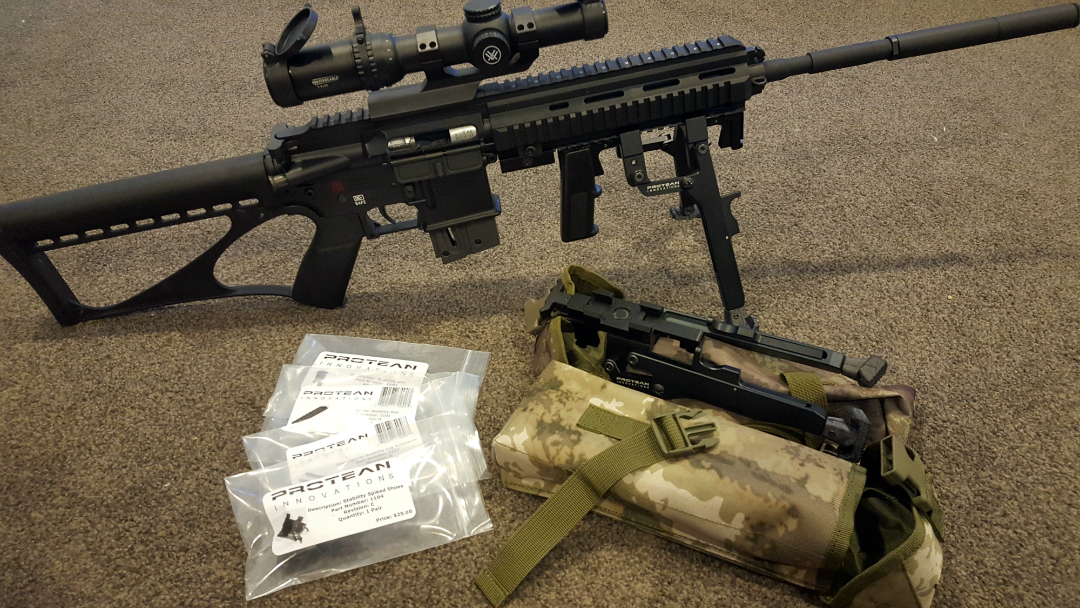
I saw some of their bipods in pics and videos on their Instagram page, and I was instantly intrigued. The bipods seemed to be built for exactly the kind of shooting I had in mind. I reached out to see if I could get a unit to test and evaluate, and their CEO Kyle Hayes, got in touch and offered to send me some gear to check out. A week or two later I received a nice little care package with a Gen II bipod and the Stability Tracker bipod (which is their gen 3 model, effectively). Also in the parcel were a bunch of Protean Innovations accessories. And not for nothing, a personal letter signed and sent by Kyle himself. That says something about the kind of company they are.
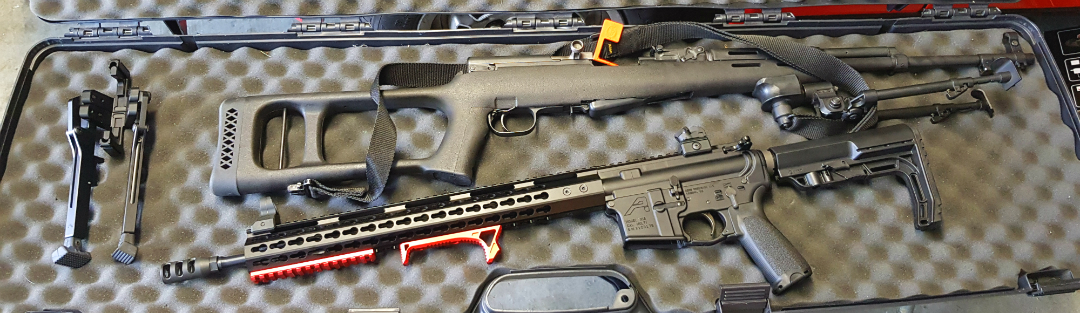
Unpacking the Protean Innovations care package
First impressions
First things first, opening this package was awesome, not only to get some new gear to test out, but also because of the way they package their products. Instead of plastic and cardboard, the Protean Innovations bipods came in their own camo pouches. These can easily be attached to molle webbing, a belt, or whatever else you want. Pro Tip: They also make great water bottle pouches to go on your belt when you’re hunting.
Looking the units over the first thing I noticed was the quality of the materials, workmanship and anodizing/coating. Despite a lot of aluminium-on-aluminium, there is no discernible friction in the system, and all tolerances seem to be exactly right for flawless deployment – precisely what you want in a “quick deploy” kind of system.
Testing
My primary use for these bipods would be for my competition guns, so that’s how I decided to test them. Of course they’re just as applicable to hunting or LE/MIL scenarios, but that’s not my use case, and I’ll leave it to other reviewers to cover those bases.
In terms of competition, I’ve used these at the PSNZ22 run by Precision Shooter, the TSCC Practical Rimfire shoot run by Gillice Practical Rifle Events, and the CNIGC Good Morning Vietnam shoot. I’ve also used the Stability Tracker bipod to get my bolt action centrefire competition rifles ready, but haven’t competed in F-Class this season.
Gen II Bipod
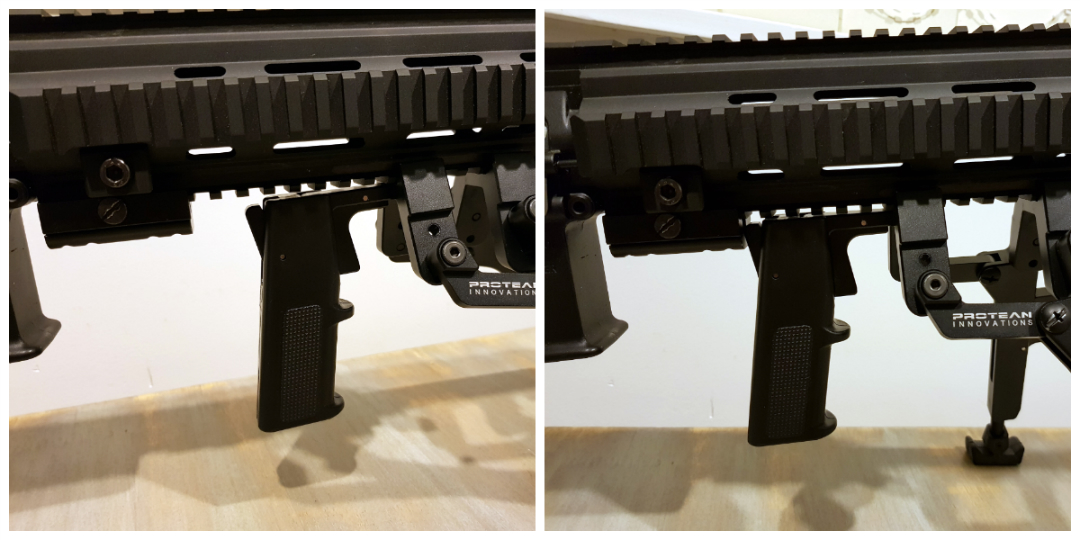
I ran the Gen II bipod on my 22LR HK416D, using the quad rail on the forend to mount the system. The Protean innovations bipod slides along the rail when you hold the deployment trigger, and catches into position when you let go. This allows you to deploy it securely at multiple angles. This can be great for practical shooting competitions, where you often shoot from angled positions, or through barricades/obstacles that have very specific fields of view at certain heights from the ground. For those thinking of a hunting application, it means you can lower your profile as you shoot downhill from a ridge into a valley, or something like that.
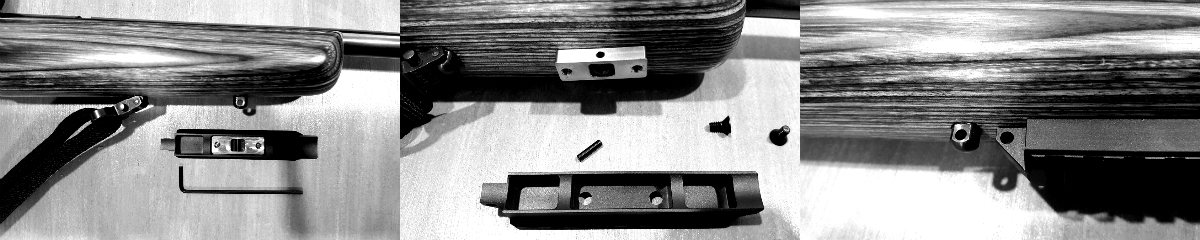
What if you don’t have a rail on the bottom of your rifle? Protean Innovations sells a simple and cost-effective adapter, called the Stability Rail, that will attach to your sling swivel stud and give you an easy to use picatinny rail. There are, obviously, other conversion system out there, if you prefer something else.
The Stability Rail is super easy to attach. It also has a hole to attach your sling, useful if you only have one sling swivel stud on your rifle
In this competition, which has a lot of positional shooting and some stages which cannot be shot supported, I used the Stability Grip attachment. This acts as a forward pistol grip, and attaches to the bipod deployment trigger. You can still pull the trigger and move the pistol grip forwards or backwards to deploy or retract the bipod.
I found this system great. It not only allowed me to quickly transition between off-hand and prone-supported positions, but the pistol grip allowed me to take more controlled standing shots, and be confident in my ability to quickly deploy the bipod, without having to play with small buttons or release levers.
Oh, worth a mention, you only need to pull the deploy trigger and slide it forward or backwards to manipulate the bipod. Unlike a Harris bipod, you don’t need to reach all the forward of your rifle and pull back the individual legs. You can stay completely in position on the rifle.
Other accessories that really make this a unique system include the Stability Spiked Shoe and the standard Stability Feet. The feet that come on the bipod from the factory are a quite grippy rubber design, and have a bit of bend in them, allowing you to achieve those angled positions in the field. With the extra grip you get compared to bipods with hard or round feet, you don’t get nearly as much “hop” or “bounce” when shooting larger centrefire rifles on hard surfaces, such as concrete benches or floors.
The feet allow for various angles, and the grippy, relatively soft rubber takes a lot out “bounce” out of heavier recoiling rifles.
The spiked shoes are easily slipped over the rubber feet in seconds, and stay completely secure. This is a revolutionary approach to bipod feet. While there are endless options for more traditional bipod systems, they usually require tools and can take minutes to switch over – not ideal for field use or in high-pressure competitions.
I thoroughly enjoyed using this bipod in competition, and although I didn’t have my best day shooting, I can confidently say the Gen II and Stability Grip combination greatly enhanced my ability to tackle a very creative shooting course put on by Kerry, Matt and the others from the Precision Shooter crew.
In fact, I ran this bipod again at the Good Morning Vietnam shoot, put on by Central North Island Gun Club, and I can honestly say that without it, I would not have achieved my 3rd place in Open Division.
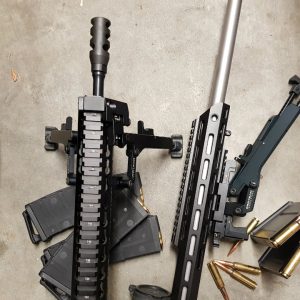
I was shooting my Aero Precision build, with most parts from NZAR15.com, and yes, I was that guy with the muzzle brake on the competition line. I heard all the comments behind me. However, I wasn’t the only one! So was the guy on my left, and the guy on my right! Thankfully only .223, with .308 and 7.62×39 further down the line.
But, even still, it was quite difficult to maintain a good sight picture with vented muzzle gas coming directly from another competitor’s rifle and getting in behind my glasses, making my eyes sting and glasses fog up in any longer strings of fire.
So, in the couple courses of fire where a supported prone position was allowed, the extra stability, and the option to quickly deploy after running to the firing line, all helped me get rounds down range before my vision became too impaired, and helped me to stay on target when my eyes were dripping tears from the stinging gas exiting the filthy brake next door.
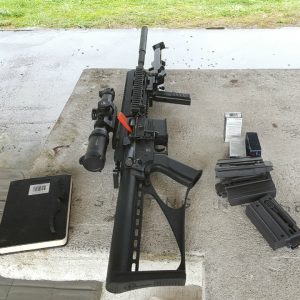
My two rifles for the CNIGC shoot. As you can see, the Protean Innovations bipod is supper easy to slip on and off.
Stability Tracker
Now this is the next evolution in bipods and shooting support. Yup, this is the version after the Gen II, and the features show.
The appearance is refined, and weight reduced, with a single locking mechanism (compared to the two on the Gen II). The function is smoother, and the front attachment trigger is smaller, and less obtrusive.
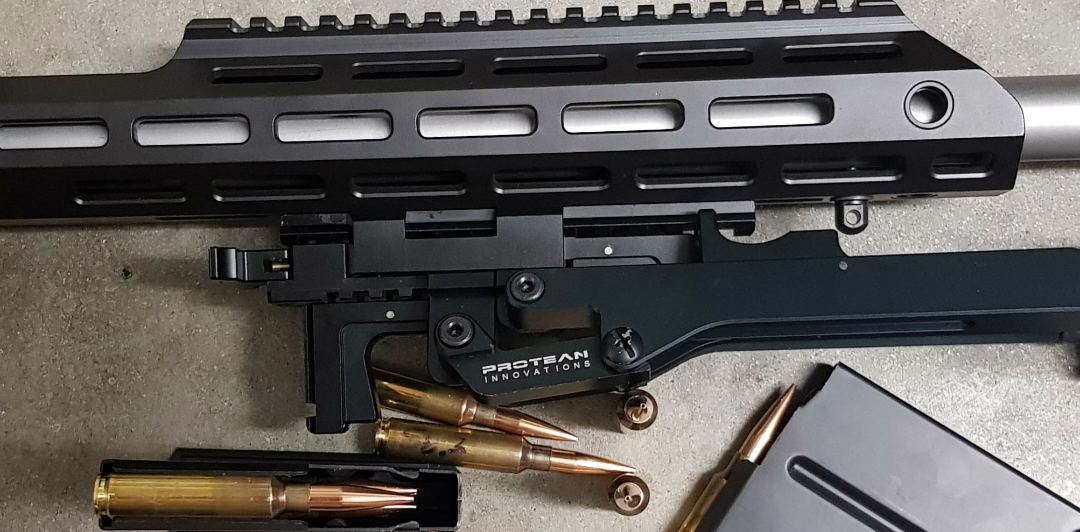
Another feature which aids smooth operation is the integral picatinny rail which the bipod operates on. With rounded and lower profile rail slots, the operation is greatly eased. The whole unit still attaches to your picatinny rail, but less real estate is taken up for the operation of the system, as the guts of the bipod hangs below and moves on its own mechanism. This also allows Protean Innovations to introduce the piece de resistance, the tracking feature.
With a simple flip of the tracking trigger with either your left or right hand, you can now pan your rifle on the horizontal axis, without moving position or lifting your bipod from its place.
At the rear of the bipod, you can see the deployment trigger hanging down, and the tracking trigger, which looks a bit like a toggle, sitting just below the picatinny rail.
For moving targets this allows you to easily introduce lag or lead without twisting the rifle or running out of horizontal movement, which is very limited on traditional bipods. In competition with multiple targets at varying distances and placements from your shooting position, this can mean being able to engage more targets from the same firing position, without having to move and add time to your run.
To lock the bipod back in place, all you have to do is flip the trigger back to its original position, and as the rifle tracks around to centre, it will click in place. It couldn’t be easier.
I used the Stability Tracker bipod, as well as the Stability Grip again, for Simon Gillice’s practical 22LR event. The bipod ran flawlessly, and as at previous competitions, I had a few people coming up to me and asking where and how they could get their hands on what is objectively a cool looking setup.
Gear for the TSSC Pracitical 22LR shoot.
I did have one failure one the day, and as always, I tell the bad with the good. Between stages I noticed the pin on the tracking trigger was coming loose. Thankfully it didn’t pop out during the stage, or it would have been gone forever. So, I pushed it back in and stopped using the tracking feature for the day, and it was otherwise absolutely fine.
When I got back home, Kyle proved again, exactly the type of company they are. He gave me instruction on how I could stake the hole with a nail and hammer, similar to how you stake an AR15 bolt carrier. This repair worked and has lasted well. But, he didn’t stop there. Kyle later informed me that they took the feedback on board, and had sourced oversized pins to stop this happening in the future. This is a company that is dedicated to a quality product and, as their name says, innovation.
This excerpt below from an email directly from Kyle shows that not only did they seriously consider the issue around the pins, but also that they are constantly refining the design, and looking for better ways to support your rifle.
“For a long term solution I have located a supplier here in the US that makes pins that are oversized. This will eliminate this issue all together. We are continually refining the design. The next production run will have a few enhancements where we will remove some more weight without compromising strength, we will fix the press fit pin issue, and we are working on trimming up the leg extension triggers as well to remove more weight. All in all it should all be even better on the next go around by the time we get to it.”
I did also ask Kyle if a canting version would ever be on the market, but he (quite reasonably) said the R&D showed it would not work. He did do the entire redesign, but found that it added considerable weight, unnecessary complexity, and extra moving parts which made the bipod noisy. With all that weighing against the cant feature, he decided not to pursue it. Not to mention the increased cost to the consumer of the extra feature, which would push the bipod into a price bracket that is probably not viable for your average Joe.
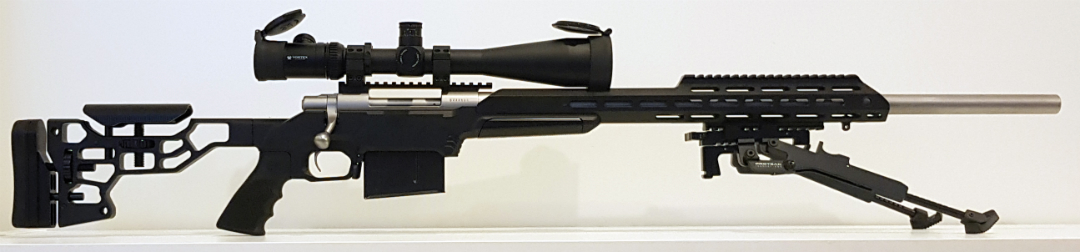
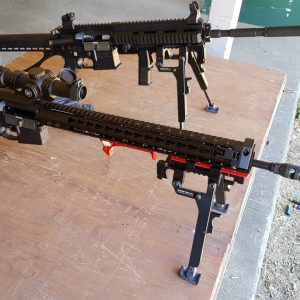
The two models side by side.
I was glad to hear the option had been thoroughly explored before deciding against it, and Kyle has a good point in that you can easily adjust your height using the legs (and extended legs option if you need them), if you often shoot from uneven surfaces. The aim of the system is quick deployment, not lots of finicky adjustment. And if you are on the F-Class line, chances are you are shooting from a flat and stable position. Feedback from PRS shooters and long range shooters has been that a lack of cant has not affected the usability of the bipod.
In our emails, Kyle did say that if he can ever figure out a reasonable way to introduce a cant feature, avoiding the above pitfalls, he will certainly consider it. So, it’s not out of the picture, but it is not a feature the Stability Tracker has right now.
Pros and Cons for the Gen II
The Gen II is a great model, and you can see in it how Protean Innovations continues to evolve their designs. Here are some of the pros and cons of this model.
Pros
High quality, solid metal construction and finish
Can be made more versatile with optional extras (spike feet, leg extensions, stability grip)
Angled shooting positions are easily achieved
Can lower your shooting profile when shooting downhill
Bipod feet designs reduces bipod hop from recoil
Bipod feet design allow for good vertical travel without losing grip
Quick deployment of a stable shooting platform when needed, quickly stowed when not
Interfaces with a common MIL-STD 1913 Picatinny rail
Easily transferable between multiple rifles in seconds
Easy/quick to extend legs to correct length
Cheaper price than Stability Tracker model
Cons
Will need an adapter for chassis or stocks without a rail
It is possible to overextend the bipod rearward if you are in a hurry (I was!). There is a simple fix. Either, get used to the operation and take your time, or, I mounted a picatinny-sling swivel stud adapter that I had lying around (took the stud out), just behind the rearward most point of travel, stopping it from going too far back. Easy fix. You could achieve the same with a rail riser, cut down scope ring, or any other picatinny accessory
If you push upwards on the stability grip while pushing the deployment trigger forwards to collapse the bipod, it can be a bit difficult to stow the bipod. This is a user issue – once you get used to it, it works beautifully
The model is likely to be discontinued as the Stability Tracker takes over as the primary model. If you want one, you’d need to get it in the very near future
Creating a backstop for the Gen II bipod with Stability Grip means I don’t have to think about anything when deploying the bipod.
Pros and Cons for the Stability Tracker
The Stability Tracker really is next level when it comes to bipods. Here are the pros and cons.
Pros
All the same pros as the Gen II, except that it is obviously a bit more expensive. Also;
Ability to pan for lead/lag
Smoother operation during deployment/stowing, thanks to its own integral rail
Simplified attachment compared to Gen II is even easier and quicker to use
Does not have the possibility of overextending during deployment
Cons
Will need an adapter if you don’t have a rail on your rifle
For a high-end bipod, lack of cant may put some off, but trade-off for weight/complexity is justified
Is this the right bipod for me?
Probably. I can’t personally think of a time when I would not use this system. I still have and use other bipods, but all of my rifles with rails or adapters will now be sharing Protean Innovation products. They’re so easy to switch between rifles, and I like the idea of using one system across multiple rifles. Building familiarity only increases efficiency.
The system is as innovative and user-friendly, as it is cool-looking.
I would definitely recommend the Stability Tracker for anyone looking to shoot PRS-style matches at a competitive level. For hunting, I love the low-profile capabilities the Protean Innovation bipods give you when shooting downhill. And for range use, it has pretty much eliminated the hop I used to get from my more powerful centrefire rifles when shooting off the bench – this is probably the biggest highlight for me.
If you’re in the LE/MIL line of work, this testimonial from one of their customers might resonate with you:
“We have had one army sniper use the Tracker while deployed in Afghanistan. His testimonial was that he pitched his Harris after one mission and never went back to it afterwards. Said he used the tracker the entire time during his tour and refused to use anything else.”
Summary
If you’re looking for a bipod that is innovative and actually improves your shooting experience, I would not look past the Stability Tracker by Protean Innovations. It is robust, quick to deploy, technologically advanced, and a joy to use. The fact that the company are so good to their customers, take on feedback, and actually continue to innovate, is just a huge bonus.
So, it’s been an awesome year, both personally, and for The Gun Rack. Having recently started importing Boyds gunstocks, it’s been great to bring Kiwis (and the occasional Aussie) a product they haven’t been able to have for a long time (certainly not at a decent price, anyway).
To celebrate the end of an awesome year, I’m giving away one free stock to one of you lucky buggers. If you buy a stock in our next order, you will have a 1 in 10 chance of having the full cost of your stock refunded to you, including the GST and shipping costs.
This is the last order for the year, and I already have 2 out of 10 spots filled (those 2 guys will qualify too). For the next 8 people who jump onto this order, simply:
Head on over to the Boyds website and find the stock and upgrade options you want
Place your order (this includes payment upfront, as usual)
Wait for your awesome stock to arrive, and hopefully for some cash to hit your bank account too!
If you want to read more about the ordering process, head over here, or email me. Unfortunately the stock won’t arrive before Christmas, as it takes a while to manufacture, ship, get through customs, courier, etc. However, if you are the lucky winner, you will get your money back as soon as the order is complete (which will hopefully be before Christmas!).
The winner will be chosen using a random draw method of some description. The decision will be random, and it will also be final (And no correspondence will be entered into, etc, etc,. Basically, I’m giving away something free, don’t be a douche if you don’t win).
Merry Christmas everyone, and thanks for being part of The Gun Rack community and our journey importing Boyds gunstocks into NZ (and AU). I’m hoping in the new year to be bringing in some other cool bits and pieces – will keep you updated on that.
I think I need to start this article off by saying my wife is awesome. Not only for all the usual reasons, but also because she’s very understanding of my shooting habit (habit, not hobby – I am addicted). So, for Father’s Day this year my one year old son, with a bit of help from my wife, booked me a hunting trip with Richard from Balnagown Hunting.
Before the start of October rolled around, I was able to get out for a day with Richard, and spend some time on his amazing property, appreciating some great game animals and other wildlife.
I’d already been to Richard’s place, when I attended one of Kerry’s Deer Processing courses, where Richard shared his knowledge on how to gut and skin a deer efficiently. Country Meat Processors were also there, and showed us how to butcher an animal that had been hung for an appropriate length of time (i.e. we didn’t butcher the deer we had just skinned).
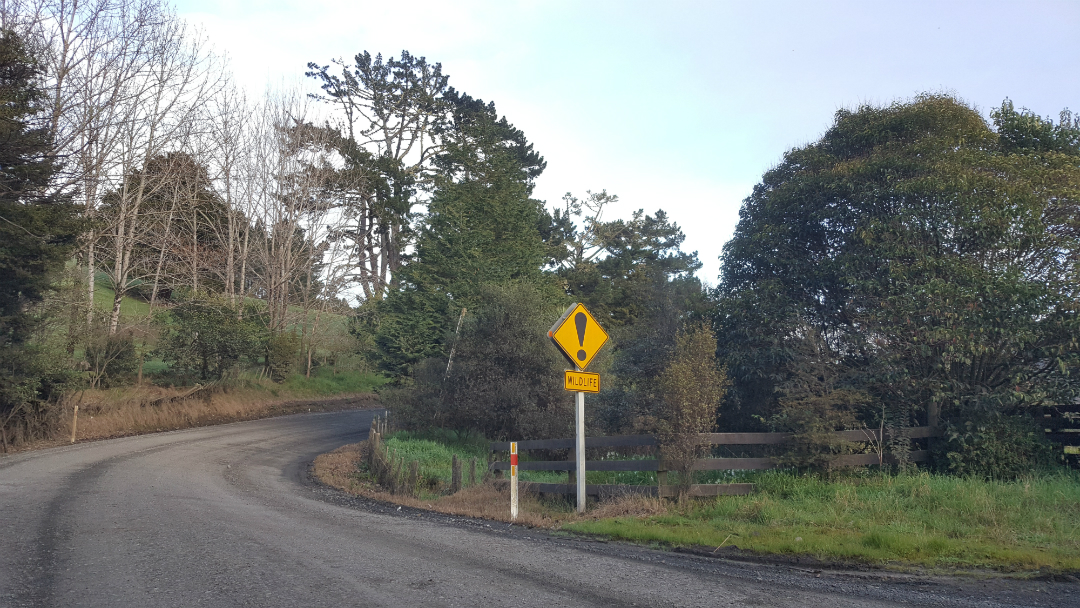
Anyway, I digress. I punched the familiar address into my phone and commenced the 1 hour 13 minute drive from my place in Pukekohe, to Balnagown, which is just a bit further than Kaukapakapa.
Richard assured me beforehand that he had everything I needed, so don’t go out buying new stuff if I didn’t have anything on hand. This is great for any new hunters who don’t have the spare cash to get flash camo gear, or who don’t know what they might want to invest in long term.
Is this what they mean by finding “sign”?
However, I came fully prepared and met Richard at the Wool Shed, where we compared our Tikka rifles and had a general chat. He took me through his safety and hunting procedures, focusing on when to load up, who will be loaded at what time, and when your finger touches the trigger, as well as reloading immediately after taking your shot. After signing in and enjoying a coffee, we checked each other’s rifles were unloaded and went for a walk.
Richard had been telling me about some previous clients who had spotted a deer 5 minutes into their hunt and wanted to take a shot. Of course Richard told them to hold on, and get a bit more out of the experience than a 5 minute walk into the pines. He reckons they were fishermen, and that a catch in the first 5 mins certainly wouldn’t be thrown back. And I get that, but after putting so much time and effort into preparing for a hunt and a hike through nature, shooting in the first 5 mins and heading home within an hour seems like a waste of an experience to me.
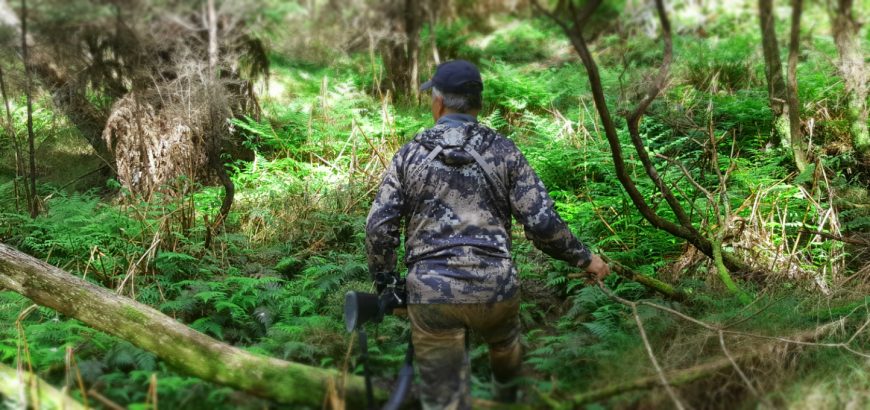
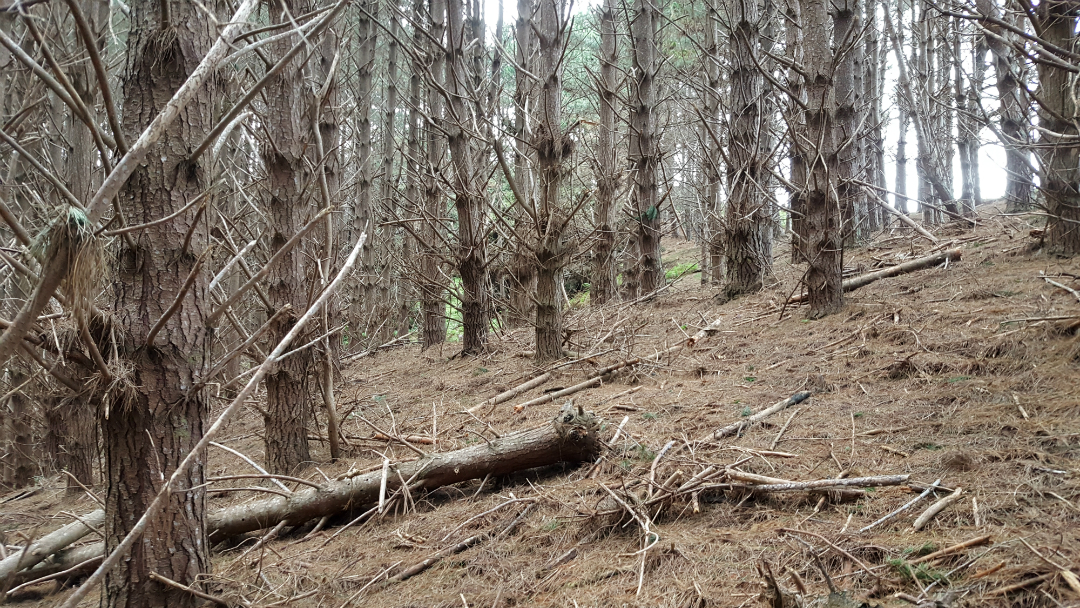
Well, true enough, we bumped into some deer within the first 10 minutes. We came across a couple that Richard spotted with well-trained eyes, and we watched them for a bit before moving on. He pointed out some does and fawns in a paddock as we progressed along the edge of the forest/bush hunting area and rounded our way into a block of pine that Richard planted when he first bought the property.
The well-established trees and dry, brown pine needles provided perfect cover for the fallow deer in between their winter and summer coats. In fact I spotted a buck across the pine block, but he was so well camouflaged that I had to check with Richard if I had seen right, or if my eyes were deceiving me.
See a deer?How about now?
As we exited the pines along a ridge, Richard shared his technique for spotting deer in a valley from behind a ridgeline, without being made out by the deer. Not only the deer down there, but also the animals across the valley on the opposite shoulder, who might see us and bolt, alerting our quarry to our presence.
We could see a few animals here and there across the valley and around the opposite ridge, and we decided to keep going around the edge of the property, through some native bush, and circle back to a purpose-built blind where we could hopefully spot some animals to stalk up on.
We kept low as we transitioned from the pine block over the spine of the hill and into the bush. We spotted some fat wood pigeons and had a chat about possums and rats, when all of a sudden we saw ahead a beautiful doe, on the larger side, standing broadside in the middle of a clearing. We hushed and kept still, observing the animal and seeing if she had spotted us.
Watching and listening under the native canopy was great – try spot the fat wood pigeon!
Unaware of our presence, she continued to graze and Richard whispered, “That’s not what we’re after.” We continued to observe for a couple minutes. “Don’t worry,” I eventually replied. “I’m not in a hurry.” I was there for the full experience of Richard’s guidance, and there was still plenty more ground to cover. From what I had seen of Richard in the Deer Processing course, I knew this man had a wealth of knowledge to share. I certainly wasn’t going to get gung ho and pick off an animal an hour in, just to pack up and get home by lunchtime.
We quietly moved off into the bush and made our way south west, keeping our eyes open for sign and animals. After a while we came to a clearing with some very fresh droppings, obviously where some animals had camped the night before. Richard quickly spotted a few deer amongst some dead gorse. I can’t reiterate enough how good his eyes and instincts are. It took me an age to find them, looking off in completely the wrong area. Even when I did find them keeping them in sight amongst the dead, dust-coloured gorse was definitely a challenge.
There was a buck flanked by two spikers, and Richard urged me get my rifle in place and crawl up behind it, while he kept low and spotted for me. The wind was in our favour, gusting gently at around 7 or 10 mph, straight into our faces. There was no way they could smell us.
We waited about 10 or 15 mins for them to move into a clearer patch amongst the gorse and ti trees, when Richard told me to quietly and slowly shift behind another bit of vegetation where I’d have a better shot. Once in position, I realised I had nowhere near enough elevation to make the shot at the deer which were higher than us, unless I want to try an unsupported shot, but there’s no way I could hold that position for 10 or 20 minutes and make a good shot.
I whispered that I was going to shift back a foot or two, so my body was on a better incline behind the rifle. With the bipod at full extension, I now had a good view of the deer. We waited another 10 minutes, sitting silently and stationary, with the wind in our face. Everything was in our favour, with nothing to do but wait for a clean shot.
Then they bolted.
The buck did a quick sidestep and ducked into the bush and out of sight, with the two spikers hot on his heels. Richard laughed. “They’ve got a sixth sense.” He said. And they certainly do. He couldn’t have heard us or seen us, but something didn’t feel right and he decided to get out of there. “That’s why he’s still alive,” Richard said, “Clever buggers…”
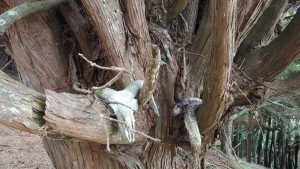
Richard has a knack for decorating.
Richard’s admiration for the animals he hunts was clearly evident throughout the day, as he discussed how intelligent and aware they were. His knowledge of their habits was equally impressive.
We picked up our bits and pieces and moved off along the edge of the property to see if we could come across the three males again. We did spot some very fresh sign, but they were gone. And the cheeky sods obviously led us through the gorse. Thankfully not too much of it. We continued through the bush, and pushed through to a large downhill slope, thinly dotted with trees. At the bottom of the hill I could see Richard’s blind.
We meandered our way down and took a seat for a while, glassing the valley to see if there were any animals worth stalking up on. There were a few groups of does and fawns, but no good game animals immediately apparent. We had a bit of a chat and Richard told me about some of his older clients who aren’t up for a long trek through the bush, and how they sat patiently in the blind with coffee and snacks and waited for deer to come into range. Not what you think of when you think of New Zealand hunting, but hey, if I still wanted to get an animal every year when I’m 80 and my legs wouldn’t take me through the bush, maybe I’d do the same.
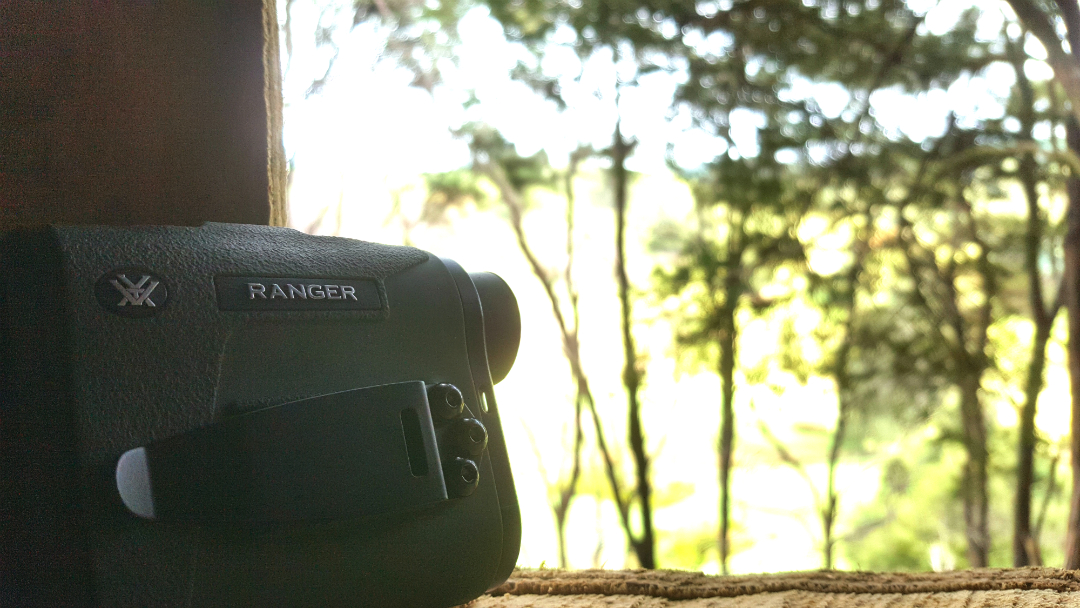
I was told to take a rest while Richard went off to scout for a few minutes. I pulled out my Vortex Ranger 1500 and spent some time practising estimating distances, and then confirming with the range finder. I won’t say what my strike rate was, but I am improving! I had a bit of water and watched as two swallows decided to play fight around the blind.
The Vortex ranger proved handy throughout the day, lining up potential shots, and was also good fun to test myself against during down time.
After a while, I began to wonder where my guide had got to. He was quiet, and invisible. Eventually, he came back, but the report wasn’t good. Although he managed to sight a fair few animals across the valley, no groups had any decent spikers, they were mostly concentrations of does and fawns.
So, we made the decision to leave the blind and climb up a ridge to look into the next valley. It was good to get moving again, even if it had only been 20 minutes or so. It wasn’t long before we were out of the trees and covering some open ground uphill to our next position. All the while, a trio of Paradise ducks had decided to fly overhead in a holding pattern, squawking away our position to every creature under the sun. Before long, we had crested the hill, taking care to peek over the top, looking for game.
After a couple furtive glances over the top, we concluded everything on four legs had retired beyond the tree line, and so we moved on a bit before taking a seat and glassing the valley. On the way, Richard showed a patch of fence that had seen better days. “Bucks have been fighting here,” he pointed out.
We sat for a while, looking over at a handful of goats to our left, seeing if a deer or two would give away its position by interacting with them. No such luck. Keeping an eye on the tree line across the valley, we saw a deer come out a couple times in the same spot, but no further activity. We glassed a bit and I played around with the rangefinder, estimating distances to where we saw the deer, the opposite side of the valley, and checking out the goats too. We took a guess at the distance to the goats, and were both surprised it came in at 103 metres.
“Doesn’t seem like a whole rugby field between us and them, does it?” I asked. “That’s just what I was thinking!,” replied Richard. It was interesting to note how the changes in terrain made distances hard to estimate.
We continued to see if there’d be any more activity at the valley floor where we saw the deer before, swapping stories. Richard told me how he had come to acquire his land, and how different it was trying to get a home or a slice of paradise back then, compared to now. Both challenging times, but different challenges. We even ended up talking politics, work, and all sorts of nonsense. The deer didn’t come out again and the goats weren’t being the deer-Judas they might have been.
So we picked up again, and rounded the shoulder of the hill, getting ready to tackle this last stand of native bush before heading in for lunch and trying our luck again. After getting under cover and out of the midday sun, it wasn’t long before our eyes adjusted and a couple young spikers made themselves apparent. Richard confirmed I was loaded and indicated for me to take the lead and begin stalking cover to cover to get a clear shot. As I progressed to cover, trying to keep the trees between myself and the deer, I realised we had walked around into the wind, and it was no longer in our favour. Thankfully it was still for the moment, but any puff of wind would carry our scent right towards our waiting quarry. The wind was the least of our concerns, as the closest spiker saw or heard a bit of movement from my direction and decided to skip along a bit.
They hadn’t seen me yet, but they were aware of my presence, or at least the presence of something that wasn’t there before. The pair went down towards a stream, putting more cover between themselves and my rifle. Over the next ten minutes of tiptoeing through the fallen leaves and branches I spotted them twice more, but only briefly each time, before they got spooked enough to run off where I couldn’t see them or catch up to them.
By this point I had descended about halfway down to the stream, and Richard was waiting a bit higher up towards the tree line. I signalled to him to see if he still had eyes on the two animals, but he shook his head. I wandered up to his position, thrilled from the chase, but annoyed I couldn’t quite close the gap.
We headed towards the bottom of the valley, and Richard gave me some pointers on stalking while we walked down. “Don’t look at the deer,” he said. “You know where they are. Just walk directly to your cover, keeping the tree between you and them – you can re-check their location when you get there.”
We talked a bit as we walked, but mostly in a low whisper. There were plenty of animals in this patch of wood, taking shelter from the heat of the day, browsing amongst the fallen leaves. Some movement ahead revealed the location of a few deer.
Right. On point again.
We weren’t far, maybe 150 metres away when we spotted the group moving around their grazing spot. I went forward, remembering Richard’s advice, moving from cover to cover in a straight line. Richard stayed back with his binos, keeping an eye on the deer. I turned back once I had reached the small group of trees to see if Richard still had the animals in his sight. He had his phone out, taking pictures or a video of me approaching the group. So I took that as a yes. No pressure!
From where I stood, I was definitely close enough to take a shot. I knelt down next to a small tree, holding the forend of the rifle against the trunk with my left hand, creating a rough and ready support. I looked through the Diamondback 4-12×40 scope, and moved the magnification ring up to about 6 power so I could get a clear picture of the deer amongst the dry, brown foliage. I had a quartering shot on a smaller animal, but it didn’t feel great. The deer was moving around slightly as it nosed through the leaves and undergrowth. I didn’t want to take a desperate shot and risk shooting it in the hind quarters if it decided to turn. I knew the 140 gr ELD-M was leaving my 6.5×55 fast enough to shatter the leg and hip bones if struck there, meaning the deer wouldn’t get far and a follow up shot would be needed, but I preferred to make a clean shot that would minimise suffering for the animal, and do less damage to the meat as well.
As I was thinking all this, the deer made up my mind for me and turned to follow a couple old does off to my right. I tracked them in my scope until they came to a stop, but now I had a new problem. The multitude of native trees made for great cover for me, but also got in the way of a clean shot. Time to move.
I headed towards another small group of trees that would keep me from view, but allow me an unobstructed view of the browsing deer. I was almost to my chosen cover when a smaller doe turned around a tree, and looked straight up at me. She stood stock still. Okay, she hadn’t seen me, but she certainly saw or heard my movement. Now I had a decision to make. This young deer obviously hadn’t developed the experience of the older animals, and was still curious enough to try and figure out what was going on, when a deer a couple years older would have done a little jump and buggered off, taking the whole group with them. How much time did I have to take this shot? There was no way to try and take cover and wait for the group to present a better animal. The ponga next to me wasn’t exactly going to hide my 6’2” and 100kg frame.
Standing square on to the animal and with no support in sight, an offhand standing shot was not looking like a great idea, as I would have been way to unstable. Taking the time to move my feet into position and raise the rifle would be all the time the doe needed to make up her mind that she didn’t like the look of me. So, I tried the opposite. I slowly sat back, keeping my upper body as motionless as possible. I felt my water bottle get in the way, and wasn’t sure if I’d get a good seated position with it hanging off the back of my belt. Screw it, I was going to try anyway. I put as much weight on the bottle as possible without making a noise or unbalancing myself. Not bad. I won’t put my water bottle there again, but I was stable enough.
I was still square to the deer, with my feet out in front of me. I slowly lifted the rifle to my cheek and got my elbows settled into the tops of my legs, just behind the knee caps. Feeling pretty stable and good about my position and shot, I took the Tikka off safe with a slight move of my right thumb.
All of this positioning took seconds, even though it felt like I was moving at a glacial pace. I now had a good view. I felt calm and my breathing was good, as I had taken my time to settle into the shot. The young doe continued to look in my direction, but still not quite making me out amongst the low scrub.
Looking through the Vortex scope I could see the deer standing basically broadside to me, on a slight angle, with her head up and looking in my direction. I definitely only had a few seconds to decide on taking this shot or giving away my position and letting the group get away. An older doe walked behind the one I was glassing, and I was tempted to switch targets, given her much larger size, but the small break in the trees that I was aiming through wouldn’t allow me to shift enough to the right. The older doe moved on, heading towards my right, and I continued to check out the smaller animal.
There was a something in the way of my shot, right around the heart and lungs. I backed the scope out to 4 power and got a bit of a better focus, given the short range I’d stalked up to. The brown blob in my way was just a bunch of leaves. That’s fine, I knew where this shot was going, I could see enough of the animal. I focused on my breathing for a second, exhaled and squeezed the trigger on my Tikka.
The sound of the shot sent the rest of the animals running. I counted 6, Richard reckons 7. And I only saw 2 or 3 when stalking in. Damn these animals can camouflage. The doe dropped on the spot, falling backwards into the leaves, exposing her white belly. I watched her, knowing she wasn’t going to move at all, but I remembered to reload again anyway and continued to watch the animal for a few seconds. Richard walked up and congratulated me on the shot, shaking my hand after I had unloaded the rifle and picked up my stray piece of Norma brass (wasn’t going to leave that behind).
I put the magazine and brass in my Hunter’s Element pouch, which sat on my left hip, and pulled out the Vortex Ranger 1500. I placed the illuminated crosshair over the white belly of the doe – 53 metres. No, not a long range shot, the challenge was in stalking up close to the group. I was happy with that. I could only imagine the thrill of the chase for a bow hunter, who gets within feet of his prey. Speaking of which, Richard was talking about opening up a bow only hunting area, but that’s another story.
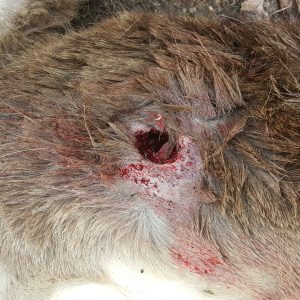
I walked over from my shooting position, and inspected the animal while Richard took a couple photos for me. As I was walking over I could hear a motor start up and a quad bike heading in our direction. When I got to the deer and inspected the shot placement, I was happy with what I saw. Below the spine and in line with the shoulder, the shot, taken from a higher elevation, had passed through the lung and left a decent sized exit hole on the other side, gushing blood from the wound.
A decent exit wound on this lung shot, thanks to the Hornady ELD-M.
The 6.5mm 140 gr Hornady ELD-M travelling at 2740 fps was probably overkill for this size animal, and a .223 or .243 could easily have done the job, but I was happy with the clean, emphatic kill.
We only had a 100 metres or so to go the edge of the tree line, were Richard expected his son was driving their quad to meet us. We dragged the deer downhill, talking about shot placement and other bits and pieces as we went. I was still buzzing from that stalk.
We got there in a few minutes, and did a final unload and show clear, as Richard’s son pulled up on the quad. He had been preparing lunch when he heard the shot, and decided to come and pick us up. The deer was tied to the front, and we climbed on the back with the rifles, heading towards the hunting hut where we had previously done the meat processing course with Richard, and Kerry from The Bloke.
As we pulled up, there was water on the boil for a cup of coffee, and a good ol’ Kiwi BBQ spread being put on. Our timing couldn’t have been better! I washed the blood off my hands, took off my water bottle and belt bag, and sat down for a hot meal and a coffee with Richard’s family. We discussed the day’s events and other items, and before the others left and Richard and I got to gutting and skinning the deer. It had been a while since I had seen Richard’s pretty awesome technique, so I was glad to get another opportunity to learn this part of his process. If you’re ever looking to learn a bit more or refine your gutting/skinning method, one of the Hunter Education courses is certainly worth the time and money.
We packed the carcass into a vehicle and cleaned off our knives, hands, and the covered deck area where we had hung up the deer. I received a quick tour around the hut and some new “glamping” accommodation Richard was building, overlooking a waterfall and some native bush. From there, we headed back to the main house and my vehicle, my day of hunting complete. Given that I was going to be back in the area in a week, Richard kindly offered to take my deer down to Country Meat Processors in Kaukapakapa for processing into steaks and mince.
Overall, the day was fantastic, and I can see how Balnagown Hunting attracts so many repeat customers. I determined before I left that I’d definitely be back, maybe taking my wife for her first hunt.
Removing and disassembling the bolt of a Swedish Mauser is a pretty simple affair and may need to be undertaken for any number of reasons. Most commonly, you’ve picked up a rifle nearing a century in age, and there’s a lot of gunk and crap in there that needs to be cleaned out. The other scenario is that you could be modifying your bolt to cock on close, or reduce lock time with lighter materials and a stronger spring.
Hopefully if the latter is your reason for stripping a Mauser bolt, you’ve inherited or bought a sporter – there are fewer and fewer whole specimens left.
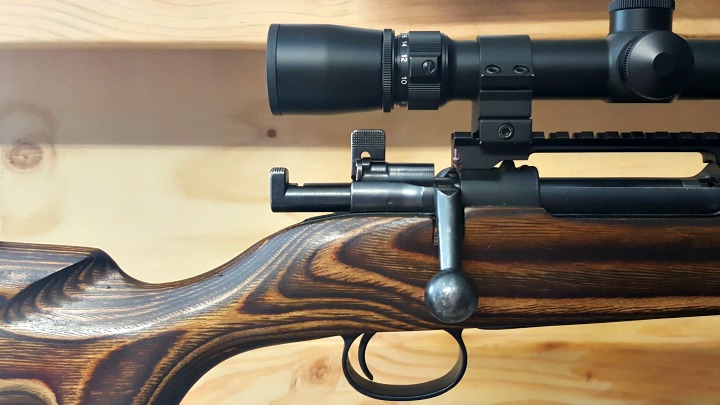
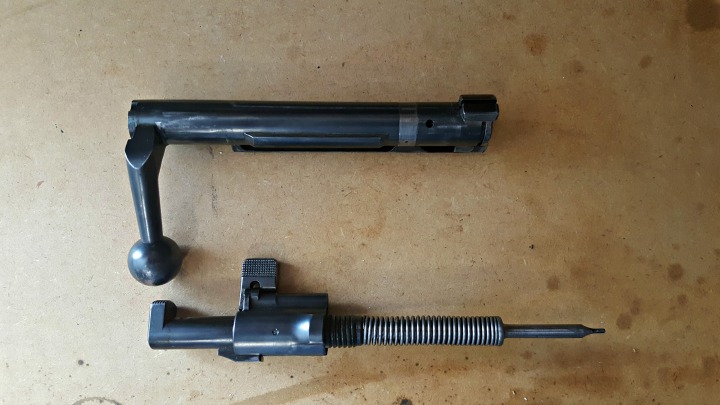
Below are a series of pictures showing how to disassemble a Mauser bolt (small ring, not a K98). If your bolt looks different, don’t fret. This is from a commercial rifle, not a military conversion. It has a blued finish and a bent bolt handle, which thankfully clears my Weaver 44/40 scope, thanks to an EGW 20 MOA rail. If you’re wondering how the extra height affects consistent cheek weld and sight lines, a Boyds stock with adjustable cheek rest helps out there.
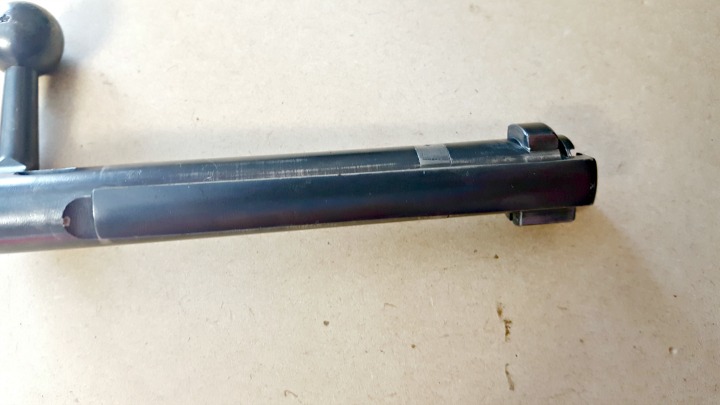
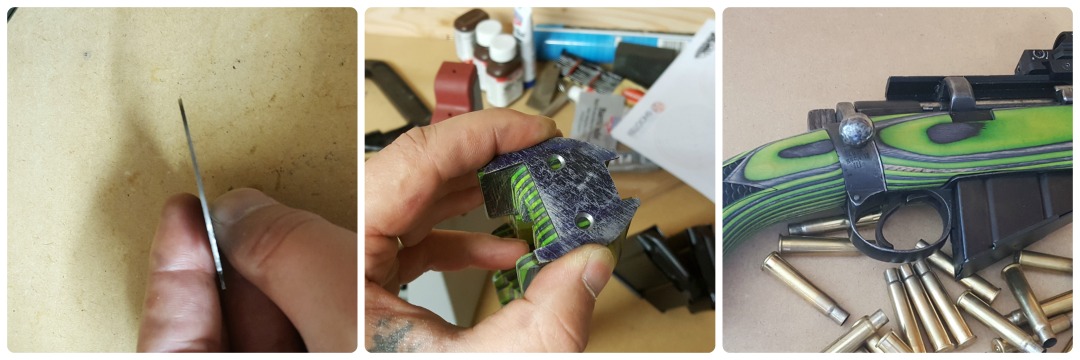
Step 1 – Get the firing pin out of the bolt body
After checking the rifle is unloaded, close the bolt fully.Lift the safety lever into the upright position and remove the bolt without lowering the safety. You may need to remove your scope if the safety won’t clear it.The bolt shroud should easily unscrew from the bolt body now. Note the cocking piece is held under spring tension by the safety lever.The firing pin separated from the bolt body. Again, note the spring and firing pin are locked back – if you don’t do the next step carefully, the spring, cocking piece, and firing pin could separate with a fair amount of speed and force.
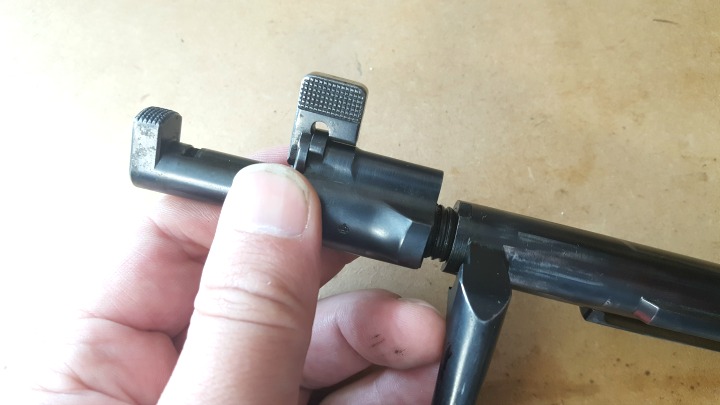
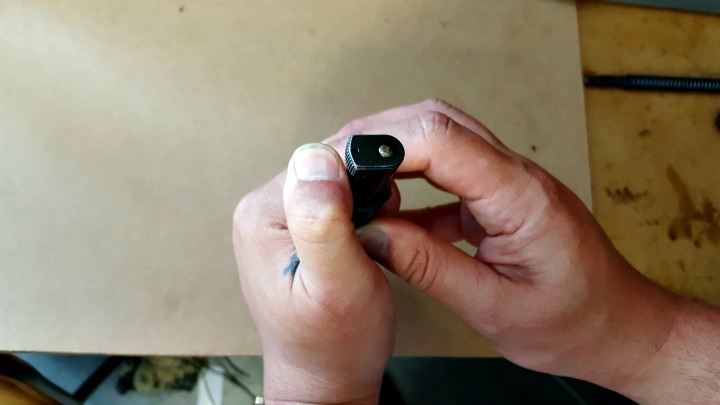
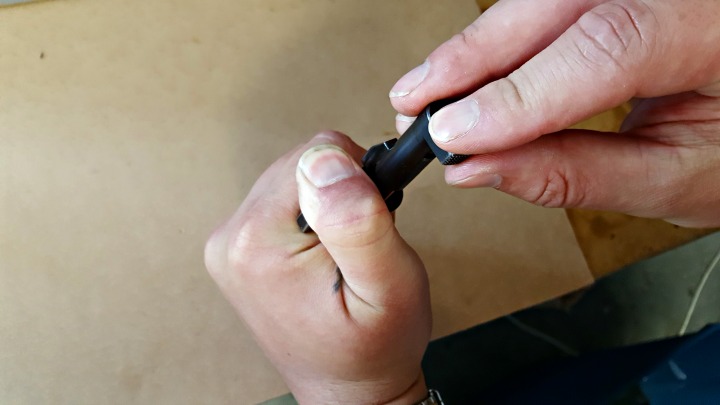
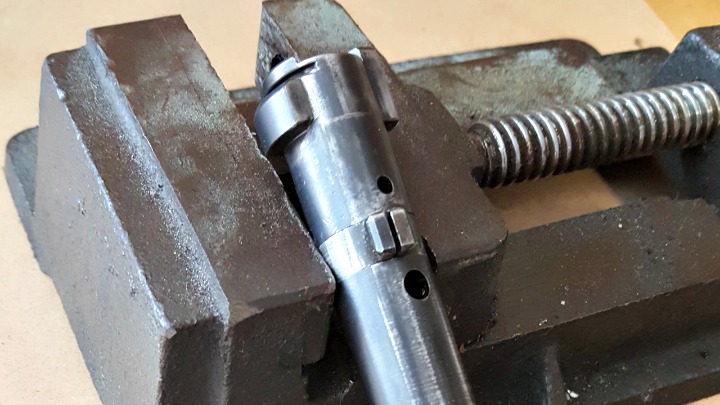
Step 2 – Separate the firing pin from the bolt shroud
Find a hard surface you don’t mind denting. Or, if you have an original stock with brass disc, you can use the indent for this step. With the firing pin against your hard surface, force the bolt shroud downward. The safety lever provides a good amount of purchase.Twist the cocking piece 90 degrees. At this point make sure you have a firm grip on the bolt shroud and firing pin, and slowly release the spring tension to avoid sending pieces flying.Fold the safety lever all the way over and pull it back to separate it from the shroud.Shroud, cocking piece, spring, safety lever, and firing pin.
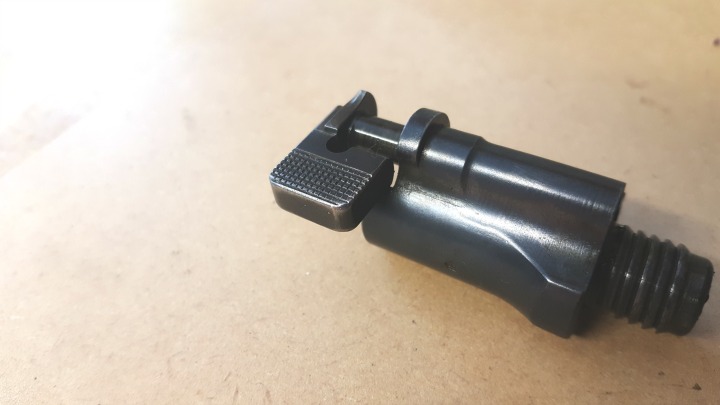
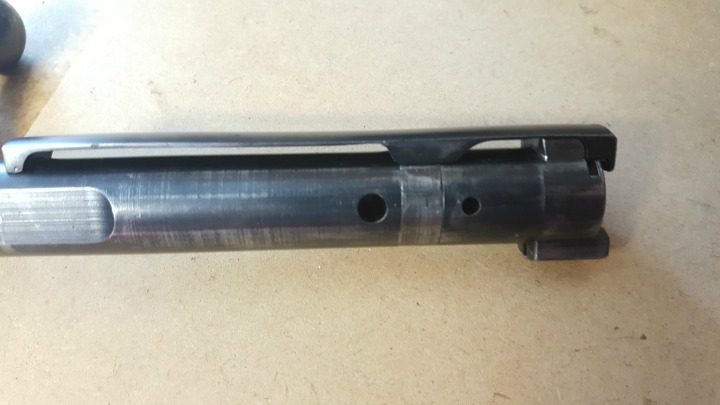
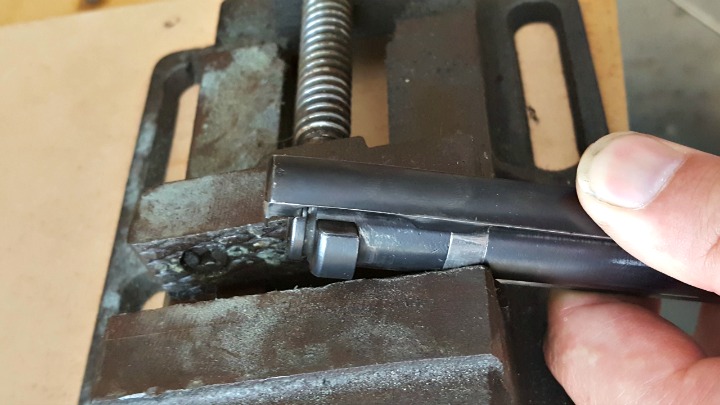
Step 3 – Remove the extractor from the bolt body
Note the extractor sits in a groove just before the bolt face.Rotate the extractor about 90 degrees so that it exits the notch.Apply downward pressure with your thumb, as you slide the extractor forward. Remember this sweet spot, as you’ll need to apply pressure in the same spot to get the extractor back on.Getting this collar off is easy, but you will stretch it as you do so. A flat screwdriver can be used to pry it open if needed. Getting it back on once it has been taken off is harder, and a vice of some sort will be handy, as you’ll need both hands to get the extractor back on.When reassembling the bolt, getting the extractor onto the collar is probably the hardest bit. If you have locking pliers or a small vice, it shouldn’t be hard to slide the slot on the underside of the extractor onto the collar. Remember where you applied downward pressure to remove the extractor – this is the same spot you need to apply pressure to as you slide it back on.
From here on, the rest of the reassembly is easy, and is simply the reverse of the above.
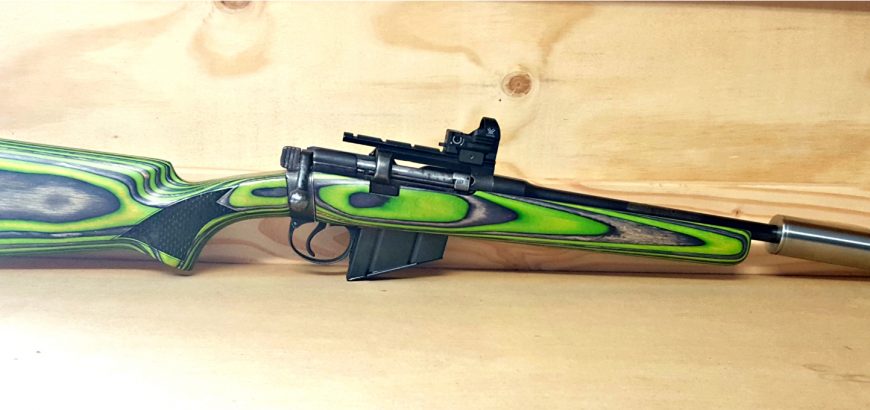
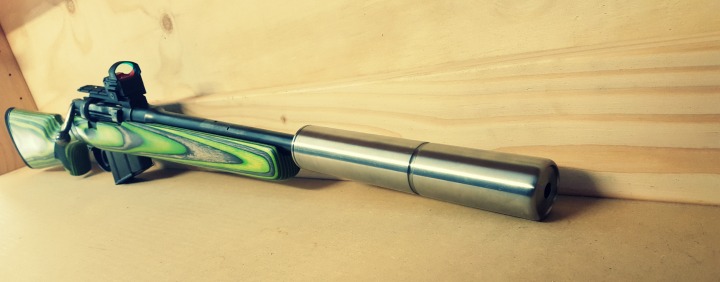
This particular rifle is a quiet bush monster. Monstrous in appearance, but suppressed and subsonic in its implementation. There’s a lot that’s gone into this particular rifle, so – fittingly – we’ll do an entire article covering the various bits and pieces, and the decisions that led to each of them.
One decision that was, unfortunately, made for us, is that I’m no longer going to have the rifle Cerakoted, as a dear and valued member of the NZ shooting community, Victor Alberts, passed away recently while on holiday overseas. Victor was the applicator and artist behind Cerakote NZ, so necessarily we’ll be looking to sort out some other means of protecting the metal on this bush gun.
The rifle that defended the free world – twice
The Short Magazine Lee-Enfield (SMLE) rifle was featured in both world wars and a host of conflicts all around the world. Its younger brother is only now being phased out of service with the Canadian Rangers, who will have a locally made, licensed version of a Sako product (T3 CTR). Other weapons have been trialled, but none compared to the reliability of the Rifle No 4 Mk 2 (since 1941 – not bad).
Even still, the old Lee-Enfield is a devastating tool in the hands of irregular forces around the world, who do not have access to more modern weaponry, or who perhaps have an abundance of old Commonwealth stock. With ballistics and firepower not too far off the .308 Win, it’s not hard to see why the rifle has kept pace.
Anyway, I digress. So, this stunning piece of history came to my possession in a sorry state. Which is okay, as I was keeping an eye out for an old beater that could be beautified without destroying a battlefield artifact.
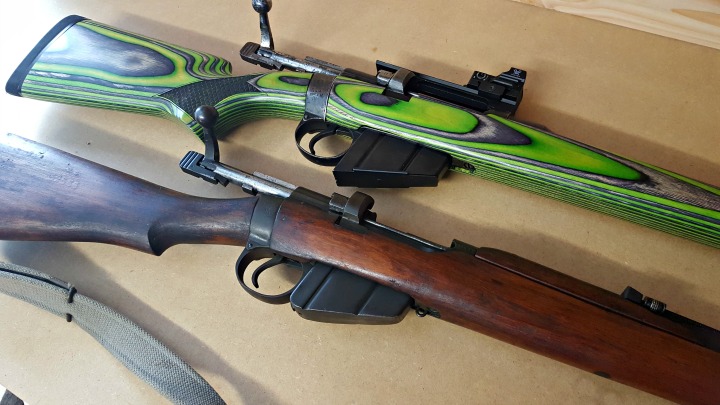
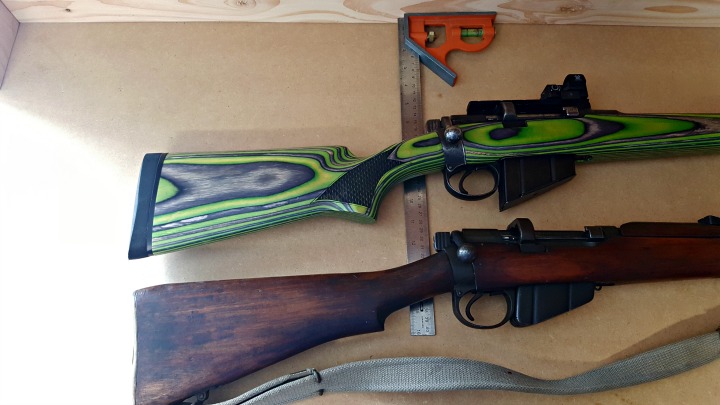
My 1943 SMLE (above) was in a sad state when I bought it – compared to my 1942 (below) which will stay unchanged.
One of the problems with using a wartime rifle (1943), that was mass-produced with unique ‘improvements’ and variations across the world, is that you are bound to run into quality issues. In contrast, I do have a 1942 Lithgow rifle which is beautifully symmetrical and well-machined (even if it is left a bit rough in some areas). But this made-in-Britain wartime specimen is a product of its environment, and loose tolerances, rough surfaces, and poor bluing are to be expected.
In hindsight, I really wish I’d done this build off a Rifle No. 4 instead of an SMLE No.1 Mk iii, as the action lends itself to being rebarrelled to higher-power cartridges, but that may have taken this build in another direction altogether.
If you’re considering a build on a No. 4 or even No. 5 action, Boyds thankfully caters to those, too.
Taking apart the two-piece stock
The Lee-Enfield is everything a modern precision rifle is not. It’s not free floated, the stock is not a single piece and and the ergonomics are all wrong. However it was well-suited to winter clothing and putting a lot of lead downrange, so we can’t really judge the designers for that.
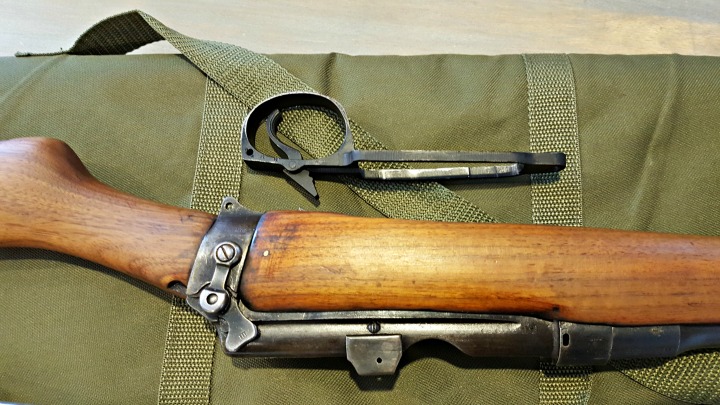
The two piece stock is easily taken apart with some screwdrivers, and potentially a socket driver if you don’t have a really long flat head screwdriver. Check out the easy tutorial here (with lots of pictures!).
Not many rifles will have the trigger come out with the floor metal.
Fitting the Boyds Field Stock Design
Final fitting will be needed.
One thing I love about Boyds stocks is seeing the precision lines in the inletting. Now. Take a look at your naked Lee-Enfield. There is not a single square section on that thing. Because the action has so much inconsistency in shape and finish, I spent a fair bit of time sanding and filing around the top of the action and inside and around the sear and trigger slot.
The area around the mag well also needed some relieving of material to get the floor plate sitting properly again, which allowed the barrel channel to move into the appropriate position.
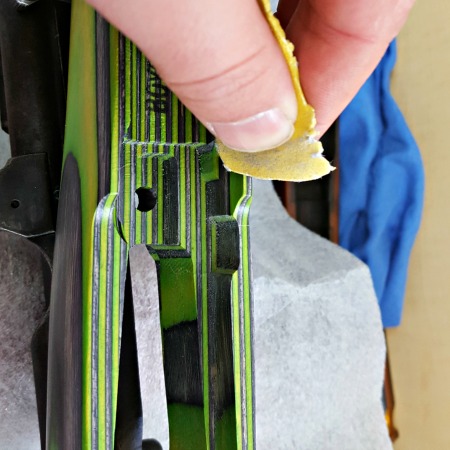
I found it really useful to mark the action with engineer’s blue (a permanent marker will do), to find the high spots on your action that necessitate removing some more wood.
Please be careful removing material, as it’s a lot easier to take off than it is to put on! While I say I spent a lot of time on this, that doesn’t mean I shaved off a lot of the laminate. Rather, I spent a lot of time making sure I didn’t take off too much, so I could still have a snug fit.
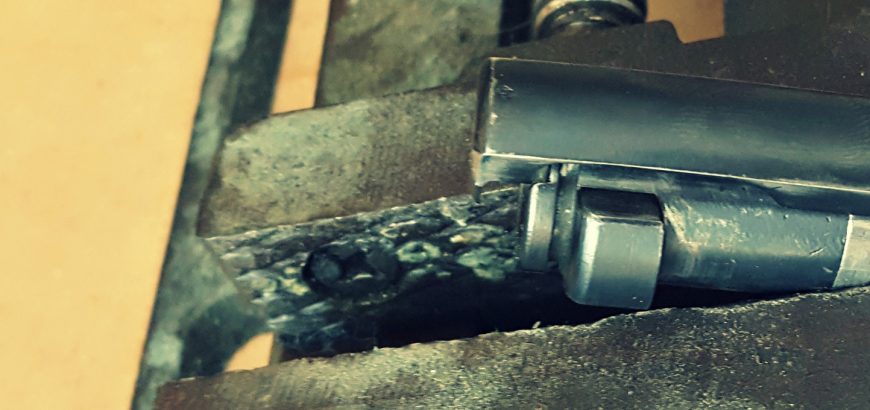
When fitting the butt stock, shaving off a small bit of wood off the top of the donut-shaped insert allowed the laminate stock to snug up nicely when I tightened the bolt. However, on the forend side I found there was a bit of a gap between the wood and the characteristic steel band which forms the rear of the receiver and separates the forend and butt stock. I had a shooting buddy of mine machine up a shim to bridge the gap. He put in some counter sunk holes so that I could screw it into the stock once I had all of the metalwork (including the shim) coated, however it’s so far been held in place by friction and is doing just fine.
The shim held in place by friction fills a small gap between action and stock. Once coated with the rest of the metal work it will blend in well.
The gap between the forend and steel band I’ll put down to variance between manufacturers of rifles over time. I measured this strip of metal on my two SMLE rifles (one year apart, but one from Australia and one from the UK), and found a 1 mm – 2 mm difference in broadness.
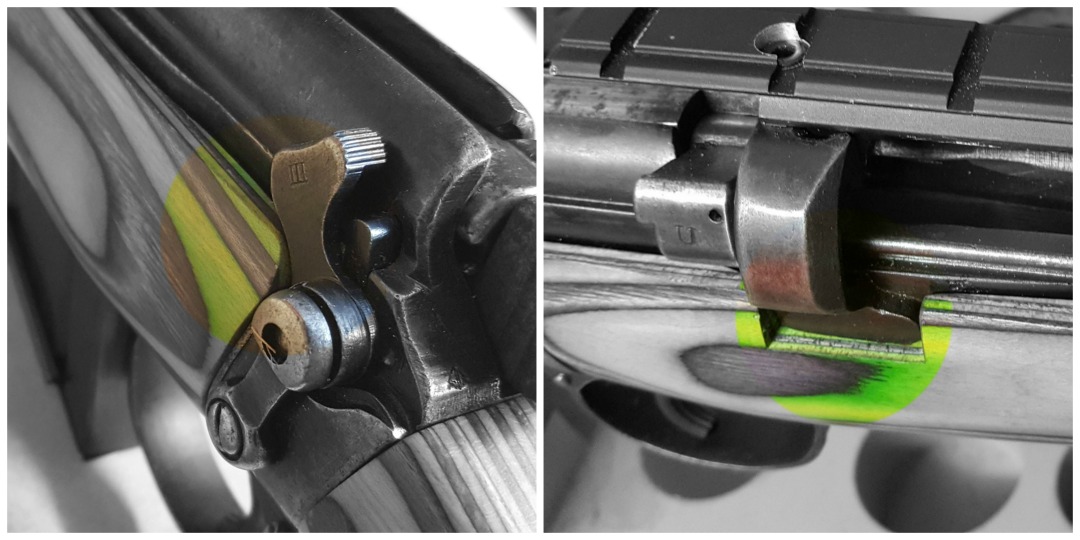
You will definitely need to take out some wood where the rear ring of the receiver interrupts the line of the stock, and also where the safety lever goes in the forward position.
A radius and a square cut will make room for the safety lever and the rear action ring.
Positives of the Boyds Field Stock Design
If you’re looking to improve your Lee-Enfield Rifle or SMLE, you have three options:
Restore the wood with new old stock or modern replicas (on a No 4 this is feasible, on a No 3, near impossible)
Put it in a plastic stock, which will reduce weight, but will deliver more recoil, and increase your noise in the bush with its hollow construction
Choose a hardwood/laminate solution
I’m assuming you landed on option 3, which is why you’re here. The hardwood solution is not only inline with the character of the gun, but also just feels right. I have a couple battle rifles in modern plastic stocks, and I’m too embarrassed to take them to the range, and too put off by the handling and feel to really enjoy them.
The Boyds Field Stock Design (and any of their stocks, really) is a re-imagining of the stock design based around the action and the shooter, not simply a replacement of the existing furniture. This means you can expect an increase in accuracy, stemming from various feature improvements, such as a better inletting, length of pull, cheek weld, positive grip characteristics and also added rigidity when compared to plastic aftermarket (or even original manufacture) stocks.
Line of sight
I found that the Boyds stock in particular raised the eye-line perfectly for the old rifle. With the original stock, if you try and get a positive cheek weld, you’ll be looking at the top of the action. You have to raise your head a bit and compromise your repeatable position on the rifle in order to see the iron sights.
Lining the two up by the rear of the bolt, the difference in drop is quite evident, as is the angle of the butt pad – both changing the handling characteristics of the gun.
With the Boyds stock, the decreased drop on the comb means you are looking straight at the iron sights. If you had a low mounted scope, you could use this quite easily with little compromise in cheek weld. I have a Vortex Razor HD red dot sight mounted on mine, which, unfortunately, means added height to the optic. However, this doesn’t bother me because, with its unlimited eye relief, I can have my head just about anywhere on the stock and still have an accurate sight picture.
Solid construction
The Boyds stock is not only solidly made with highly advanced resins, but it feels more substantial when you’re shouldering or handling the rifle. The forend fits an adult male hand well, unlike many skinny stocks, where your fingers will wrap around onto the barrel if you’re not careful. It’s also beefier at the butt end. This is in contrast to the original skinny grip that would have been perfect for gloved hands in the trenches, but not user friendly for acquiring a positive grip in the hot bush and forest we often hunt in.
The slight increases in length, width and girth, add up to a much better length of pull and trigger/bolt manipulation characteristics, without increasing the overall length by much at all.
Choice
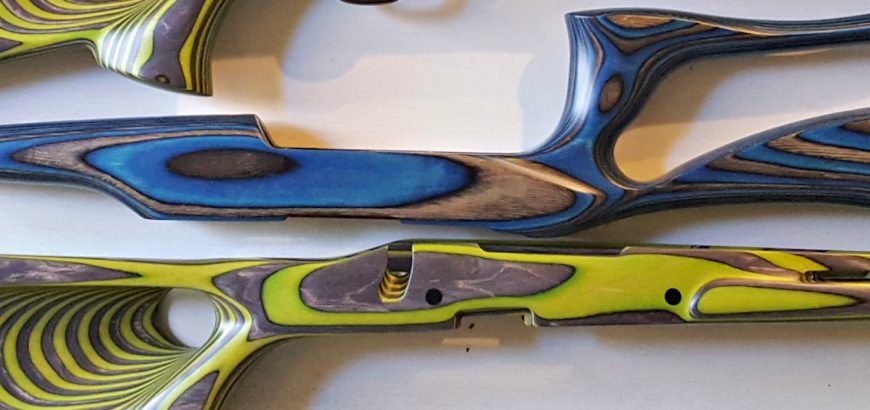
If you’re pulling apart an old rifle like this to do something special, why not make it truly one-of-a-kind? From the standard colours offered by Boyds, the Pepper laminate is a sexy rendition. Black and charcoal – it modernises any firearm, while still retaining the warmth of wood. There is also a straight walnut stock if that’s your preference.
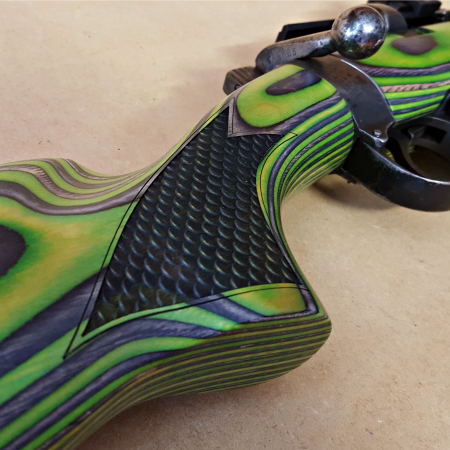
The ‘Scale’ laser engraved chequering adds aesthetic appeal, visual depth, and enhanced grip characteristics.
I chose a Zombie Hunter custom colour for an extra US$16.50, and my rifle stands out like no other. It’s an attention grabber at the range, and it just looks freaking cool. It’s one of those guns you want to take out and shoot, regardless of whether you’re actually working on a load or hunting or just plinking. I might burn through a lot more ammo just because she looks ‘cool’, but that’s okay. Not to mention, everyone else wants a go at it, too!
I also asked for some chequering on the stock, specifically the ‘Scale’ pattern. It’s laser engraved, and absolutely perfect. It adds some extra grip (of course), but also adds depth to the appearance of the rifle. There are a couple other options to choose from as well.
While you’re at it, you could also look at a custom finish, or a different butt pad option to tame your heavy-hitting wildcat magnums.
Negatives
Hey, nothing’s perfect, and there always have to be some negatives.
My only regret on this build (regarding the stock) is not having sling swivel studs, as a sling will be essential for crashing through some of our heavy NZ bush. However, I’m sure Boyds would have included some had I actually thought to ask. Not to worry, I do have some spare, but that’s definitely something I’ll think about next time. More a mistake on my part than a negative with the stock.
There is one negative, and again, it’s not actually a fault of the Boyds Field Design Stock: It’s the rifle. There is no way on God’s green earth that you will have a perfect fit. Unless you own the Boyds’ house action that they model their stocks off.
There is so much variation in fit, quality and manufacturing tolerances between these old war time rifles, that I can almost guarantee some work for you with sandpaper and a file or two, no matter what brand of gun stock you choose. However, if you’re restoring or upgrading any milsurp rifle, this should be something you expect along the way, so don’t let this put you off.
If hard work is not your cup of tea, there are plenty of modern actions that are very uniform and require little-to-no work to customise. Thankfully, Boyds makes stocks for those rifles, too!
Conclusion
At the end of the day, I’ve found (once again) that the Boyds product is a substantial improvement on the original stock that came on the gun. Not only this, but dollar for dollar, I can’t imagine another aftermarket stock coming close.
The customisation options offered by Boyds are a real bonus for anyone looking to increase the appeal of their old shooter, and the standard options are plenty for those who don’t like drawing too much attention to themselves or those who are watching their budget.
Would I buy it again? Yes. And I guess that’s the highest recommendation someone can give after thoroughly testing a product.