When I started shooting, I had a penchant for buying budget guns and trying to improve them to compete with much more expensive guns. With some home tweaks, such as trigger jobs and recrowning, a certain level of success could be achieved. The two things I would spend money on would be a good scope, and a stock from Boyds.
While we have access to some great optics in New Zealand, it’s been almost impossible to get a Boyds rifle stock for a long time. With the US$100 export limit on certain firearm-related items, New Zealanders have had to try and buy the cheapest of the stocks on offer, with no upgrades or customisation, or wait for a run-out special that matched their firearm/stock combo. Unfortunately as prices have naturally risen, even the option of squeezing in under $100 has just about disappeared for most items.
Are there any NZ Boyds dealers?
There have also been various businesses in NZ that have had a Boyds dealership at one time or another – but they’ve always been bloody expensive. In many cases, the stocks would have cost more than people had spent on their rifles to begin with – and the options were limited too.
So – we’ve tried to fix this issue.
I’ve long been a fan of Boyds stocks, and you can read about stocks I have used over the years in the product review section of the website. In order to give everyone else access to the same stocks that I’ve really enjoyed using – and at a reasonable cost – we’ve established our own Boyds dealership in NZ.
This Swedish Mauser was my second ever Boyds project, in a Prairie Hunter stock.
The Gun Rack and Boyds Hardwood Gunstocks
Yup, you can get any Boyds stock you want, with any customisations. There’s no federal export limit, and you don’t have to pay a retail store half of the deposit of an Auckland 3-bedroom house either. In fact, we can get you a basic Boyds stock, delivered to your door, for around NZ$525. If you want to spend more and get an adjustable comb, custom colours, change the LOP, or whatever, you can do that too. We’re also able to sell the At-One stock, at around NZ$640, delivered.
So, how come we’re able to do this? Well, we can bring in the stocks because we have a federal export licence from the US government, specifically for Boyds stocks. And how do we do it so cheaply? Quite simple. We’re not greedy. We make a very small amount of money on each stock, and that money means I can buy ammo and other bits and pieces to keep this website going. I’m much more interested in bringing something cool to NZ shooters than I am in making a shed load of money.
In late June I had a question from Ken in Gisborne about whether or not you could fit a BRNO Model 2E in a JW-15 plastic after market stock. Immediately you probably have two questions.
Why am I only answering this question now; and,
Why would you put a beautiful European-crafted rifle in a cheap, ugly stock?
So, I’ll quickly answer those:
I replied to his email, so don’t you worry!
Ken is unable to obtain an original stock – and I imagine his beautiful rifle is pretty hard to shoot without a stock!
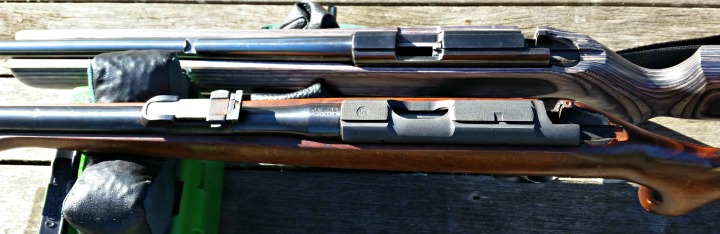
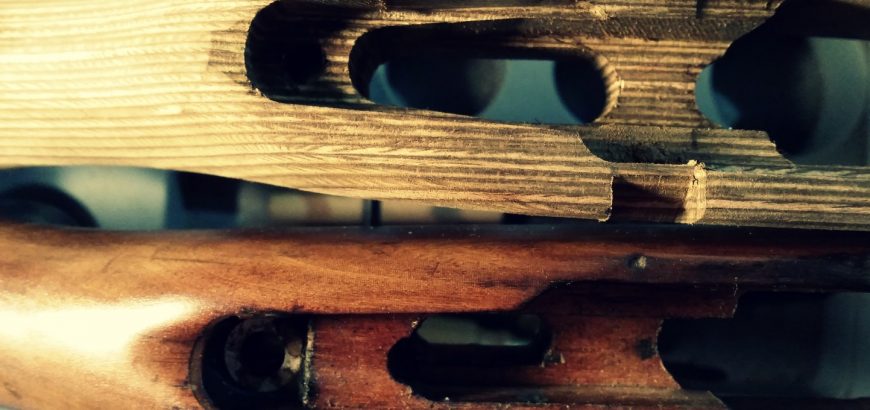
Comparing the JW-15 and BRNO Model 2, you’ll see a lot of similarities, but even more differences.
Easy way to find out stock dimensions
If you ever come up against a similar issue yourself, you may need a quick work around to see if you can do something similar. The other question you often get is “Can you put a CZ 452 in a JW-15 stock?” Usually this comes from people who want a light, farm-ready 22LR, without having to ruin their wood stock or buy a new rifle. FYI, the CZ 452 and BRNO Mod 2E are practically identical. Here’s a nice little write up that someone has done on the BRNO, which saves me repeating a lot of the same points.
Essentially, as with many European brands, there was sharing of parts and designs, and eventually a merger. The rifle was largely unchanged. And the difference between the 2E and the 2 is that the 2E is the luxe version. Nicer stock, etc.
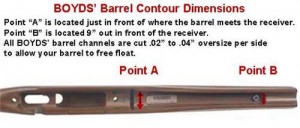
Anyway, I digress. A quick, easy way to confirm barrel and action dimensions for stocks? Head on over to the Boyds’ Gunstocks website. They give you the barrel dimensions and centre to centre measurements between action screws for all their house actions (that they base their aftermarket and OEM stocks on). While you’re there, you may be tempted to buy a whole new Boyds stock, and why not? They’re awesome quality, solid wood and modern designs!
So, using my little cheat, this is what the Boyds website reveals:
Boyds barrel measurements. Image from Boyds’ website.
Barrel Dimensions: Point A = 59/64″ and Point B = 43/64″
Center to Center of Action Screws: 3 25/32″
Over All Length of Part: 31 1/2″
Comes with Boyds’ 1/2″ Rubber Recoil Pad
Other differences
The biggest barrier is the difference in action size.
While my quick cheat above provides a very useful starting point for stock comparison, there are other things to consider as well. When considering a rifle like the JW-15, which is essentially the cost-saving, poor cousin of the BRNO/CZ, you’ll usually get differences in dimensions where changes have been made in the manufacturing process to reduce costs. Often you’ll find this in stamped instead of milled parts, simpler contours, thinner barrels, etc.
Below are some of the basic differences that unfortunately make this stock swap a no-go.
Action shape
The BRNO/CZ action is longer, thicker and circumference and a little bit different where inletting is concerned (this last isn’t the biggest concern in stock swapping, as you can alter inletting). Somehow the Mauser-action origins seem more apparent in the lines of the BRNO, even though the JW-15 has a similar, but simplified, shape.
Barrel contour
The Chinese rifle has a much simpler barrel contour, while the Czech rifle follows traditional lines. The thickness of the barrel is a fair bit different, but where it meets the larger action is the biggest difference, as the BRNO barrel swells up to meet the threads.
The BRNO barrel is close to what we’d consider a bull barrel in a modern rifle, and the contour differs significantly to the JW-15.
Action screws
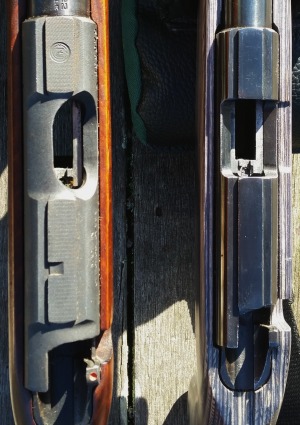
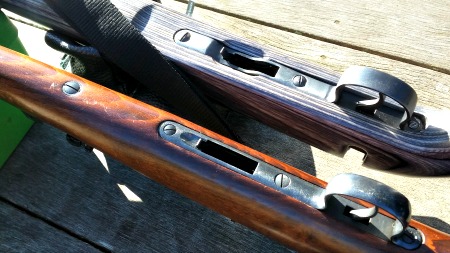
Another clever simplification in the Norinco is reducing the amount of screws and metal work by merging the forward action screw with the recoil lug. Looking at the image below you’ll see three screws on the JW-15 and four on the BRNO. The rear screw on both is a wood screw, which secures the trigger guard to the stock.
The next screw forward on both rifles is a simple action screw. In front of the trigger is the last action screw. In the JW-15, this screws up into a recoil lug dovetailed into the action. The BRNO has another screw, independent and forward of the floor metal. This screws up through a steel collar into a recoil lug that forms the hidden part of the rear sight assembly.
Differences in inletting and dimensions are indicated by the presence of fewer screws in the Norinco. Also notice the softer metal the screws are made of.
Bits and pieces
There are various other bits and pieces that differ, such as the mag well and the trigger unit. The trigger in the Model 2E is a fine example of a single stage trigger, with adjustable over-travel, and a clean break around 3 lb. This is streets ahead of the simple, but practical, trigger in the JW-15. These can be toyed with to produce more acceptable results, as detailed in this previous article on JW-15 trigger improvement.
Verdict
If you are considering swapping things up with either of these rifles, an aftermarket stock specific for the JW-15 or BRNO would be far better than trying to adapt one to the other.
In the first part of this blog series, I looked at the rifle stock I’ve chosen for this project – Boyds Prairie Hunter – as well as the bedding compound I’ll be using – Matchgrade Bedding Compound. In this piece, I’ll go over the initial fitting of the stock, and the bedding process.
Prepping the stock
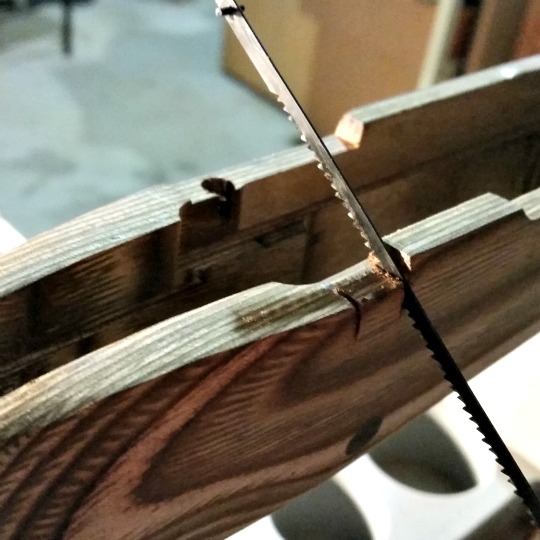
A hacksaw blade gives nice, crisp edges.
Whether you choose to bed your stock or not (you should choose to 99% of the time), your stock may need some prep work. The Prairie Hunter is quite a classic shape, with a nice cheek swell and elegant lines forward of the action. Supplied with sling swivels and a nice butt pad already in place, there’s not much you need to do to get this stock looking great.
Because of my model of rifle, I had to remove material to provide the clearance for the bolt handle. For this reason, my stock was provided unfinished (uncoated). Fortunately, with the bent M38 handle, there wasn’t much to take out. I simply used a hacksaw blade to achieve the angle and depth of of relief needed, and removed the material between the two cuts with a small file, and then some sandpaper. By doing the two cuts on the outside, the relief is quite crisp and even.
Next I had to deal to the plastic nose cap. There are several options you can go for here, ranging from the synthetic (cheapest), through to rosewood and others. Of course, for a more simple appearance and cheaper project, you may choose to exclude this option.
A dremmel makes quick work of evening out the nosecap.
The nose cap and the pistol grip cap where both ground to fit, however, the barrel channel of the nose cap needed some relieving to ensure the barrel is free floating. These caps are obviously produced to allow for common barrel dimensions without having excess clearance, which would look terrible and accumulate dust and grime in the field. So, in this sense, having to clear this out for your particular barrel shape is actually a benefit, as you can ensure you have a free floating barrel, with a minimum of clearance to keep your barrel channel free of any foreign debris. Of course, you’ll want to make sure it matches up nicely with the lines of your stock.
Aside from that, my Boyds stock was good to go. However, as I’m bedding this rifle as well, I chose to leave the final coating of the stock for after the bedding process. This way, any spilled bedding compound or other marks can be easily removed when I do the final sanding before oiling the stock.
Glass bedding the action
The term ‘glass bedding’ comes from the fibreglass-like products that were used in the past to mate barrelled actions to their new homes. Material choice has improved in leaps and bounds, however there are a few prominent bedding systems that seem to have really got it right.
There are a couple that you can find on Brownell’s (if your in the states), or Gun City, Reloaders, Serious Shooters, etc., in New Zealand. However, far and away my most preferred bedding compound is Nathan Foster’s Matchgrade product. It’s easy to use and provides a solid and stable platform on which to achieve repeatable and accurate results with your rifle.
The first time I used this product it came with printed directions, which I have stashed in my drawer somewhere. The second time it came with a basic info sheet and instructions to find the directions online in a PDF. To be honest, I think this is great. It saves on paper and keeps the cost of the product from increasing, but also, it’s so much easier to use your phone to view instructions.
When using your phone or laptop you can use ‘Ctrl + F’ to find exactly what you’re looking for.
In the thick of it
I won’t waste my time repeating Nathan’s instructions, which you can find here, but there are certainly some points to note.
Bedding a rifle is pretty much a one-time job. Undoing a crappy bedding job is an immense amount of work, and the cured product will harden like steel to whatever surface it is on. For this reason, you need to have your barrelled action and the stock completely prepared beforehand.
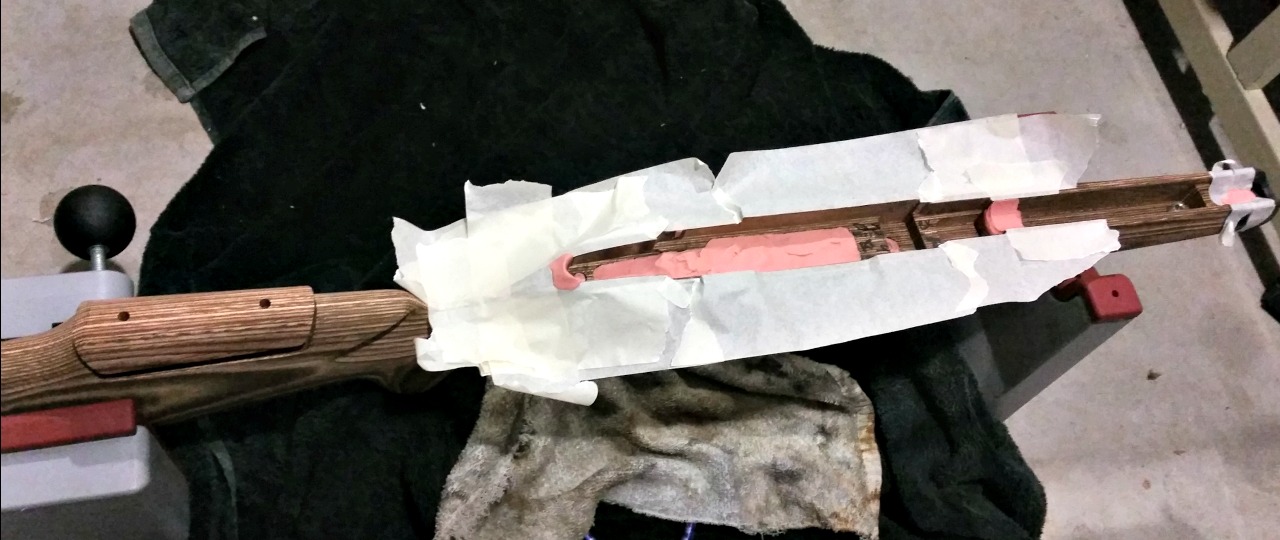
The Prairie Hunter stock ready to receive a full-length bedding job. You may wish to wrap your stock in plastic to protect its finish.
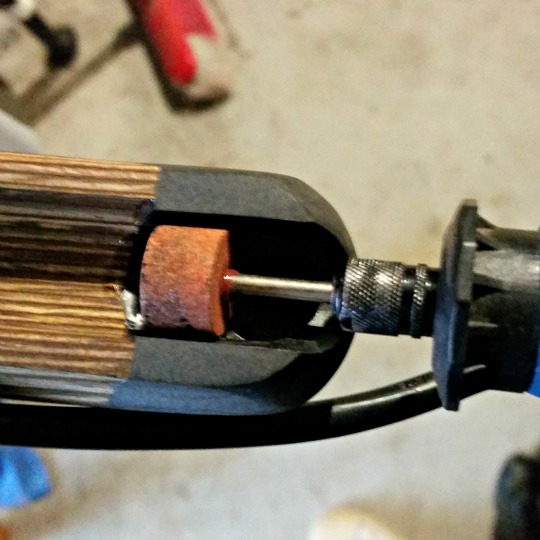
The stock will need to be dammed up, so the compound doesn’t run through the action screw holes, the mag well or down the barrel channel. The action needs to be protected with masking tape and graphite to ensure it doesn’t end up permanently glued into the stock. You also need to ensure that the bead of bedding compound around the action doesn’t creep over the tang or into the ejection port – trapping the action.
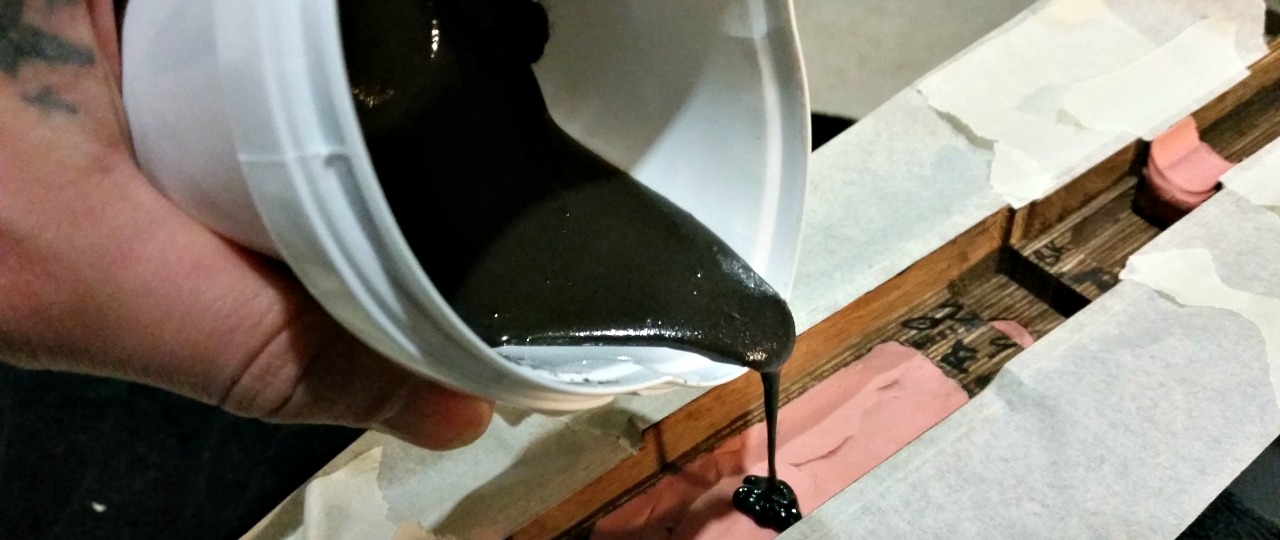
Once you’ve started pouring, there’s pretty much no going back.
You also need to make sure your working space is completely ready for all stages. You need to be able to keep the compound at a reasonable temperature (no problem in this summer heat) for it to cure properly. However, in winter, this can mean heaters, hot water bottles or any number of weird contraptions. I tend to make a tent of sorts over my workplace once complete (it’s hard to shift the rifle to a different area once you have poured the compound), and use a small heater to warm it up.
Now’s the hard part – you need to be patient and wait for it to cure. In the next part of this series we’ll look at getting the rifle out of its mortice, and how to finish the stock up to a beautiful satin sheen.
There are a few centrefire rifle events every year that are just thoroughly enjoyable and worth attending. The Auckland NZDA Prize Shoot is one, as is the Thames NZDA shoot. The Hangiwera Station Sniper Shoot is definitely up there, and so is the Swiss Club’s Any Sights Any Rifle 300 metre shoot.
This year was my first shoot at the Swiss Club, although some of my shooting buddies have been going for years, and I attended on their recommendation.
An enjoyable shoot
The shoot is well organised, and is accommodating for younger or inexperienced shooters. There are club rifles available and the RO is very helpful with sighting in. The club rifles are either straight-pull Karabiners (K31s), chambered in the venerable 7.5×55, or modern semi-autos in 5.56 NATO/.223 Remington.
If you’re bringing your own rifle (as most do), you can use anything you like. If you’re really ambitious, you can try your open-sighted SKS and see what it will do at 300, but you’ll be going up against Bench Rest rifles that hit 10.1 more often than not. Most rifles on the day were a mix of F-Class, BR, sporting and service rifles. Because there is such a variety of shooters and equipment, it’s more likely that you will be competing amongst your group of friends than with the top of the table – unless you’re an excellent BR shooter.
The variety of rifles on the range is a joy in itself.
Although I knew there was no way I could beat the top BR shooters with my modest sporter, this did not diminish my enjoyment of the day at all. I’m pretty competitive by nature, but found myself comparing my scores to my wife’s and those of the other Howick shooters. It also meant I got to see a bunch of really cool guns that you wouldn’t usually see in one competition.
Three-hundred metres is a pretty challenging distance if you haven’t shot past a hundred before. There were even a few who had not shot at all before. However, with the help of the club’s rifle master, these young shooters were hitting paper in no time.
The cost of the shoot is not prohibitive, with a range of $20 on the day, and of the cost of 25 rounds of ammo. The Swiss Club has a really good website for the ASAR shoot, which lets you book your position on the mound ahead of time. With several details across a few days of shooting, you’ll definitely find a time to shoot, and you may even try and better your score on another day.
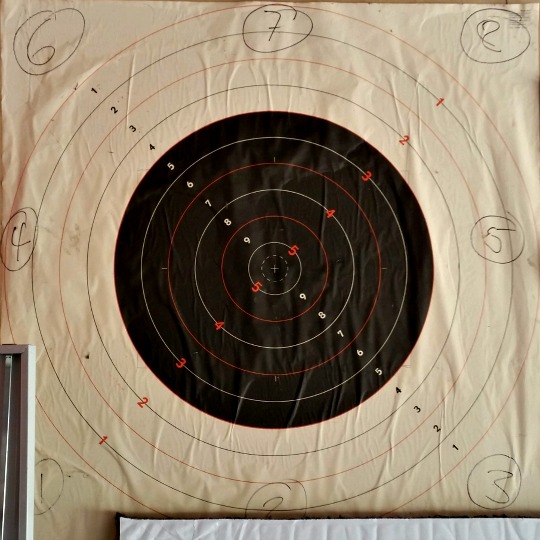
Swiss Club target.
The format
The shoot starts with 5 individual sighters. Each shooter on the line takes a single shot from the prone position (all shooting is prone), after which the targets go down and the scorers call back the score and location of the round to the RO via radio. A notepad and pen are handy, as you try and figure out where your sighters are landing. The shots are called out like “9 at 3 o’clock” or “7 at at 1 o’clock”, with the first number being the score (1-10) and the position on the clock helping you to identify which segment of the target you are landing on.
After you’ve gone through your 5 sighters, there are 10 individual scoring shots, shot in a very similar fashion. Each shot is still called out, helping you adjust your shot placement, especially if the wind picks up downrange.
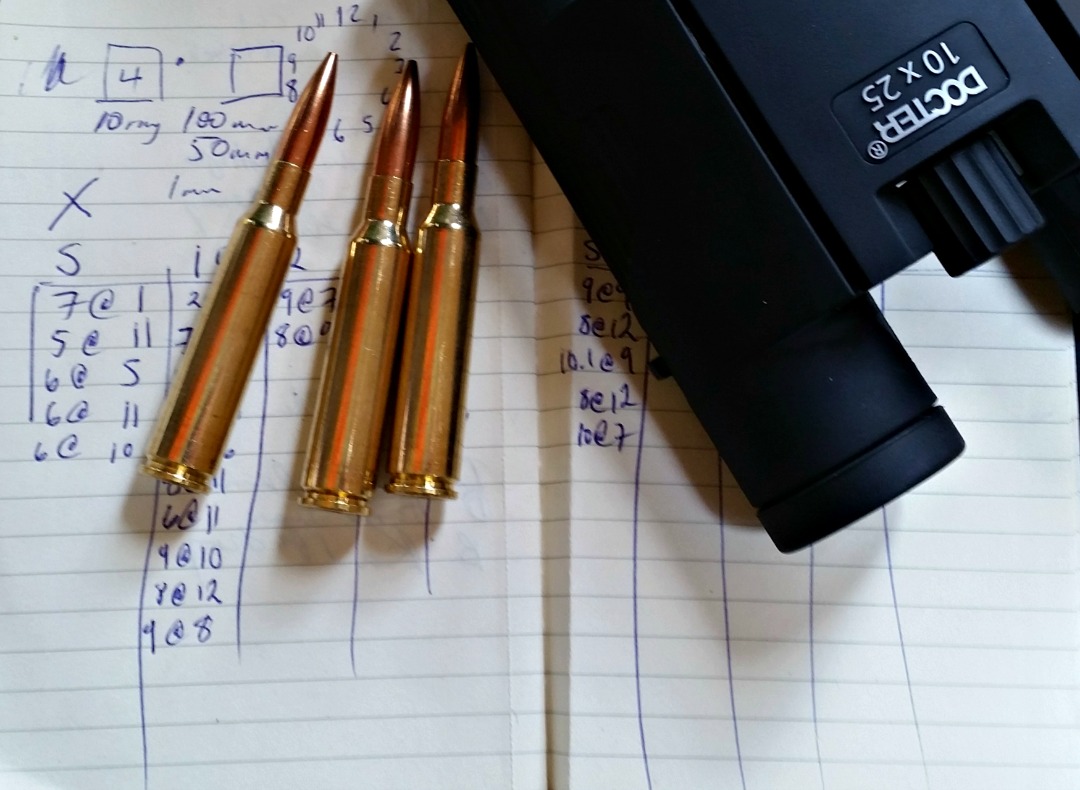
A notepad is essential to sighting in at 300 metres.
After the individual shots, you have “rapid” groups of 2, 3 and 5. I say rapid, but it’s really not. It’s simply a few shots in a row. There is no pressure to hurry up, and there are plenty of people single loading their shots.
All shots are still called out, except for the final group. This means you can adjust your shot placement right up the last minute.
How hard is it to hit the 10 ring? You’ll need to be shooting around MOA (just over) to consistently hit the 10 ring at 300 metres. If you want to notch up a bunch of 10.1’s, you’ll need to be shooting around between 0.5 and 0.66 MOA.
The experience
I thoroughly enjoyed the shoot. I went a bit early to watch some of my mates shoot, but also to familiarise myself with the format and calls. I did end up waiting around a bit, but I ended up being there for most of the day, as I had some “technical difficulties”.
After watching the 11 am detail, I hung around over lunch time before taking up my spot on the mound. I was a bit nervous as I was shooting my rifle in its complete configuration for the first time. Since the last time I had shot, I had fitted and bedded my Boyds Prairie Hunter stock, had a new bolt handle machined, and modified my magazine follower. Also unfamiliar to me was a 6-24 scope that I had been sent to review.
One new bolt handle coming up, thanks to my mate Thomas.
Unfortunately the scope did not perform and was unable to be zeroed on the day. This meant I had to wait through an entire detail, pushing out my wife’s shoot as well. However, I used this time to fit my trusty Vortex Diamondback 4-12×40 BDC, which I brought just in case. I have learnt my lesson with taking unfamiliar equipment to a shoot.
Unfortunately this meant I had to sight in from scratch, however, I was on paper on my 3rd shot, and the rest was just fine-tuning. By the end of my shoot I had it right were I wanted it, which meant my wife had the rifle ready to go for her shoot, and actually did quite well. Results can be seen here.
Overall I was very happy with the my complete sporter set up, and with some more powerful glass, I think I’d be comfortable taking this rig out onto the F-Class range.
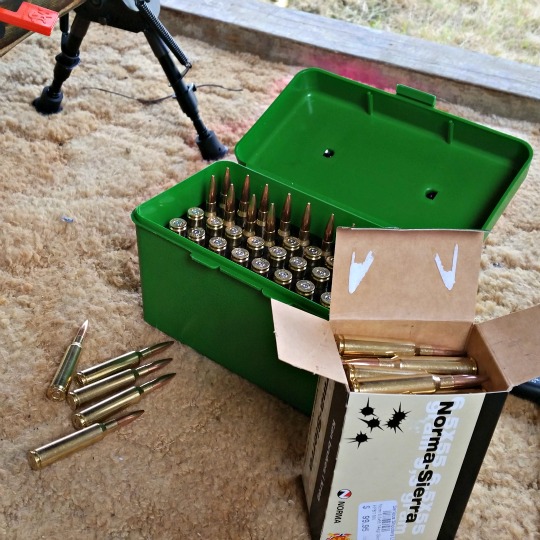
Looking forward to some Norma brass at the end of this.
I think the load development still has some way to go, particularly as the barrel on this rifle is quite short. Not having developed a satisfactory handload, I shot this competition with factory 6.5×55 ammo. I used the Norma-Sierra 144gr HPBT, and the round seemed to perform pretty well. To be honest, I was more interested in the brass than anything else, as I think this rifle will prefer lighter projectiles, in the 130 – 140 grain range. Over the holidays I’ll be testing out the 129 gr Hornady Interlock and 140 gr A-max. I’ll be comparing this projectiles side-by-side with the 142 gr SMK and the 144 gr OEM projectile in the Norma-Sierra load.
At the end of the day, the shoot was enjoyable, and definitely an experience worth repeating. You can shoot multiple times on one day, or on multiple days across the competition. If I have the time next year, I’ll probably try shoot it on a few days. Being located only 45 mins or so north of Auckland, the range is really accessible, although it is also rarely accessible. The Swiss Club is, of course, a club for Swiss nationals, and as far as I know, this shoot is the only time of the year that the range is opened up to the general public.
If you would like to try a different range and format, and perhaps a longer distance than you usually get to, you’ll definitely enjoy the Swiss Club’s ASAR shoot.
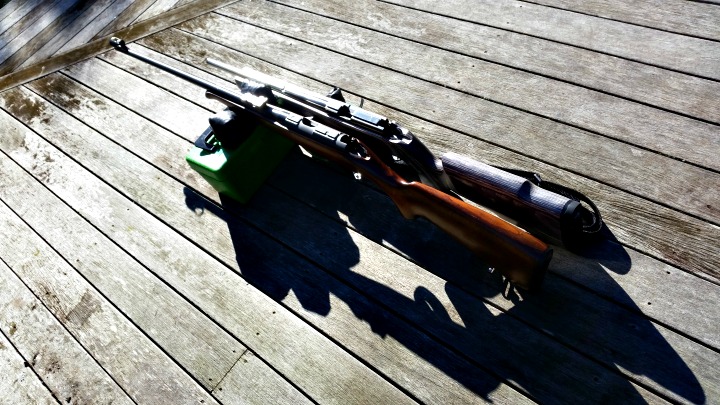
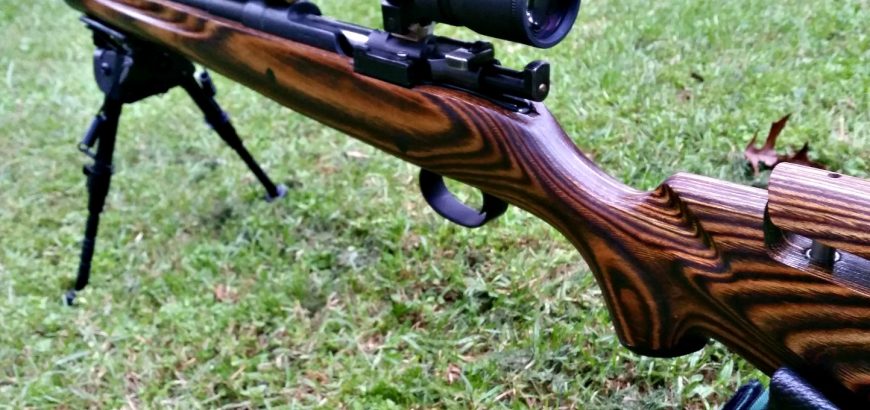
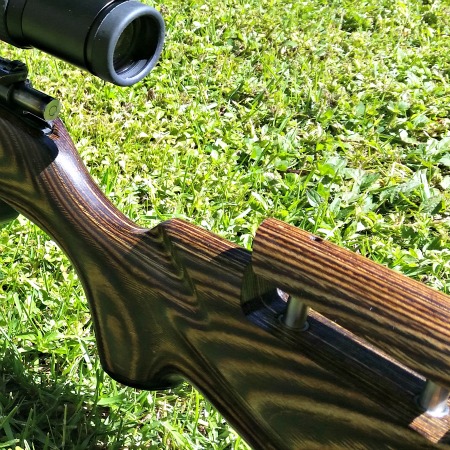
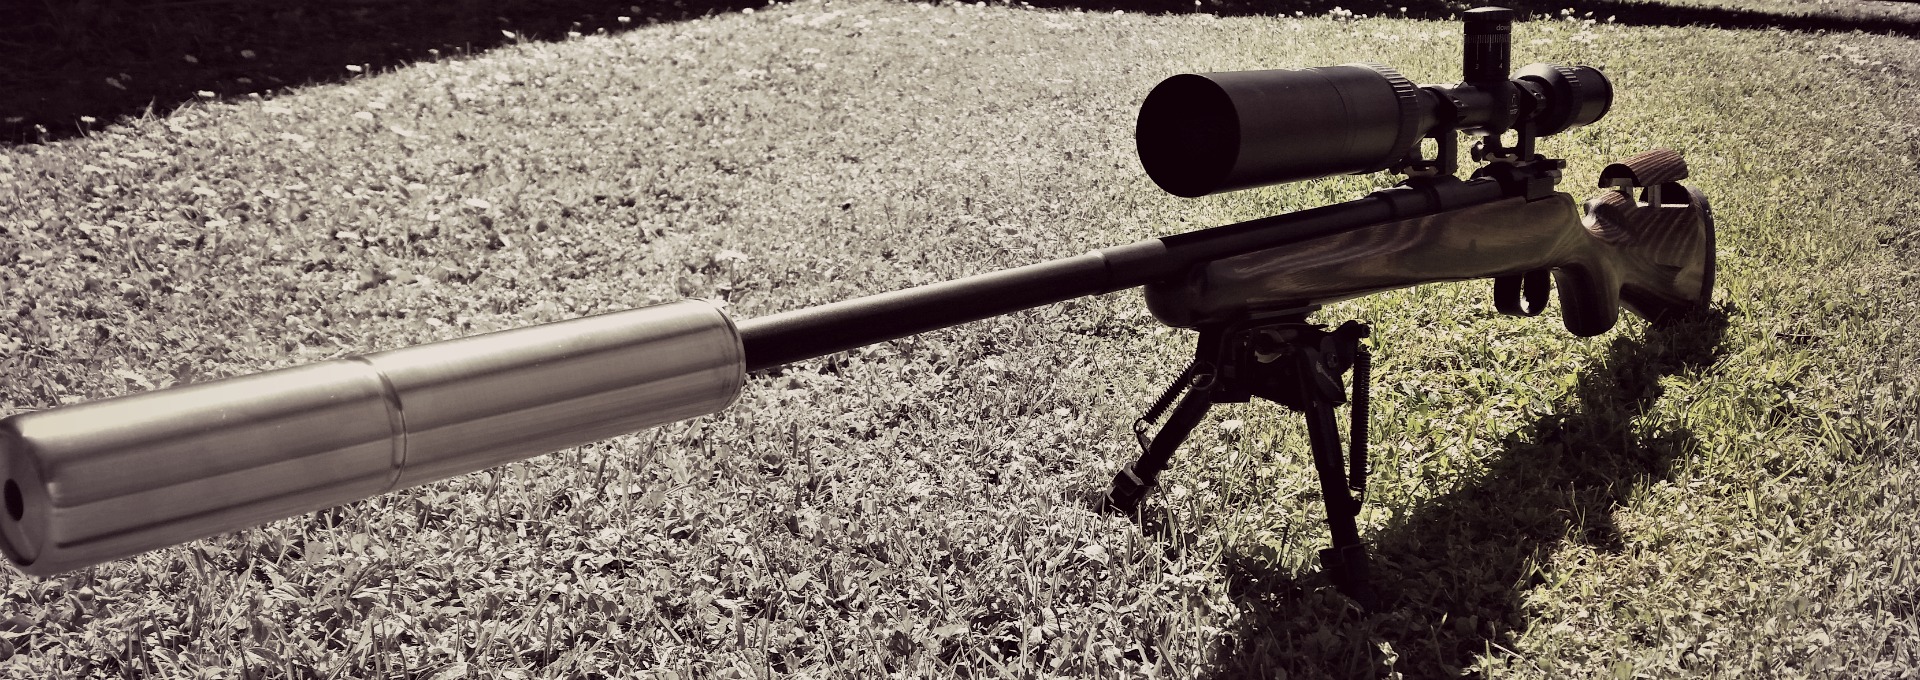
Sometimes you find a winning combination. Something that just works for you. This has been my experience with the Prairie Hunter rifle stock from Boyds, combined with my 1943 Husqvarna Mauser – a dream come true. What makes this such an epic combination? There are several factors that combine to make this gun incredibly shootable, but for now, let’s look at the fancy piece of wood it’s sitting in.
The looks
The old Mauser looks perfectly at home on the range in its Prairie Hunter stock.
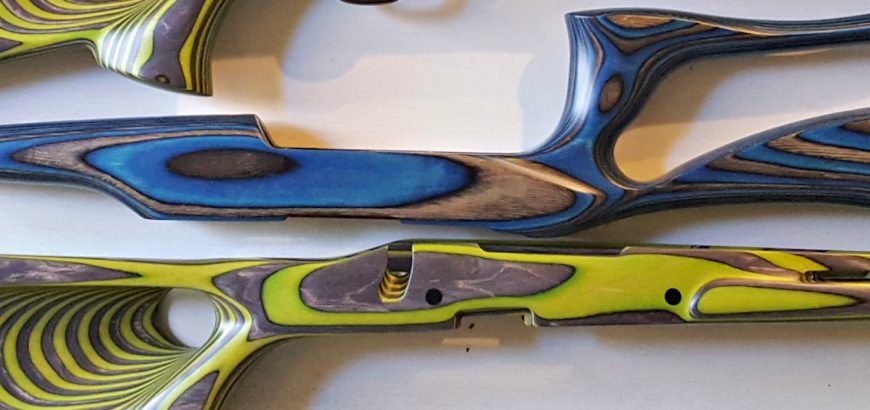
The Prairie Hunter is a good looking stock, no doubt about it. The first time this rifle was on the range in its new configuration, an old time shooter said “such a pretty stock for such an old rifle!” And he wasn’t the only one. Laminates are known for being hardy, heavy and beautiful in an age of synthetic rifle stocks.
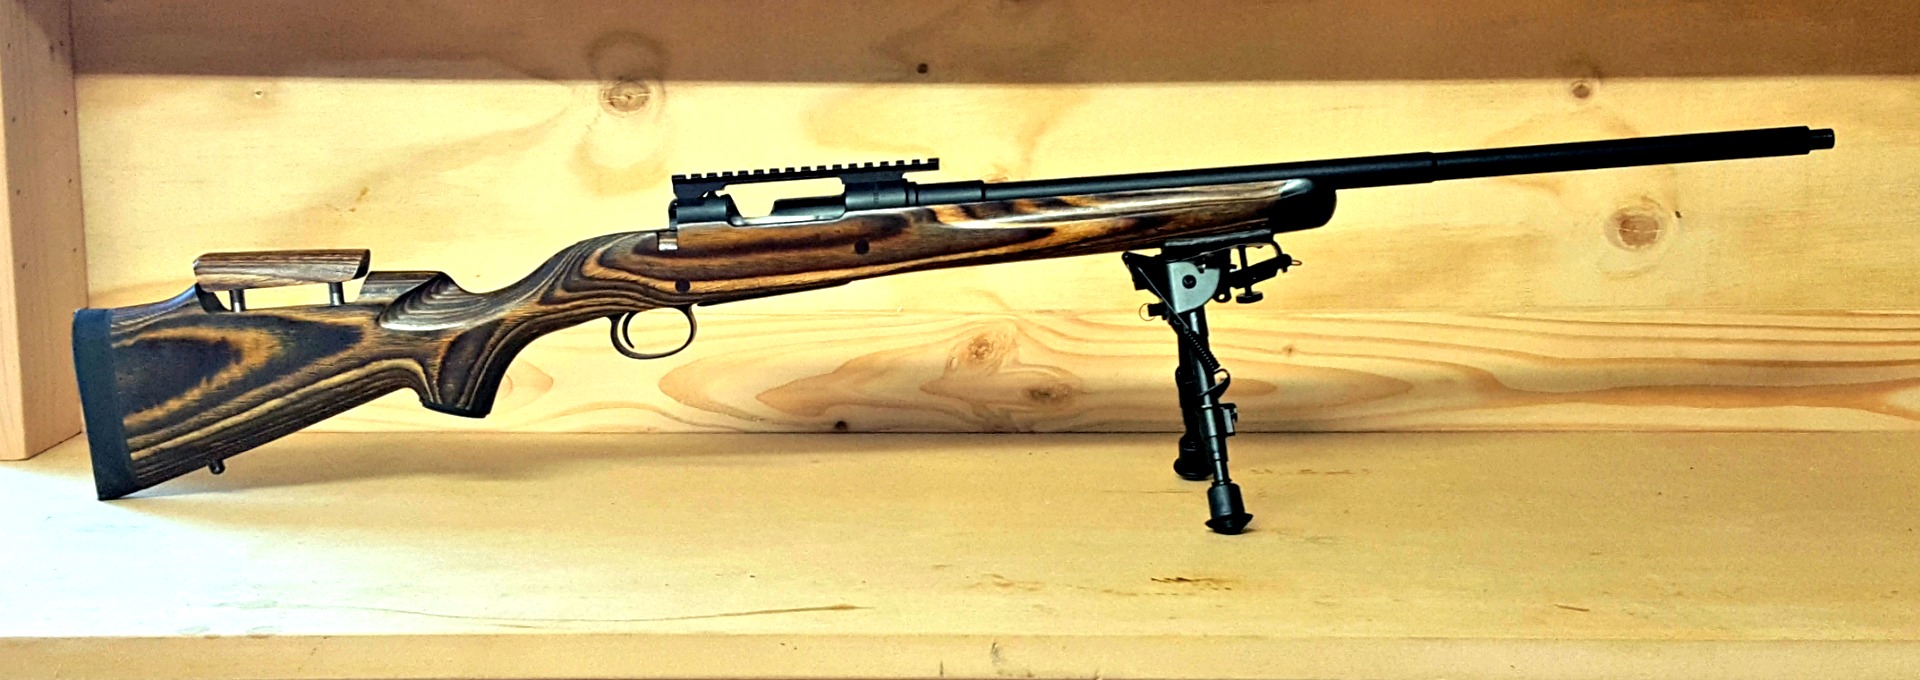
In the looks department, this stock was certainly helped along. Boyds provided this specimen with a nice, thick Limbsaver recoil pad and synthetic caps for the nose and grip. What adds to both the functionality and visual appeal of the rifle, is an adjustable cheek piece. The adjustments are made from the top, with an allen wrench, which means no adjustment knobs on the side of the rifle.
Full profile picture of the Boyds Prairie Hunter stock with adjustable cheek rest. This picture is here especially for Zach.
Final fitting needed
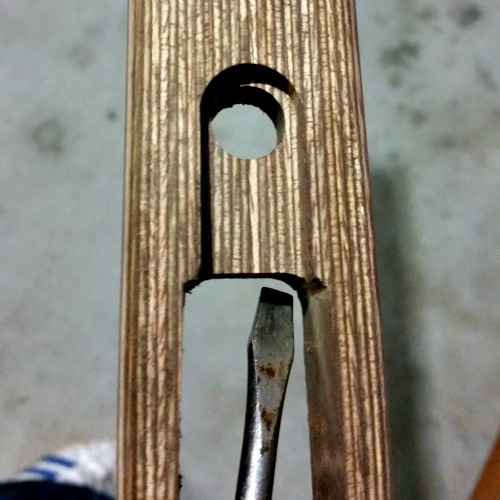
Boyds does advise that their stocks are made to their house actions (imagine how many actions they have!), so final fitting may be needed for your rifle. For this particular project, I received my stock in ‘unfinished’ condition. This means a final sanding and some polyurethane are needed. The reason for this, is that old Mausers come with several different bolt configurations, depending on the life they’ve had. This means that the channel that the bolt handle fits into should be determined by the end user, depending on their particular model. With a bit of work to do, Boyds doesn’t send you a finished stock, that you will then have to cut into and sand down anyway. Makes sense.
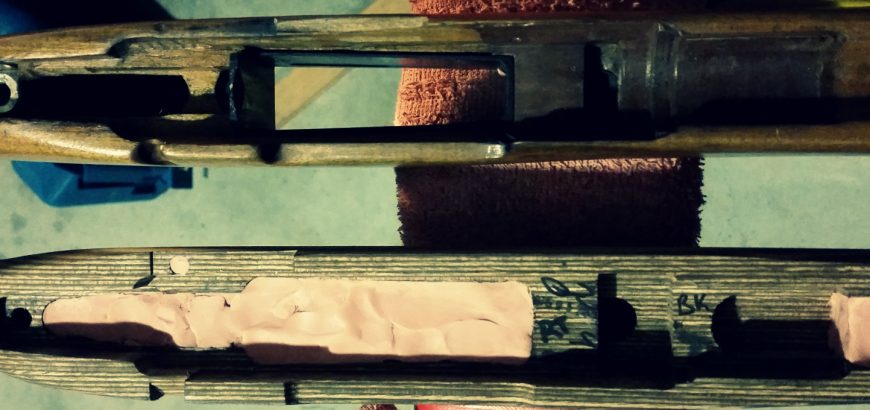
Some relieving of material was needed at the front of the mag well.
The bolt handle notching was easily done, and is covered in my series of articles on bedding and finishing stocks. With this particular stock, I found that the floor metal was a couple millimetres further back than I needed it to be. All I needed to do was to relieve some material from the front end of the mag well to get the metal sitting where it should, and mating up to the action.
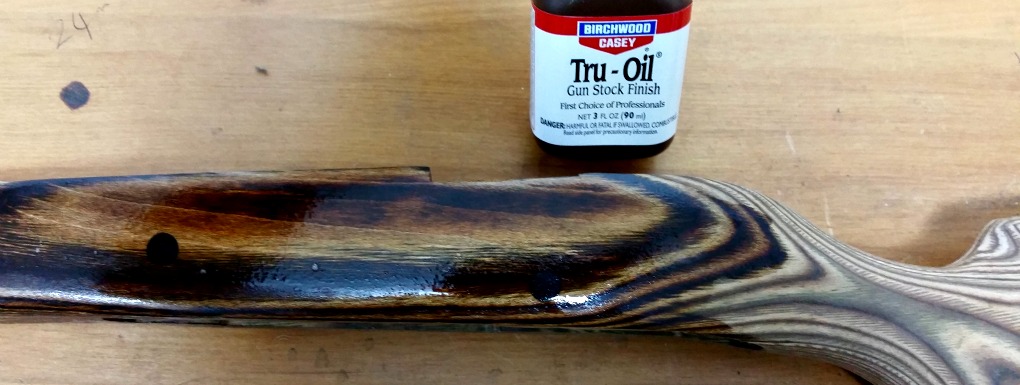
I chose to bed my action, which was a bit more work still, and instead of polyurethane, I opted for a hand-rubbed finish, using Birchwood Casey Tru-Oil and Stock Sheen and Conditioner. The oil even gave a nice gloss to the plastic bits on the stock as well. Learn my lesson without doing the hard yards though, tape off the recoil pad if it’s rubbery. The oil will make this super sticky, and you will get all sorts of fluff on your butt pad for a while. You will eventually be able to rub it all off.
The Tru-Oil immediately brings out the character in the laminate.
Performance
Oh what a joy. I couldn’t be happier.
And that’s not sarcasm!
The 6.5×55 is not known to have heavy recoil, but if you have a shortened barrel and sporterised stock, you feel every bit of it. Having purchased this rifle second-hand with the intention of restoring it, I was happy enough with the home-made sporter stock, but it was certainly made for a shorter person, and the lightweight nature of it didn’t do much to tame the kick of the old service round.
The extra weight associated with the laminate stock meant all sorts of recoil-reduction. I would definitely recommend going for this or a walnut stock over most of the synthetic options out there. The normal-person-sized length of pull also helped, along with the 1″ recoil pad. Don’t get me wrong, the stock isn’t overly heavy either. With a hollowed out barrel channel for free-floating and weight reduction, the balance and weight is nice. Most of the heft is around and behind the action – where you need it most.
Tall scope mounts are no problem with the adjustable cheek rest.
Combining this with my MAE 6-30 ST suppressor, recoil concerns are now a thing of the past. So much so, that I can shoot off the bipod with my off-hand under the grip as a stabiliser, instead of holding down the fore end to stop myself getting a scope in the face, as I had to do with the synthetic-stocked Mossberg ATR a month or so ago.
Shooting with this configuration and my wife’s Vortex 4-12X Diamondback with BDC reticle, my wife and I were hitting 9’s and 10’s at the 300 metre Swiss Club shoot a couple weeks ago – even a 10.1! And this is with factory loads (Norma-Sierra 144gr).
Adjustable cheek rest
One of the major selling points of the configuration I now have is the adjustable cheek piece on the Boyds stock, and I would highly recommend this option on the next stock you buy. Below are a few of the reasons I love this feature:
easily adjust for different users and eye-relief
raise your line-of-sight for scopes that are mounted high due to large optic bells, iron sights or bolt handle clearance
quickly lower the cheek piece when needed for cleaning rod access
ensure proper cheek-weld to maintain repeatable, accurate shot placement
Overall impressions
There is a lot to be said for keeping old military rifles in their original condition. However, if you’ve bought yourself a bit of a project, or inherited a less-than-perfect specimen, a great place to start with your customisation efforts is a replacement stock from Boyds.
You can get a stock that is more suited to varminting, target-shooting or tactical-style precision matches than the military wood. These old stocks were made to be shot with full winter clothing, and to be light as well. As such, they transfer a lot of recoil to a normal-size shooter. You can also help your sweet Swede look as good as it shoots. With a nice-looking stock, like the one I have in a Nutmeg finish, you won’t feel out of place next to the Howas and Tikkas on the range.
The Boyds stock completes the set up, along with an MAE suppressor and BOLD Trigger unit.
Bear in mind, when you order a stock from Boyds and you are not in the States, you have to keep your order under $100 to avoid costly permits which make the process impossible. If you or someone you know is making a trip to the USA, take advantage. Or get friends and family over there to help you out. Worst case scenario, you can still get an amazing stock, but you may have to forego some of the bells and whistles.
Properly bedding and finishing your rifle will not only help it look a million bucks, but will seriously enhance your accuracy as well. In this blog series I’ll be looking at bedding and finishing my Boyds Prairie Hunter stock for my Swedish Mauser.
The stock
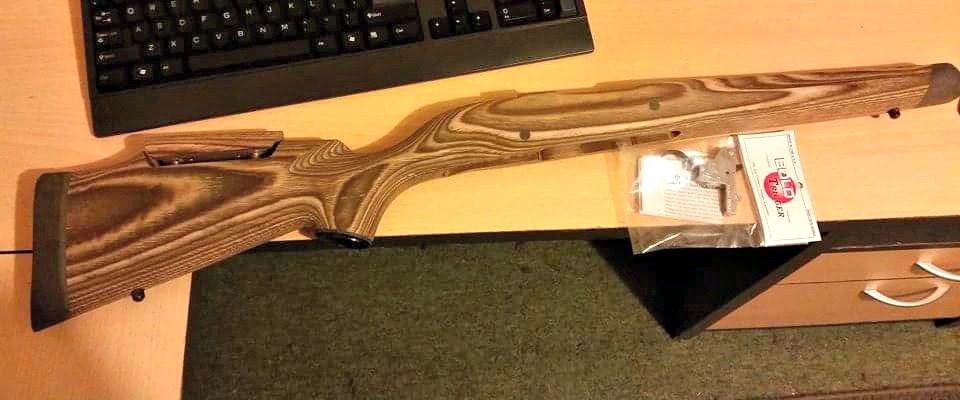
The stock I’ve chosen for my small ring Husqvarna chambered in 6.5×55 is a laminate from Boyds Gunstocks, in their Prairie Hunter shape with a nutmeg finish. The stock has more weight than my current one, absorbing some more recoil, but also balancing well against the almost half a kilo of suppressor on the other end. It also has a more appropriate length of pull, and a nice recoil pad that not only reduces kick, but also gives me that little bit of extra length.
This stock has been provided with a few nice extras, including an adjustable comb and synthetic pistol grip and forend caps.
The Boyds stock and BOLD Trigger made a nice care package to come home to.
For some stocks, Boyds only provides their products unfinished, which is the case here. This is because some rifles come in so many variations of configuration, that they will necessarily require some fitting by the user. In this case it’s differences in bolt handle that make it a must for users to complete their own stock. Many older Mausers still have their straight bolt handles, but increasingly if you come across an old Swede, the bolt handle will be bent back, or you could even have an M38 bolt – or similar – which comes turned down from the factory.
After finishing this, and any other inletting adjustments needed, you can then apply your choice of protective coating. While Boyds recommends a polyurethane, I really like the hand-rubbed oil look, so that’s what I’ll be trying with this project. My Pro Varmint stock from Boyds does have the polyurethane finish from the factory, and I must admit, it looks good and is very hard-wearing. But hey, since I’m doing this bit myself, I may as well try something different.
The bedding compound
There are various bedding compounds and systems on the market, and you have some serious research and decision-making to do. Some newer factory rifles will come with an aluminium bedding block, while others are pillar-bedded.
Rifles that are bedded after the fact can be done in several ways, depending on your capability, tools, budget (if your smith is doing it), desired application and the needs of your rifle’s action.
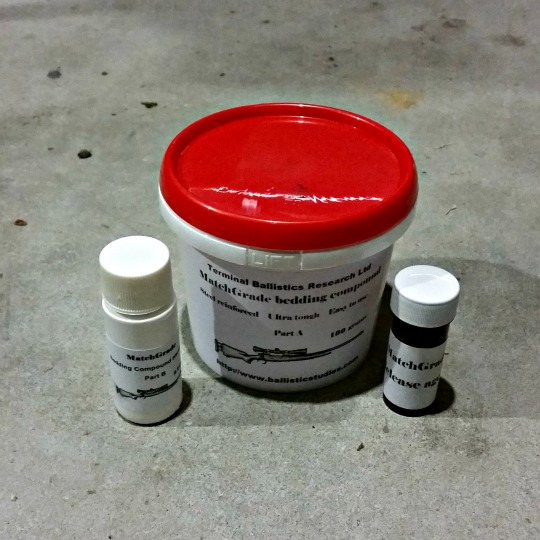
Terminal Ballistics Matchgrade Bedding Compound – release agent, component A and component B.
Generally people choose between pillar or glass bedding, or both. Then there’s also a full, front or front-and-rear glass bedding job. Pillar bedding uses metal pillars, such as aluminium or stainless steel, to eliminate the risk of compression or crush when tightening the king screws.
The pillars are tubes that are epoxied in the action screw holes, for the screws to go through. This way, when the wood expands and contracts, or is put under pressure between the floor metal and action, the screws can always be done up to the same point, as the metal is pretty much impervious to these stresses.
Glass bedding is the process of using a compound, that is pretty much an epoxy in most cases, that is reinforced in a fibreglass-like way. The compound I prefer is Nathan Foster’s Matchgrade Bedding Compound, which is steel reinforced, and easy to apply.
Check back in for Part 2, where I’ll go over the first steps of the stock prep and bedding process.