
Mounting a scope on a .303

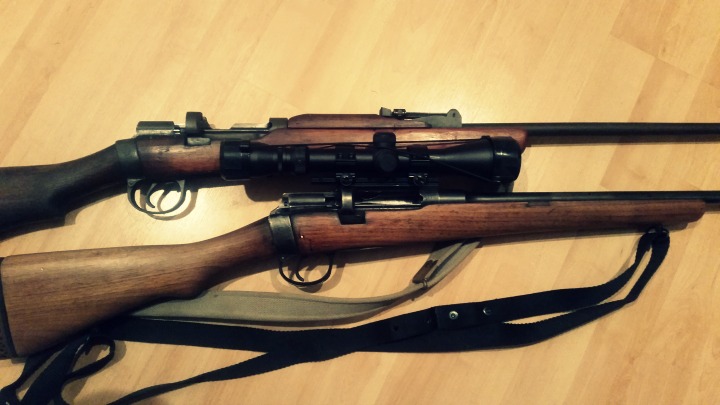
The old .303 has been a staple of the Kiwi bush for decades, and will most likely continue to be around for decades to come. Usually the pristine, fully wooded specimens are locked away in gunsafes and taken out for service rifle shoots, and even old sporters get treated with a degree of respect, reflecting their heritage from the culling days.

However, some sporters are the perfect base for a project that’s a little bit fun – a little bit different. So, looking out for the perfect beginning of a bush rifle project, an easy scope mounting scenario was high on the list for me.

Comparing two SMLEs, one with original fixed sights and one with a scope mounted and iron sights removed.

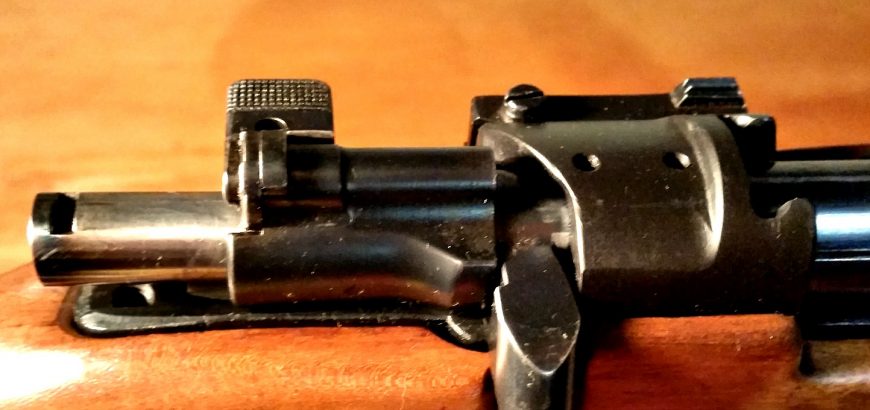
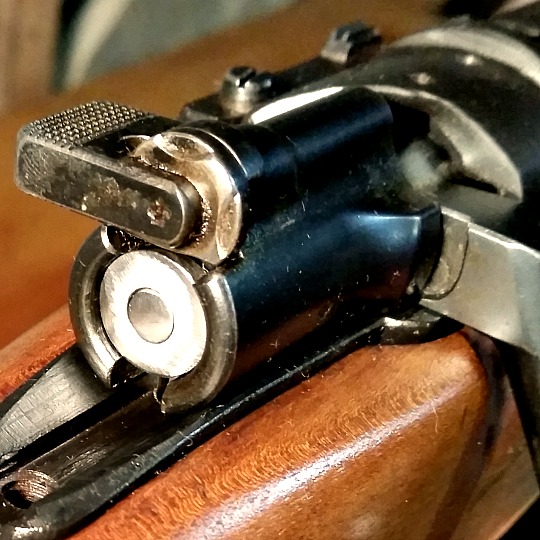
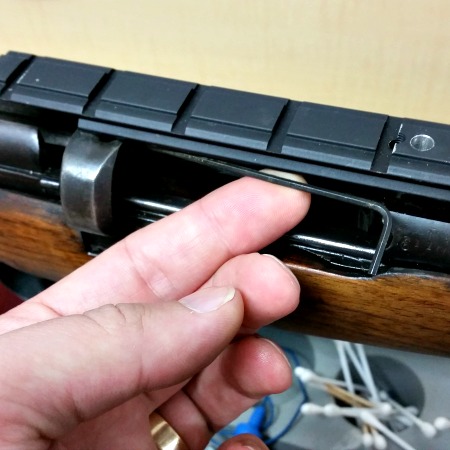
Most of the older rifles with scope mounts have rails that bridge the gap between the front of the action and the stripper-clip/bolt guide. I think I’ve only seen one with weaver-style rings jimmied into place, and one with a scout-type mount that fit over the rear sight – similar to what you see on some Mosin Nagant scout projects.

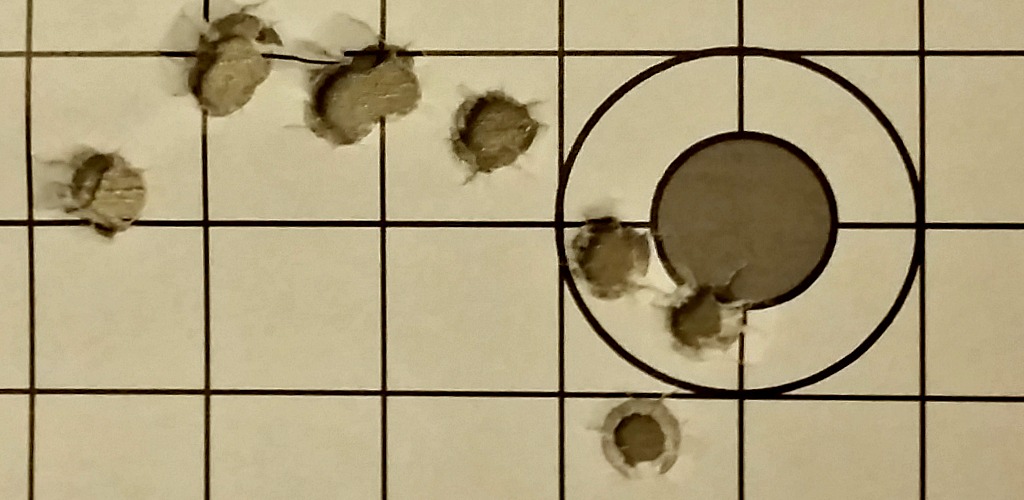
Anyway, these older rails – they all tend to lack any Weaver or Picatinny type cross sections – the slots where the recoil stop sits. If you try and fit modern rings to one of these older rifles, you’ll find that after a few shots, the rings will start to slide back or loosen.

So, this means if you buy a rifle with one of these old rails you have a couple choices.

Find some old rings

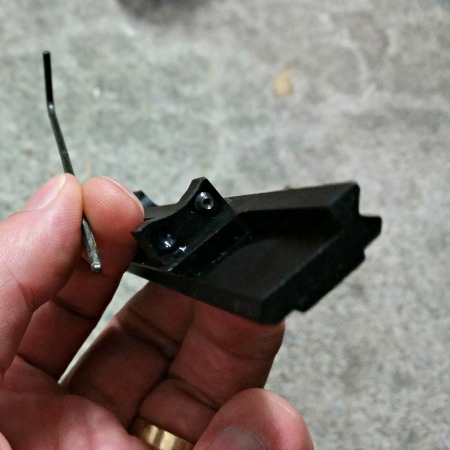
You could try and find some old style rings that lack a cross-bar. These are similar to the dovetail rings you get for rimfire rifles and for modern Tika rifles. The difference is the width of the ring bases, so you may not be able to find a modern type that will fit your older rifle – especially if the angle of the lips doesn’t mate up with the angle of the rail.

With the ATI scope mount, a longer allen key will be very helpful for the rear grub screws.

So, you may have to try and find some old school rings. However there are two downfalls to this approach. Firstly, older rings were phased out for a reason. The cross bar on picatinny and Weaver style scope rings means the rings cannot slide back on the rail under recoil.

The second downfall is that you will be getting an unknown quantity. They will probably be for 1″ tubes only, and you won’t know whether they’re good quality, well-aligned, etc.

Remove the rail and replace

There are a few modern rail types that you can fit to your .303. There are ones that you drill and tap into the side of the action – I’m not a big fan, but others like them. They’re quite similar to the kind of aftermarket rails you’d use on an AK, Mosin or SKS – basically actions that aren’t designed for scope rails.

The grub screws in the rear of the ATI scope mount use tension to keep the rail in place.

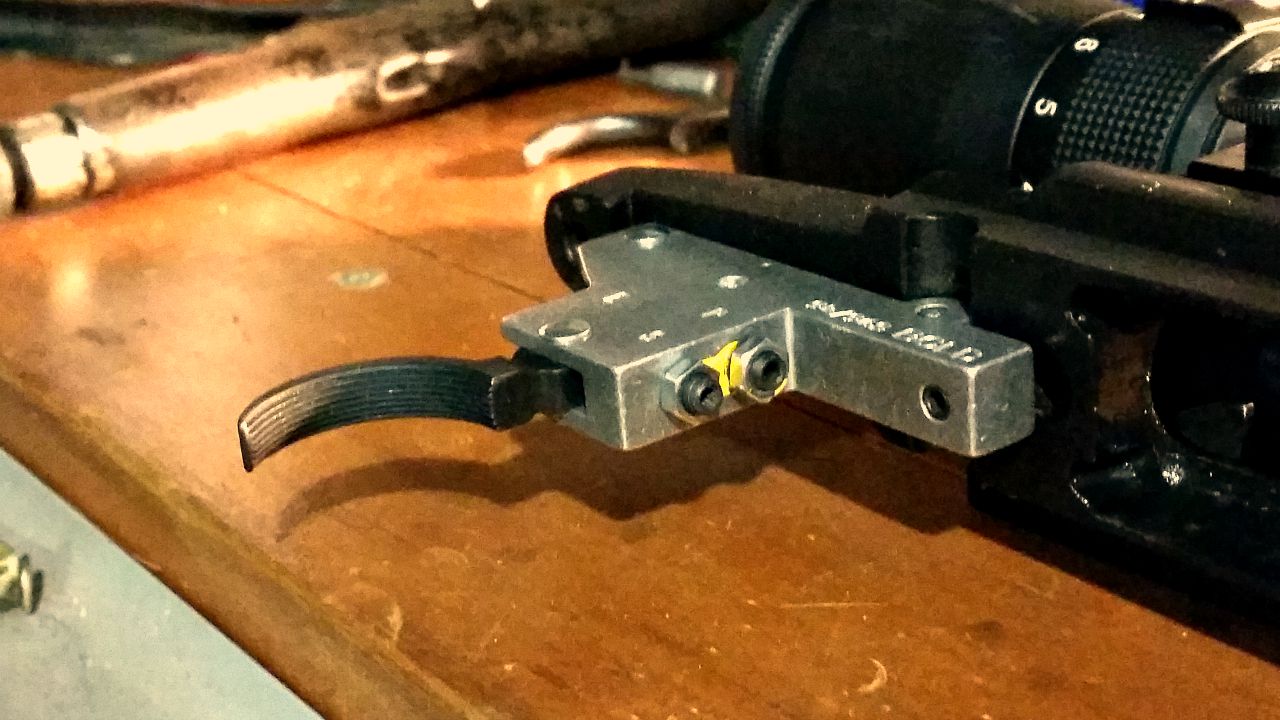
Because the rear ring of the action is quite different to modern actions, your standard MOA rails probably won’t be much help. However, ATI produces a mount that uses one screw into the front ring of the action and a couple grub screws against the rear ring of the action. While these two rear screws are not drilled and tapped into the action, the force they apply seems to be strong enough to keep the rail in place under recoil.

I’ve been using one on a project .303 for a while now, and have had no complaints.

With any aftermarket scope mounts on an SMLE, you’re going to have a pretty high scope. So, you’ll probably need to look at an aftermarket stock or some sort of cheek riser to allow easy and repeatable eye relief. More on that in another article soon, as this project continues to evolve.

The tools needed for this job are pretty simple and should all be in your tool box already.

Installing an aftermarket triger

Modern rifles with their out-of-the-box accuracy guarantees usually come with adjustable triggers, but if yours didn’t, help is on the way. Whether it’s an old military surplus rifle that you’re modifying or a modern hunter that needs a little bit of work, installing a new trigger is easy and worthwhile.

A stiff trigger pull can be the difference between a bullseye and the 9 ring, or the difference between a clean kill and a long walk through the bush chasing a wounded animal. If you want to see the difference a good trigger can make, one of the best examples you could have would be to try a 10/22 with a match trigger, and then shoot one with the standard trigger. After shooting with a lightened trigger for so long, I thought the safety was on when I tried to pull the standard trigger.

The tools you’ll need

There’s not much to this job really. Most stock triggers are removed by driving out the pin that holds the unit in place. This pin also acts as the fulcrum for the trigger set and reset. To drive this out, you’ll need a hammer and punch – or a filed down nail if you don’t have a punch to hand.

Depending on the trigger unit, you may need a small spanner or wrench to adjust lock nuts, and probably some allen keys or screwdrivers to adjust pull and sear engagement. Depending on your rifle, you’ll probably need a large flat head screwdriver to undo your action screws.

The tools needed for this job are pretty simple and should all be in your tool box already.

The trigger of choice

Of course all of this is moot if you don’t have a trigger to install. There are a few options out there, depending on your breed of rifle. Ruger 10/22s, AR15s and Rem 700s have a multitude of aftermarket bang switches, however if you’re improving an older rifle you may have to do some digging to find the trigger you need.


Nice new trigger thanks to Boyds Gunstocks.

My most recent trigger install is a BOLD Trigger from Boyds for my Husqvarna M38. As I’ve mentioned before, I don’t like using a safety – an empty rifle is the best type of safety – so I went for the version without the side safety. However, if you do like to use your safety in addition to safe gun handling practices, the side safety is much more convenient than the toggle on the back of the bolt on the old Swedes.

The 94/96 trigger fits the M38 perfectly. Boyds also stocks triggers for the 98-family Mausers, as well as a Mosin Nagant trigger. Other hardware obtainable from the gun stock manufacturer include trigger guards and floor metal, as well as sling swivel studs and action screws.

Extra inletting

Depending on your trigger, action and stock, there could be some extra in letting to do. Thankfully with the Boyds stock this rifle is destined for, there is ample space for the trigger. However, before I get round to bedding and finishing that stock, I’ll be taking out a bit of material from the current stock to allow the larger trigger unit to fit.

For this job you may want to use a mill. However, hand tools or a dremel will do just fine.

The easy part

The easy part is the install itself. For most triggers, all you’ll need to do is punch out the retaining pin, put the new trigger in the old one’s place, and insert the pin again. That’s almost all there is to it.

With the BOLD Trigger, there’s a grub screw forward of the pin which, when tightened, keeps the unit in place. The mechanism is quite different from the original trigger, so you won’t need the old spring or any of that. If there is any issue with fit (as there can be with the many variations of these beloved milsurp rifles), the instructions that come with your trigger should tell you where you need to add or remove material.

Adjusting the pull and sear engagement

This is where your new trigger comes into its own. It will have its usual factory setting – 3 pounds for the single-stage BOLD Triggers – and an adjustable range. The range on my new trigger is 2-4 pounds, and the sear engagement can be altered too.

On my model, this is done by loosening the locking nuts and adjusting the grub screws with an allen key. In the photo below, you can see I’ve started on this in the photo below, as the factory seal yellow paint has been broken.

The yellow factory seal on the adjustment screws is broken.

I’ve adjusted my trigger to the lightest it will go. This rifle will be a range-only queen, so the heavier pull you’d want on a hunting rifle is not necessary. When adjusting sear engagement, work the bolt rapidly to make sure it won’t fire on closing – too little sear engagement and you could end up with an unsafe rifle.

Once the trigger pull is where you want it – I shouldn’t have to say this, but obviously you’re testing this on an empty chamber or dummy round – it’s time to tighten up the locking nuts. Your particular trigger may have different instructions or mechanisms, so make sure you follow the included install directions.

Of course, the number one concern when modifying a rifle is safety when operating, as well as during the install process. If you’re unsure of how to properly install or set your trigger, your local gunsmith should be able to help you out for a very reasonable fee, as the the work involved is not onerous.

Modified M38 bolt.

Why I will never use my safety

If you’ve gone through the effort of getting your firearms licence, you’ll have come across seven neat rules that should dictate the way you handle guns for the rest of your life. These are the foundation of the arms code and are as follows:

Rule 1: Treat every firearm as loaded
Rule 2: Always point firearms in a safe direction
Rule 3: Load a firearm only when ready to fire
Rule 4: Identify your target beyond all doubt
Rule 5: Check your firing zone
Rule 6: Store firearms and ammunition safely
Rule 7: Avoid alcohol and drugs when handling firearms

You’ll notice, not one of these is “apply the mechanical safety on your firearm”. Why is this? Mechanical objects fail due to wear and tear, extreme conditions and pure bad luck. If you’ve read the instruction manual that comes with your new rifle or shotgun (highly recommended activity), you’ll notice that while new and improved safeties are always created for weapons and mentioned in these manuals, they usually discourage you from relying solely on these little switches.

How does a safety work?

There are two ways that most safeties work. The first is that they block the trigger from being pulled back, or even disconnect the trigger mechanism. The other is that they block the striker or hammer from moving forward and contacting the firing pin. There are many, many other types of safeties, and they can be in different places on your firearm, but they all have one thing in common – they are small bits of material upon which a large responsibility hangs.

That is why you never rely solely on a safety. Now – this my preference – I prefer not to use the safety at all. Some ranges will require your safety to be applied, and that’s fine. But, I personally don’t want to build up a reliance on a little switch.

What do I do instead?

When on the range and not using the rifle, I have it pointed in a safe direction with the action open, magazine out (or empty) and a breech flag in the chamber. This indicates to everyone that firearm is unloaded and safe.

When carrying a firearm to or on the range, same applies. Magazine out or empty (if fixed), and safety flag in or thumb in the chamber – muzzle pointed in a safe direction.

When firing on the range – well, you’re firing. What good is a safety when you want it to go bang?

When carrying a rifle in the field… This is where it gets a bit tricky. I leave my ammunition in my pocket, as well as my bolt if it’s a bolt action, until I’m near where I want to be shooting. When I am in the area in which I want to shoot, I fit the bolt (or close the action on a semi), and load the ammunition.

At this point, I do not chamber a round. I close the bolt on an empty chamber by pushing the top round down with my thumb or inserting the magazine on a closed bolt. When you’re ready to line up your shot, rack the bolt and get ready to squeeze the trigger.

If your quarry eludes you – drop the magazine out and remove the chambered round. Double check to see there’s nothing in there and close the bolt on an empty chamber before inserting your magazine again. Or, push the top round down on your bolt action.

This is just my personal procedure – you may have different feelings on the matter, or experience to the contrary. Leave a comment below with your tips on firearm safety.

Check out the arms code here.

Should I clean my .22LR barrel?

There are many opinions, myths and vagaries about rifle cleaning. Some will tell you to clean and polish your bore after every trip to the range, others will tell you cleaning your rifle is a waste of time or a bore snake will do the trick. However, one thing’s for sure – maintaining your .22 is completely different.

What’s the difference?

Whether it’s rimfire or centrefire, some fouling is often needed to get a barrel shooting to the same, reliable point of impact. Lead rimfire projectiles are much softer copper-jacketed bullets, doing minimal damage to the bore, and the lead deposits left in the barrel don’t do any harm either. Copper not only wears down the barrel, but leaving it in the bore can lead to quicker deterioration of the rifling after subsequent shots.

So, the question then becomes – if fouling is good and lead isn’t harming your barrel, why would you clean your .22?

This picture shows how a clean barrel walks to its point of impact once it fouls up.

How often to clean your .22LR barrel

I don’t personally clean my barrel very often. The standard is “when accuracy starts dropping off”. And to be honest, I’ve never got to that point. I give my .22 a couple pulls through with the bore snake and some Hoppes No. 9 after a couple thousand rounds – give or take a few. But, lead crud is nasty on the action.

I mainly shoot bolt action when I’m shooting rimfire, which means I can feel when the bolt starts getting stiff or it doesn’t feed nicely. Semi-autos tend get gummed up a bit more, as gasses from firing come back into the action. What to do? Use some bore solvent and angled brushes, cotton swabs or cloth to clean the gunk out. Every now and then disassembling the bolt or action could be necessary to ensure reliable functioning. Some shooters also like to clean up the crown, however, I shoot with a suppressor, so I’m not super-fussed on that score.

If you have any questions or tips for cleaning your rifle – share them in the comments below.

Modified M38 bolt.

Mauser bolt modification

Spend any time exploring gun forums and corners of the internet dedicated to military surplus firearms, and you’ll quickly encounter the opinion that Mauser’s bolt design is the standard by which all other bolt actions should be judged, and that most subsequent “improvements” were purely cost-saving modifications.

As a big fan of the small-ring Mauser variants, especially in the super-accurate Swede, it was only a matter of time before I started pulling apart my Husqvarna M38 to see what I could improve. Most Mauser bolt mods are bent handles to allow for scope clearance – something which has been covered ad nauseam all over the place.

So, instead of going over the same ground about oxy-acetylene torches, vices and hammers to get your military Mauser into sporting condition, I’m instead going to look how to reduce lock time by shaving some material off the cocking piece and firing pin. As always, remember that modifying your firearm is dangerous/irreversible/stupid, etc.

What is lock time?

Lock time is the minuscule period of time between when you pull the trigger and when the firing pin crushes the primer to set off the powder inside the cartridge. In other words, how long it takes the firing pin to travel to the primer from the time it is released by the pull of the trigger and the disengagement of the sear. The term lock time comes from the age of muskets – flint locks and wheel locks – the time it it took for the lock to work.

Essentially, the longer the lock time, the more likely it is that the shooter’s natural movements will move the rifle off target. The other period of time that is quite significant is how long it takes the bullet to leave the barrel, as again, the shooter can move slightly during this time.

So, naturally, it’s in a shooter’s best interests to have as short a lock time as possible. Modern bolt actions are incredibly quick compared to old military surplus rifles, and the chief ways in which lock time can be decreased are through eliminating excess material which causes resistance, friction or drag, and making modifications to the main spring, or replacing it and/or the firing pin. There are a few “speed lock” products out there, which are kits aimed to help you reduce the length of travel of the striker, and usually the trigger pull as well. Often, they will also convert your cock-on-closing Mauser to a cock-on-opening action.

Personally, I quite like the cock-on-closing action on older rifles, as it allows you to “feel” more of the chambering and extraction process – a real plus for reloaders.

Removing material

This is something you can’t afford to do wrong, especially if you’re working on a rifle with hard-to-replace parts. Fortunately for me, I had recently bought a replacement bolt due to a different issue and had some good parts on the old bolt to work with.

If you’ve spent any time on Mauser-related forums, you’ll have come across Dutchman, or Dutch. A very knowledgeable gentleman with his own website dedicated to everything Mauser. I came across one of his posts, in which he showed the modifications that were made to cocking pieces and firing pins in order to produce the bolts for the super-accurate CG63s and CG80s. With this as inspiration, I set off on my own bolt-modification adventure.

I removed the thumb piece on the back of the cocking piece to reduce weight and drag, and made the firing pin short enough to match. As you can see in the picture below, the previous owner of this rifle cut down the main spring to decrease cocking effort on the rifle, but this can lead to unreliable firing and pierced primers, so I’ll be swapping that spring for the one on the blued bolt I recently bought.

Modified Mauser firing pin.

As you can see in Dutchman’s post, there is more material that can be removed in order to reduce friction, as he shows some rifles with scalloped bolt sleeves. Whether I attempt this or not is still yet to be seen, I’d like to see the difference this makes first before going any further. The sear engagement on the cocking piece can also be altered according to his pics, but it looks like a welder would be needed to reinforce the sear engagement section. There’s also the fact that you’ll need to case harden this section again, as a cut-up sear piece will quickly wear away, creating a dangerous firearm.

I’ve opted to leave this bit for now, as I’m planning on replacing the factory trigger with a Timney trigger in the near future. I want to see what it’s like with the new bang button, before I go and make any permanent changes.

It’s all about the looks

The flush fit of the cut firing pin is much more attractive than the thumb piece.

Well, not all about the looks, but it does play some part. I’ve got to admit, the cut down cocking piece looks a lot more modern and svelte than its military-style counterpart. I’ll take this opportunity to remind you that this rifle was not in collectors condition when I got it from the previous owner, so it is purely a project – no one is cutting up a pristine M38 here!

Another thing I wanted to do was break up the solid black of my rifle. The “new” bolt I bought had been blued and combined with the matte black paint job I did on the action and barrel, it was starting to look pretty boring. For a bit of contrast I took the un-blued extractor and extractor collar from the original bolt and added it to my new hybrid monster. The end result is a little bit of flair, with no real practical relevance. Be warned though, that while the extractor is easy enough to remove, the collar does not spring back into shape nicely for you to put teh extractor back on. You’ll need to hold it shut while sliding the extractor over – which isn’t easy without the armourer’s tools. I used a pair of circlip pliers, which while tricky to do, managed the job in the end.

The blued bolt body creates a contrast for the polished extractor and extractor collar.
Assorted brass picked up from different ranges.

Range brass – any good for reloading?

Picking up brass from the range is seen by some to be scavenging, and by others to be a useful service to all range users. But at the end of the day, should you be putting range brass through your rifles?

When you sling a couple hundred rounds down range, chances are you won’t be able to recover all of your brass, especially if you’re shooting a semi-auto rifle. After a shoot we all (hopefully) like to clean up our casings, even if they’re not reloadable. We also pick up our targets and other rubbish because we like to keep the range in good condition for all users – and we like to find it that way too.

However, while you’re cleaning up and finding (most) of your brass, you come along some shell casings left by other range users. Do you take them? Sure, why not? Picking these up leaves the range cleaner than you found it and probably makes up for some of the brass that you’ve lost. You could recycle it, beef up your collection of weird and wonderful casings, or you could even reload it. But should you?

Reloading casings of unknown origin

When you’re reloading to achieve optimum accuracy, the answer is: No. As mentioned in a previous article, hand loads designed for match performance eliminate as many variables as possible. When you pick up random brass you have no idea how many times it’s been fired, whether it was a factory round or reloaded and what kind of pressures it’s been subjected to.

All of this has a large bearing on tempering and forming of the metal, which ultimately won’t be consistent with any of your own carefully prepared cases. If you’re controlling your shooting and keep brass sorted as unfired, once-fired, twice-fired and so on, why would you introduce a complete unknown into the mix?

Although, we all like to let loose and destroy things from time to time. Not every trip to the range is about absolute accuracy. Sometimes you just want to put big holes in things. Other times you could be introducing your friends to shooting. These are occasions that don’t warrant using your pet loads and favourite materials. In my opinion, range brass is perfect for this.

Preparing range brass

When it comes to using unknown brass you’ve got to be more careful than usual – but saving your good brass makes this extra effort worthwhile. I don’t think tumbling is a necessary step in reloading, but when it comes to cases picked up off the range, I think it’s a great idea.

Running your new found cases through a tumbler will remove any unknown dirt or residue that may be lurking around. You should also make sure you clean the primer pocket, trim the case to length and debur/chamfer the inside and outside of the case mouth if necessary.

Remember that these cases may have been fired 6 or 7 times before you ever got your grubby mitts on them, so they could only have one or two shots left in them. But again, remember that you’re saving your good stuff for competition days and hunting trips – when accuracy is really important.

In the meantime, keep your range tidy and your ammo box stocked by cleaning up after yourself and your fellow range users. Just don’t take someone’s brass if they haven’t left yet – chances are they want that when they’re done!