If you’re more familiar with the build of a bolt action rifle, removing a shotgun stock can be puzzling at first. No obvious action screws and a bunch of stuff hidden inside. Here’s a quick run down on replacing a shotgun stock.
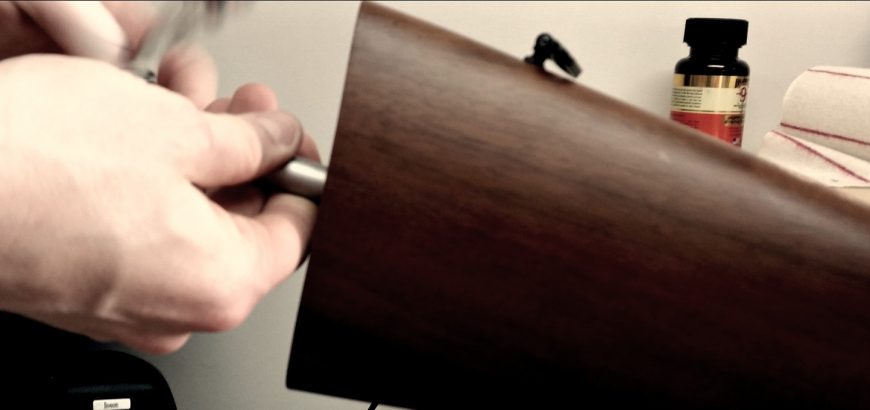
Step one: Remove the recoil pad
The reason you can’t see any action screws holding the wood to the metal is that you have one long bolt hidden in the buttstock that keeps it all together. Removing the recoil pad will reveal a hole in the centre of the stock, through which you can access that bolt.
A Phillips head screwdriver is usually the tool for the job.
If the screws holding your recoil pad to the stock are hidden in the rubber and you can’t see what tool to use, try a Phillips head screw driver. Most manufacturers still use these.
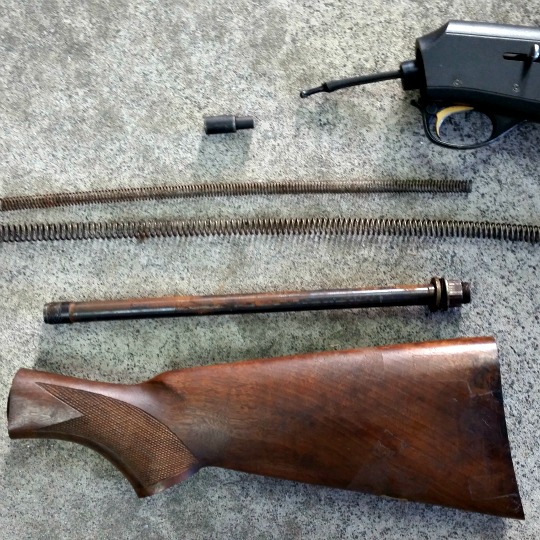
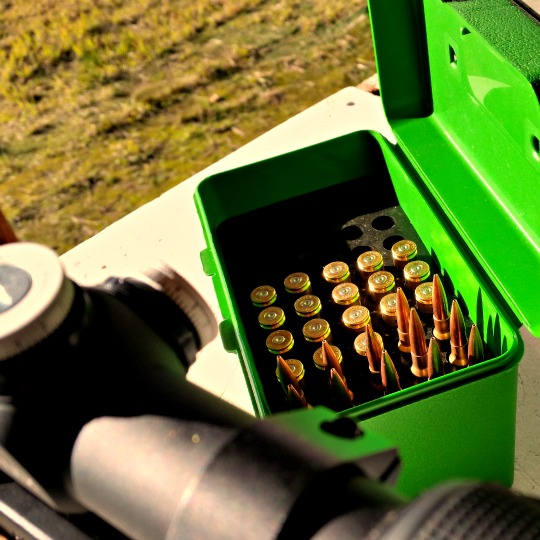
What’s missing from this SKB? You’ll never know if you weren’t paying attention in the first place.
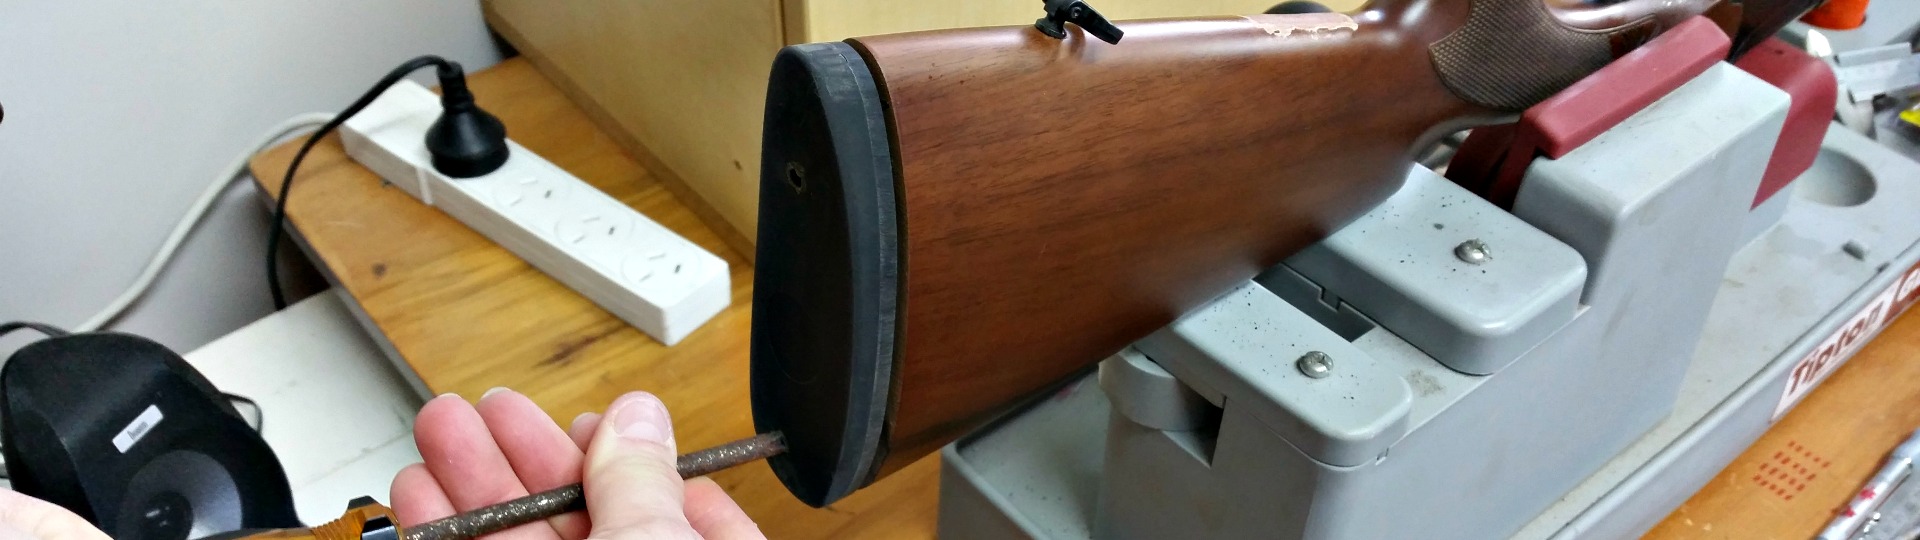
Step two: Remove the stock bolt
These are usually pretty easy to remove, and all you need is a socket wrench with appropriate extensions and the correct size socket. Trial and error will help you find the right socket size, as each firearm is different.
Because these bolts are not overly tight, the slight differences between imperial and metric should not be too much trouble.
CAUTION: If you’re working on a semi-automatic shotgun, there are a lot of parts (including springs) that will shoot out if you do not hold the stock and action together and carefully remove the bolt and other pieces. Watch how they come out, as you’ll have to put it back together.
Step three: Do whatever it is you were going to do
This is the part where you clean your action, replace your stock, repair any cracks, or whatever it is that motivated you to remove the stock in the first place.
Step four. Reassemble
Putting it all back together is pretty simple, especially for U/O, SxS and pump-action shotguns. If you’re working on a semi for the first time, I hope you paid attention when you took all the bits and pieces out, or you may end up with a click but no bang the next time you go out shooting.
There may be some fining up to do at this point. If you’ve replaced your buttstock, you may have to grind the old recoil pad down to size, or you might want to use some sawdust, stain and oil to fill up fine gaps between the action and the replacement stock (if necessary).
This Hatsan Optima O/U got a good clean while the stock was off for replacement.
Step five: Function test
With an empty chamber or dummy rounds (snap caps), test the firearm for function. This means loading, firing and unloading. This is the time you want to find out about it. Not in the blind or on the range.
There are so many places around the web that you can visit to become more informed about your chosen shooting sport or firearm. However, some resources stand head-and-shoulders above the rest. Here’s a quick break-down of great places to to do a bit of digging.
Cartridge research and long-range accuracy
Terminal Ballistics is not only the home of Matchgrade Bedding Compound, but is also a wealth of knowledge when it comes to… well… terminal ballistics. The study of terminal ballistics is the study of what a bullet does once it impacts the target.
Nathan Foster does a lot of wound research and load development to help shooters figure out which cartridges will suit their desired application. If you’re thinking of trying out a new calibre, this is a great place to start.
Terminal Ballistics also provides long-range shooting advice, both on the web, and in books and other media. If you’re interested in hunting or target-shooting at extended ranges, make sure to give these a go.
Community opinion
Sometimes what you really want to know, is what other users think of a product. Sites like The Gun Rack provide product reviews and other useful information, but if you’d like to get a variety of opinions or start a poll on a certain subject, a forum may be the best place to do that.
In New Zealand we have nzrimfire.com, fishnhunt.co.nz, nzhuntingandshooting.co.nz and many, many more. Often you’ll find that forum members are across multiple sites, and you’ll soon figure out who really knows their stuff.
Advice on reloading and other topics is plentiful on online forums.
Technical reviews
While I try and provide thorough reviews from a user’s point of view, sometimes what you want is a very technical investigation into a certain issue.
A website you can’t look past is precisionrifleblog.com. Full of comprehensive tests and healthily objective comparisons, this is a site that I could get lost on for hours (and sometimes have).
Services
Some of the services that rifle shooters need are just not advertised in the way makeup or used cars are. To find out where to get your stock repaired or get a barrel threaded, you probably shouldn’t rely on Google.
Theirs no better resource for this than your fellow shooters. Aside from checking out forums, or the other resources listed above, joining a hunting or shooting club is an invaluable way to make contacts in the community/industry, and find out where your local gunsmith or hunting spots might be hidden.
Properly bedding and finishing your rifle will not only help it look a million bucks, but will seriously enhance your accuracy as well. In this blog series I’ll be looking at bedding and finishing my Boyds Prairie Hunter stock for my Swedish Mauser.
The stock
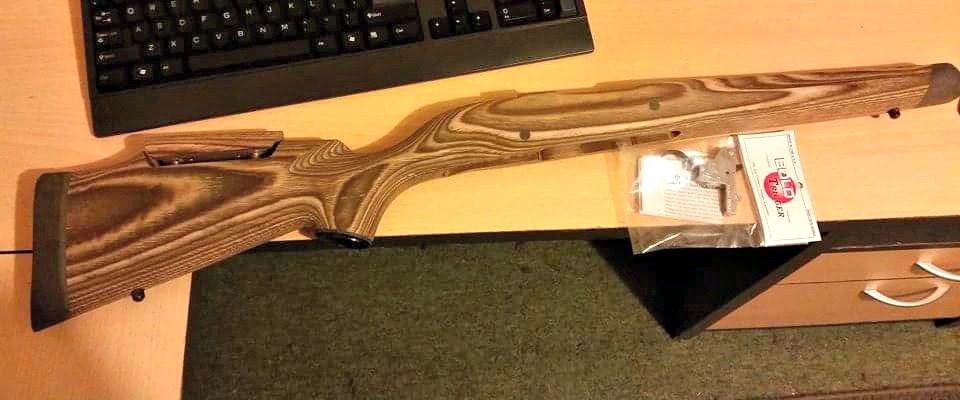
The stock I’ve chosen for my small ring Husqvarna chambered in 6.5×55 is a laminate from Boyds Gunstocks, in their Prairie Hunter shape with a nutmeg finish. The stock has more weight than my current one, absorbing some more recoil, but also balancing well against the almost half a kilo of suppressor on the other end. It also has a more appropriate length of pull, and a nice recoil pad that not only reduces kick, but also gives me that little bit of extra length.
This stock has been provided with a few nice extras, including an adjustable comb and synthetic pistol grip and forend caps.
The Boyds stock and BOLD Trigger made a nice care package to come home to.
For some stocks, Boyds only provides their products unfinished, which is the case here. This is because some rifles come in so many variations of configuration, that they will necessarily require some fitting by the user. In this case it’s differences in bolt handle that make it a must for users to complete their own stock. Many older Mausers still have their straight bolt handles, but increasingly if you come across an old Swede, the bolt handle will be bent back, or you could even have an M38 bolt – or similar – which comes turned down from the factory.
After finishing this, and any other inletting adjustments needed, you can then apply your choice of protective coating. While Boyds recommends a polyurethane, I really like the hand-rubbed oil look, so that’s what I’ll be trying with this project. My Pro Varmint stock from Boyds does have the polyurethane finish from the factory, and I must admit, it looks good and is very hard-wearing. But hey, since I’m doing this bit myself, I may as well try something different.
The bedding compound
There are various bedding compounds and systems on the market, and you have some serious research and decision-making to do. Some newer factory rifles will come with an aluminium bedding block, while others are pillar-bedded.
Rifles that are bedded after the fact can be done in several ways, depending on your capability, tools, budget (if your smith is doing it), desired application and the needs of your rifle’s action.
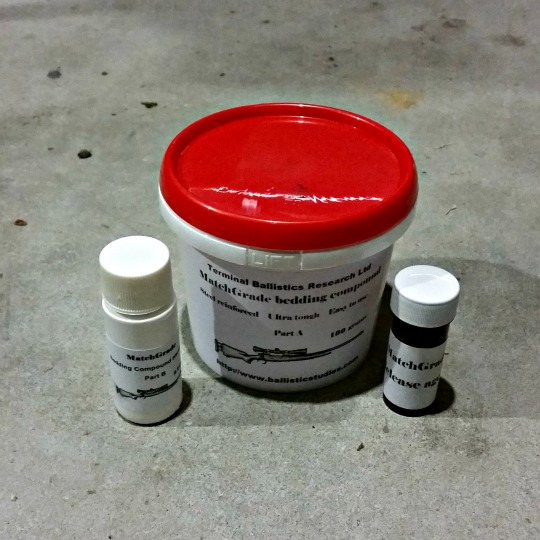
Terminal Ballistics Matchgrade Bedding Compound – release agent, component A and component B.
Generally people choose between pillar or glass bedding, or both. Then there’s also a full, front or front-and-rear glass bedding job. Pillar bedding uses metal pillars, such as aluminium or stainless steel, to eliminate the risk of compression or crush when tightening the king screws.
The pillars are tubes that are epoxied in the action screw holes, for the screws to go through. This way, when the wood expands and contracts, or is put under pressure between the floor metal and action, the screws can always be done up to the same point, as the metal is pretty much impervious to these stresses.
Glass bedding is the process of using a compound, that is pretty much an epoxy in most cases, that is reinforced in a fibreglass-like way. The compound I prefer is Nathan Foster’s Matchgrade Bedding Compound, which is steel reinforced, and easy to apply.
Check back in for Part 2, where I’ll go over the first steps of the stock prep and bedding process.
It’s not unusual for an older rifle to make its way through the family tree and lose its bolt or mag along the way – especially .22s which can be used and abused. The other way no mag/bolt guns fall into our hands is through Trademe auctions, usually run by gun stores that have used older rifles for parts, and no longer need the barrelled action and/or stock. So, is it worthwhile trying to restore these firearms to their former glory?
What’s the value?
If it’s a family heirloom, it could have enough sentimental value for you to undertake the project regardless of cost. However, if you’re eyeing up an auction, it’s probably because you want to get a rifle together on the cheap. Depending on your scenario, it may or may not be worth the time, money and effort to restore the firearm.
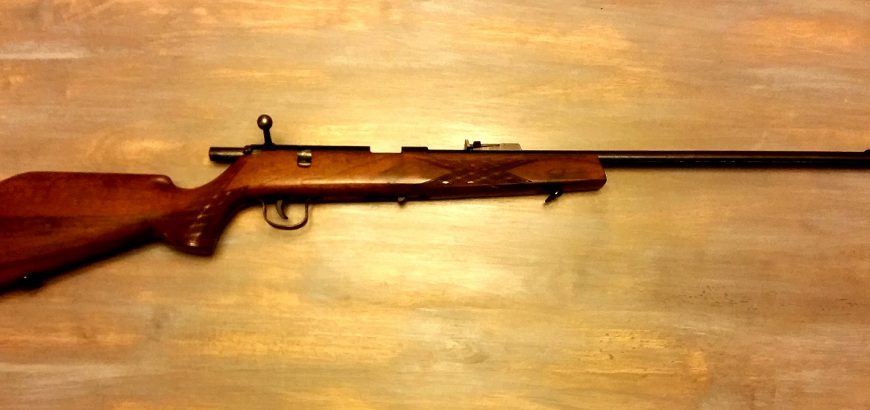
A word to the wise – thoroughly research your intended purchase before assuming you can find the parts to complete the project. As an example, I wanted to put together a cheap shotgun and bought an SKB semi action and stock, missing the forewood and barrel. I had seen some barrels online, and figured it would be easy enough to put this thing back together.
However, I found out (like an hour after the auction), that the SKB factory had been shut down, and that the barrels that I had found in the States were not ideal. There are some available locally – for over $900. There goes the idea of a cheap shotgun. So I paid $29.50 for something that probably won’t ever be used for anything, except perhaps testing out gun blue or stock reconditioning products.
What’s the cost?
Sometimes you can source the parts, but you have to be inventive to keep the cost down. The thing is, if it was cheap to do, the gun store would have bought the parts and sold a complete rifle for more – so you know it’s not going to be a walk in the park.
A good example of getting creative is a rifle I got from my father-in-law. It’s a .22LR bolt-action from sometime around the ’70s or ’80s. It was sold by a trading house by the name of Wischo Kg Erlangen in Germany originally, essentially assembled from parts provided by various European manufacturers. The rifle is basically a Voere.
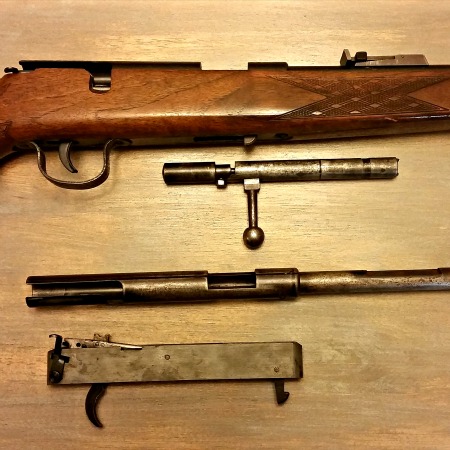
The rifle came into my possession for the princely sum of a nice bottle of wine. It had a decent looking barrel and a crisp two-stage trigger. However, it was missing the rear sight, magazine and bolt. By keeping my eyes open, I managed to spot a Voere parts auction on Trademe.
The auction was for an action and bolt, with about 8 inches of barrel attached. See below video of me firing this weird thing, after fitting it to the stock from the rifle I had acquired.
Included in the “barrelled” action was the rear sight – a stroke of luck. Also in the auction I got a 6mm garden gun without bolt, which is just a wallhanger in my office. Oh well. I’m never even going to try solve that mystery.
The Wischo rifle sporting the Voere sight, pictured next to the Voere bolt, action/barrel and trigger group.
The issue then became whether the parts I bought on an (educated) whim for $40 would fit my rifle – as technically they were not from the same gun. Well, it turned out I was right with my assumption that the trading house rifle was a Voere in disguise, however the bolt wouldn’t close nicely and the rear sight was obviously different, as it had a larger dovetailed base.
A machinist/engineer friend of mine helped me take a small piece of metal off the action around the bolt, which got it cocking smoothly, and extended the dovetail to take the sight off the parts gun. This cost me a box of Heineken.
All that’s left to buy is a magazine, which I can get from here, or here, for between $100 and $150. So, all up, for the cost of a bottle of wine, a box of beer, $40 for parts and around $150 for a mag, I’ll have a nice wee shooter with a bit of character and a story worth telling. By throwing in some of my own time and effort, I can reblue the rifle and varnish the stock, and it will end up being a really good looking little gun too.
So, again, it can be worth it – but you’ve got have the time, and sometimes know the right people, to make it worthwhile restoring a non-functioning rifle.
Before the NZDA Prize Shoot earlier this month, I was lucky enough to get my hands on a brand new suppressor from MAE. I didn’t get a chance to shoot with it before the day, so I must admit I was a bit nervous – but it was well worth it in the end.
MAE
MAE are a New Zealand suppressor manufacturer, based out of East Tamaki in Auckland. These guys are not only part of what keeps New Zealand’s shooting community ticking, but they are able to actively engage with their customers to discover new needs and develop better products. Some of the models and cutaways that I saw at the shop were incredibly impressive – include a suppressor that tightens itself on the thread as you fire.
Suppressors in New Zealand
Unlike the USA, suppressors can be had without any legal hoopla or extra taxes. They are seen as practical accessories that improve the shooting experience, control noise on the range or farm, and make it easier to destroy pests or hunt game.
Suppressors help to reduce felt recoil, as well as decibel levels.
There are many – many – types of suppressors on the market, include muzzle forward (muzzle cans), over-barrel (reflex) or full-barrel (integrated). There are many produced here, and as much come in from overseas. Price-wise, you can expect to pay anything between $300 and well over $1000 for a centrefire suppressor. A decent rimfire silencer can go for as little as $55 on Trademe, and up to a couple hundred bucks if you want better performance. Again, the more you spend, the more you get. I have seen some impressive .22LR setups with full-barrel or over-barrel suppressors.
6-30 ST Muzzle Can
The 6-30 ST suppressor is the cheapest (brand new) centrefire suppressor I have seen in New Zealand recently. Don’t let this fool you though – it’s damn good.
The positives
It does what it says. This suppressor greatly reduces felt recoil and muzzle climb. It was infinitely easier to shoot with this suppressor fitted, especially with a light (and short) stock. For modern hunting rigs in large calibres and light stocks, one of these should be on your radar.
It’s a solid unit. Literally. It doesn’t come apart for cleaning and is joined at the muzzle end with some very neat TIG welding. This means there are no bits to lose or break.
Long life expectancy. With a 5000 round minimum service life according to MAE, you can expect this suppressor to last as long as the barrel on your rifle. For the price, it’s definitely worth it.
Solid stainless. The 304 stainless means it’s heavy as hell, and you certainly notice the balance shift. However, the heavy material absorbs more sound and makes for a more solid unit. The 304 will also be less prone to corrosion than other materials. For a range rig, this is ideal. For a hunting rig, you may want something that reflexes over the barrel to spread the weight a bit better. MAE offers a 5 year warranty, so you know they’re built like a brick sh…
The price. At $250 for the stainless finish or $290 for the matte black, it’s the cheapest you’ll find on the market (at least as far as I can see).
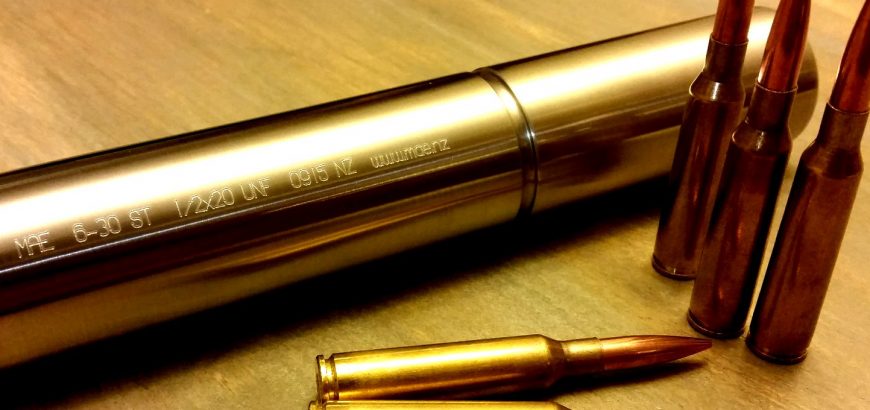
The versatility. If you have multiple rifles with the same thread but in different calibres, this silencer is for you. Good for anything between 6mm and right up to the 300 magnums, you can have one suppressor for your rifle, your partners, and the three she doesn’t know about.
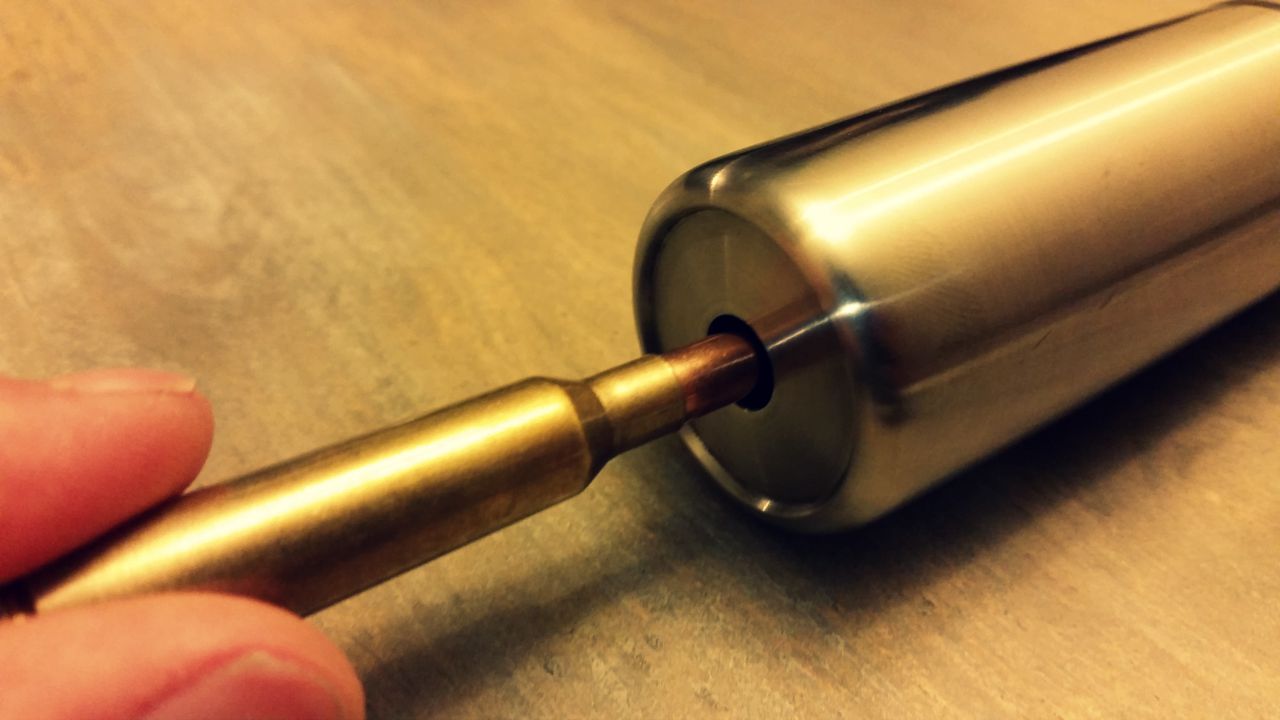
The suppressor is built for anything between 6mm and .300 RUM. The 6.5×55 above shows how much room there is left over.
The negatives
Weight. Although I like the weight of this unit, at almost half a kilo, it could be off-putting for those after a bush-ready rig. If you want a long-range shooter or a tactical sniper set-up, then this won’t deter you at all.
The price. Some people just don’t feel like they’re getting a good product unless they have to have their wallet surgically removed through their nose. In my opinion, this suppressor does what much more expensive ones do (without skipping a beat), at a much lower price. If this bothers you, I imagine your gun safe is full of some pretty expensive stuff. If you do want to spend more money, I’m sure MAE will have something to fit the bill.
Um…… I can’t think of anything else to be honest.
Range shooting
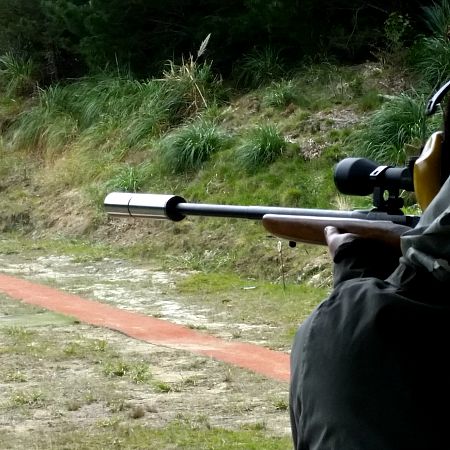
I must admit, I had a pretty poor shoot at the NZDA, but that was me, not the rifle. However, the one thing I did get out of the day was an immense satisfaction with my new suppressor, as well as the BOLD Trigger from Boyds Gunstocks.
The brushed stainless finish stands out and looks great. Although, for hunters a matte black would be better.
I chose to leave my suppressor as brushed stainless. Not only did it keep the cost down, but it looks cool with my rifle and the other polished metal bits on it (the Mauser-style extractor and the cocking piece). Having had a look at the paint MAE use (Gun Kote 2410F), I knew I had a pretty good match at home if I wanted to paint it myself later. In fact, it would then perfectly match my barrel which I did with the same paint.
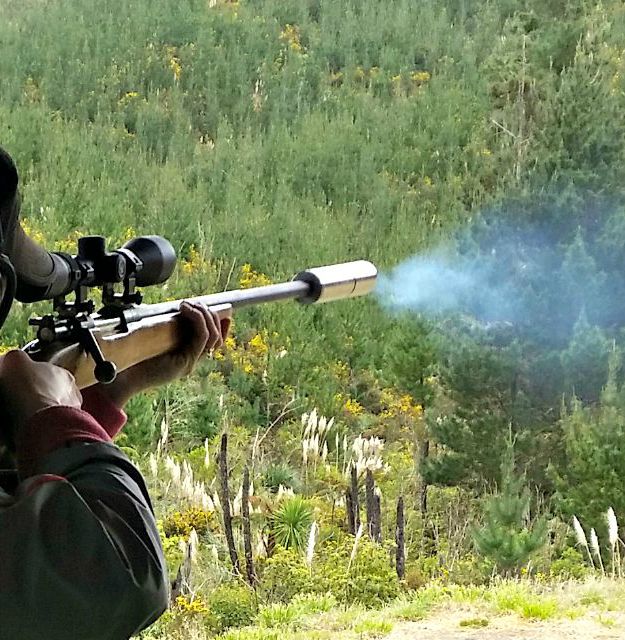
The 6.5×55 is a pretty mild-recoiling round, however, in the short, light-weight stock mine is in, it has quite a kick. Not enough to make it uncomfortable to shoot, but after 50 rounds, you’d definitely feel it. The first thing I noticed was an immense reduction in recoil. Not only does this get rid of the instinctual flinch you might develop over time, but it means you are right on target for your next shot. Previously I would find myself pointing two targets over to the left after each shot.
Shooting amongst a bunch of bare-barrel .308s and .223s all day, I could certainly notice (and appreciate) the significant reduction in noise from my old Swede. Ross, whom I shoot with regularly at the Howick Smallbore club, remarked several times throughout the day that he was incredibly impressed with how quite my gun was – he was sitting next to me and expecting a pretty big blast. Another shooter from our club noted that the rifle sounded “pretty cool” – which I must admit, it did. If you play Battlefield 4, you’ll know what I’m talking about. I was even approached by a complete stranger who said he would love to get one himself.
With the grand sacrifice of $250, and a little weight on the end of my rifle, I improved my shooting experience greatly. And the rifle did do really well on the day in the end, as my wife placed top of Division B with it.
Some caveats
When I got my suppressor I was given two bits of advice. Firstly, use a lubricant on the threads to ensure you can get it off after you shoot (nickel-based is good, copper-based is bad). Secondly, take the suppressor off after you shoot, or the stainless will attack the barrel.
Anyone who is familiar with the concept of sacrificial metals will quickly grasp that last one. I would just add one last piece of advice. The burnt powder and gunk that is on the crown of the barrel when you remove the suppressor – wipe this off immediately. I waited until I got home and cleaned my rifle, and it had hardened and become very difficult to remove.
My overall opinion is that this is a product which will help you enjoy shooting more – especially larger calibres, and will improve your accuracy. If those are two things you would like to do, and at a reasonable price too, then this is the suppressor for you.
Modern rifles with their out-of-the-box accuracy guarantees usually come with adjustable triggers, but if yours didn’t, help is on the way. Whether it’s an old military surplus rifle that you’re modifying or a modern hunter that needs a little bit of work, installing a new trigger is easy and worthwhile.
A stiff trigger pull can be the difference between a bullseye and the 9 ring, or the difference between a clean kill and a long walk through the bush chasing a wounded animal. If you want to see the difference a good trigger can make, one of the best examples you could have would be to try a 10/22 with a match trigger, and then shoot one with the standard trigger. After shooting with a lightened trigger for so long, I thought the safety was on when I tried to pull the standard trigger.
The tools you’ll need
There’s not much to this job really. Most stock triggers are removed by driving out the pin that holds the unit in place. This pin also acts as the fulcrum for the trigger set and reset. To drive this out, you’ll need a hammer and punch – or a filed down nail if you don’t have a punch to hand.
Depending on the trigger unit, you may need a small spanner or wrench to adjust lock nuts, and probably some allen keys or screwdrivers to adjust pull and sear engagement. Depending on your rifle, you’ll probably need a large flat head screwdriver to undo your action screws.
The tools needed for this job are pretty simple and should all be in your tool box already.
The trigger of choice
Of course all of this is moot if you don’t have a trigger to install. There are a few options out there, depending on your breed of rifle. Ruger 10/22s, AR15s and Rem 700s have a multitude of aftermarket bang switches, however if you’re improving an older rifle you may have to do some digging to find the trigger you need.
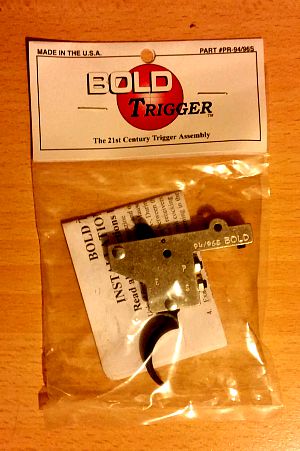
Nice new trigger thanks to Boyds Gunstocks.
My most recent trigger install is a BOLD Trigger from Boyds for my Husqvarna M38. As I’ve mentioned before, I don’t like using a safety – an empty rifle is the best type of safety – so I went for the version without the side safety. However, if you do like to use your safety in addition to safe gun handling practices, the side safety is much more convenient than the toggle on the back of the bolt on the old Swedes.
The 94/96 trigger fits the M38 perfectly. Boyds also stocks triggers for the 98-family Mausers, as well as a Mosin Nagant trigger. Other hardware obtainable from the gun stock manufacturer include trigger guards and floor metal, as well as sling swivel studs and action screws.
Extra inletting
Depending on your trigger, action and stock, there could be some extra in letting to do. Thankfully with the Boyds stock this rifle is destined for, there is ample space for the trigger. However, before I get round to bedding and finishing that stock, I’ll be taking out a bit of material from the current stock to allow the larger trigger unit to fit.
For this job you may want to use a mill. However, hand tools or a dremel will do just fine.
The easy part
The easy part is the install itself. For most triggers, all you’ll need to do is punch out the retaining pin, put the new trigger in the old one’s place, and insert the pin again. That’s almost all there is to it.
With the BOLD Trigger, there’s a grub screw forward of the pin which, when tightened, keeps the unit in place. The mechanism is quite different from the original trigger, so you won’t need the old spring or any of that. If there is any issue with fit (as there can be with the many variations of these beloved milsurp rifles), the instructions that come with your trigger should tell you where you need to add or remove material.
Adjusting the pull and sear engagement
This is where your new trigger comes into its own. It will have its usual factory setting – 3 pounds for the single-stage BOLD Triggers – and an adjustable range. The range on my new trigger is 2-4 pounds, and the sear engagement can be altered too.
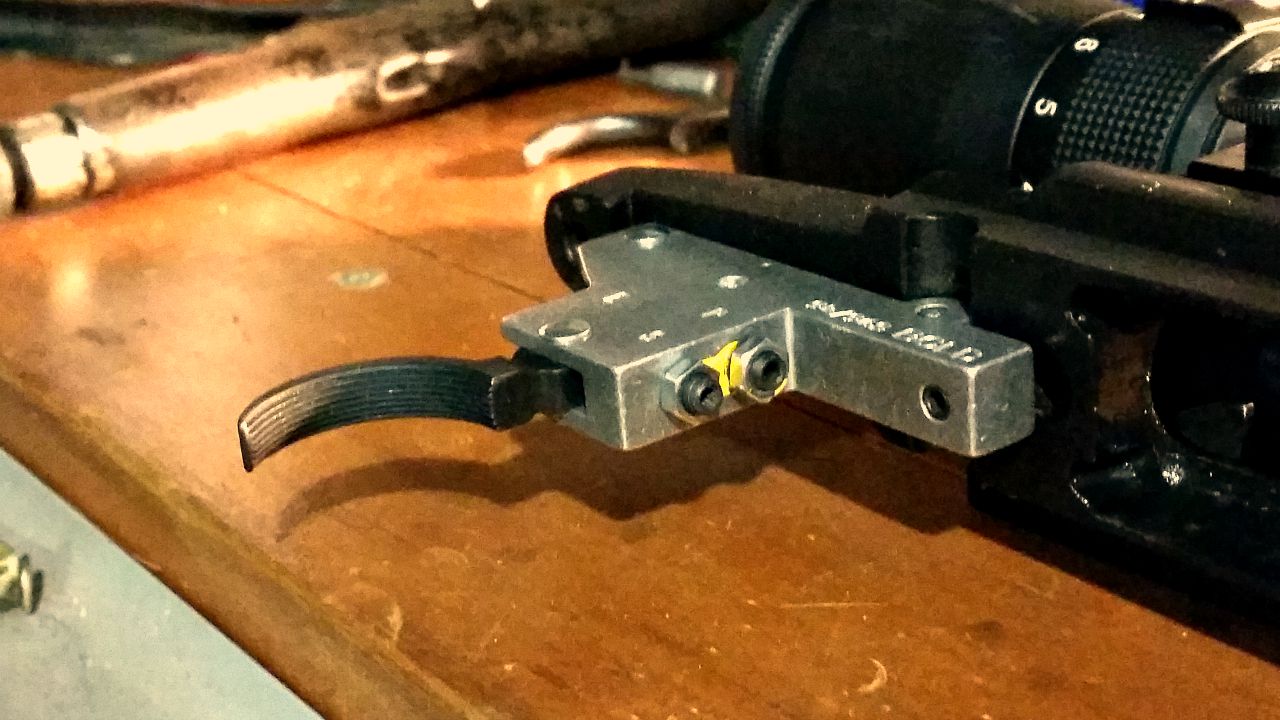
On my model, this is done by loosening the locking nuts and adjusting the grub screws with an allen key. In the photo below, you can see I’ve started on this in the photo below, as the factory seal yellow paint has been broken.
The yellow factory seal on the adjustment screws is broken.
I’ve adjusted my trigger to the lightest it will go. This rifle will be a range-only queen, so the heavier pull you’d want on a hunting rifle is not necessary. When adjusting sear engagement, work the bolt rapidly to make sure it won’t fire on closing – too little sear engagement and you could end up with an unsafe rifle.
Once the trigger pull is where you want it – I shouldn’t have to say this, but obviously you’re testing this on an empty chamber or dummy round – it’s time to tighten up the locking nuts. Your particular trigger may have different instructions or mechanisms, so make sure you follow the included install directions.
Of course, the number one concern when modifying a rifle is safety when operating, as well as during the install process. If you’re unsure of how to properly install or set your trigger, your local gunsmith should be able to help you out for a very reasonable fee, as the the work involved is not onerous.