
How to find PRS / Field Shooting matches in NZ

If you’re new to the precision rifle sports, or maybe you just read our recent article on what PRS and Field Shooting are, next steps are probably to find out how to get involved and where matches are held. This article will list out all of the current organisations which hold these kinds of matches – if we do miss any, feel free to drop us a message on Facebook and we’ll make sure to add it.

Speaking of Facebook, the bulk of info on matches, entries, updates, etc., is done through Facebook and Facebook Messenger. If you don’t like social media, or you’ve just never got around to it, it would be worthwhile creating a profile just so you can interact with these organisations.

A rare non-natural prop at a TLRS event. Featured shooter Mizz Gunrack

North Island

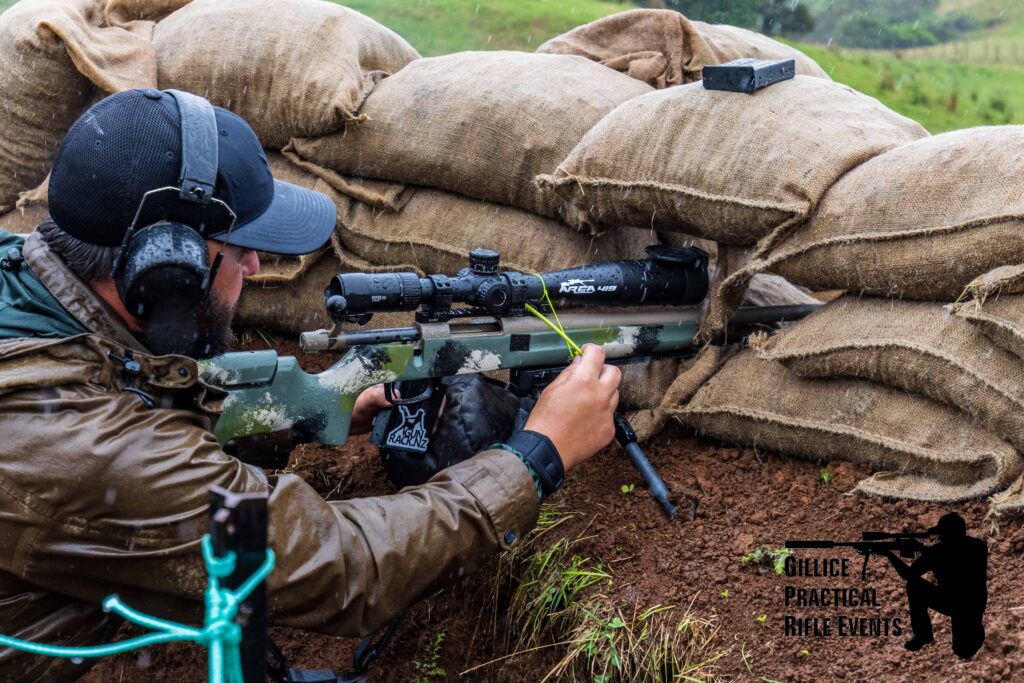
Gillice Practical Rifle Events

The original and the best! Simon has been running shoots for longer than most of us have been in the sport, and his events inspire and inform a lot of the other matches held across the country. You can follow GPRE on their Facebook or Instagram pages. Regular matches held by GPRE include the Pre-Roar Eye Opener (Mar), Desert Duel teams match (May), Speed vs Precision 22LR Match (Nov) and Tarata Practical Rifle Match (Nov).

As and when other properties / locations have been available, Simon has held other medium range and long range matches, as well as frequent 22LR shoots. Keep an eye on their social media for events not listed above. GPRE events are mostly held in the Central North Island, around Taranaki and Waiouru / Taihape.

Taranaki Long Range Shooting

TLRS, run by Graeme (and his loyal crew of volunteers), largely follows the format established by GPRE, adding its own flair and personality. Having started off as some social gong shoots a few years ago, the organisation and matches have evolved significantly to be some of the best precision matches in the country.

Surplus Steel is an awesome Service Rifle / Field Shooting crossover event that is a highlight of the shooting calendar

Regular events for TLRS include Surplus Steel (Jan), Ahititi Long Range Challenge (Feb) and Winter Blast (Jun / Jul). Other matches have included Bowers Valley Brawl (a dedicated long range / magnum event), and some 22LR matches. The Ahititi Long Range Challenge is the biggest event in the precision sports calendar, with the 2022 match consisting of 3 days of shooting, each day being a separate event. TLRS operates mostly in Ahititi (Taranaki), and other Central NI locations, up to Waitomo District.

TLRS and GPRE have collaborated in 2022 to run the SPARC 22LR series, four matches with distinct flavours, different match directors and locations, culminating in an upcoming series final.

To follow TLRS, you can check out their Facebook or Instagram pages. Graeme also runs Bolt Action Media, and co-hosts the Precision Unloaded Podcast with Mark (land owner / match director / podcast host extraordinaire).
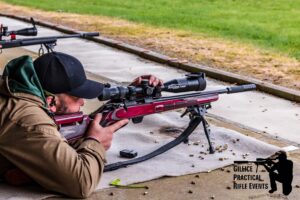
The Gun Rack

Yes, that’s us! We’ve run a grand total of two 22LR events in the northern Waikato region (out towards Port Waikato) over the course of 2022, and hope to do more in the future. Follow us on Facebook or Instagram for more updates.

Our aim is to provide matches that the other regular match directors/ hosts can participate in (as they’re always doing the hard work), as well as holding events closer to Tauranga, Hamilton and Auckland. This means a little bit less driving for those of us up this way, and also means we can attract new shooters to the sport.

Rifle being made safe at the end of a stage. We shoot in any conditions, so long as we can see the targets.

Precision Rifle Series New Zealand

PRS NZ are the official PRS affiliated organisation in New Zealand, and run matches in the Waiouru / Taihape area. It seems to be the aim of the organisation to get other match directors / locations involved and part of the series in due course, as well as qualifiying shooters to compete in the PRS USA Finale.

You can find them on Facebook. PRS NZ is also supported by Long Range Academy, and you can find out more at their website.

Central North Island Gun Club

CNIGC are primarily a Service Rifle club, and they host a few really cool events every year (along with all their club shoots). If I’m not shooting a precision or practical rifle match on the same day, I’ll try and be at their ANZAC shoot, Rapids, etc.

A couple years ago CNIGC worked with Simon from GPRE to run their first 22LR precision match. As far as I know, they have held more matches since then and have gone from strength to strength. Some of the CNIGC members have become familiar faces at other North Island matches, so it’s good to see the sport spreading to shooters from other disciplines.

CNIGC have a website where you can get in touch or find out more.

Auckland Shooting Club

Auckland Shooting Club are based in Makarau, about 45 mins north of Auckland central. They host 22LR precision club matches, amongst lots of other shooting disciplines. It’s not clear if this is restricted to members only, so get in touch, I’m sure they’d be happy to point you in the right direction.

Auckland Shooting Club have a Facebook page and a website for contact details.

The dreaded camo net is a prop that features at GPRE shoots every now and then – gear management is essential.

South Island

Now, I have very limited knowledge of the precision rifle scene down South, so Mainlanders, please excuse the brevity of this section.
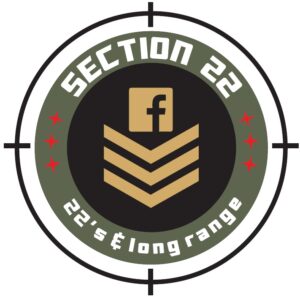
Section 22 is a great resource for our Mainland friends looking to get into precision shooting. Blair also imports some essential gear for the sport

Section 22

Section 22 is run by Blair, and hosts a bunch of 22LR matches in the North Otago region. Blair also imports a bunch of shooting gear, including tripods, ammo pouches, Wiebad bags, etc. Section 22 is run as a private group on Facebook, so have a look for them there.

Sparrowhawk NZ

Sparrowhawk NZ has been around for a minute or two. These guys have their own range in South Canterbury and run regular shooter education and training courses. They also host matches at their range. You can find them on Facebook or at their website.

Boundary Creek

Another venue down South which frequently hosts precision style matches, the range is just outside of Oamaru. A private group on Facebook contains info on upcoming matches, so search for them on there.

Hokonui Precision Rifle Matches

22LR is a great way to get into precision shooting, yet is still a highly competitive and fun subsection of the sport when you’re fully into it.

Another private Facebook group for you to search and apply to. A great resource for matches being held in the South Island.

Alpine Long Range

Alpine Long Range hosts matches in the Canterbury region, not too far from Christchurch. You can follow them on Facebook to keep an eye out for upcoming matches.

Peak View Range

PVR operate an established range with targets available for plinking or practice at distances from 100m – 1000m. They also run competitions and have a shop to buy gear you might need. If you or your significant other need extra motivation to get out there, they also operate Peak View Retreat.

Peak View Range can be found in Nelson, on Facebook or their website.

New Zealand Mountain Challenge

The Vortex NZ Mountain Challenge has been running since 2015, and is a world class long range event. The most recent event had a 3-day format, with a 1000 yard shoot off, the main mountain challenge match, and a precision rifle match on the third day.

You can find more info on the Mountain Challenge on their Facebook page. The match is sold out fairly quickly from what I hear, so make sure to keep an eye on it if it interests you. The Mountain Challenge is an annual event in Wanaka.

PSNZ22 – Practical rimfire shooting event

Firstly, where the hell did March go? Between shooting events, reloading, work, and an overseas holiday, I can’t say there’s been very much time to write anything. However, I did make time to attend Precision Shooter’s inaugural PSNZ22 practical rimfire shooting event.

Remember that horrendous rain and flooding we had a few weeks ago? Yes, we were shooting in that. I have never shot in such wet and miserable conditions in my life – and it was great fun! Being RO for our detail of 6 also presented its own challenges in the rain (i.e. keeping scorecards dry – which didn’t happen).

The test shoot

I was lucky enough to be invited by Kerry Adams to the test shoot a month prior, where we shot the course and provided feedback for the competition proper. It couldn’t have been in more different conditions. I walked away dripping in sweat, and completely sun burnt, but having had a great time.

I shot the test shoot with my bolt action Norinco JW-15 in a Boyds Pro Varmint stock, topped with a 6.5-20 x 44mm Weaver 40/44. The stock was great, and I was glad I had a bipod, as I used this to lean on fences and obstacles (even when folded), which avoided damage to my rifle. I also used one leg folded out as a foregrip on the tank trap and barricade obstacles with great success.

Chris takes alternating left- and right-handed shots at the practice shoot, with the entire detail watching, Kerry videoing, and me taking photos. No pressure.

The scope was an interesting choice – but the only one I had on hand at the time. The course was not designed for taking wind and dialing elevation – it was designed for holding over and snap decisions. With a duplex reticle and capped turrets, I was going to have a hard time.

So, what I did was sight in at the range  the day before at 75 metres, and figure out my drop to known ranges of 50, 75, 100 and 150 metres. I did this by firing a group at a target at the known distance, and then using the magnification to zoom in or out, until one of the posts lined up with the group. I then tested the holdover and it worked fine.

This was far from ideal as I shot 50 m targets at 20x and 150 m targets at 6.5x. The latter is fine, but shooting close targets at high magnification while moving around is pretty difficult.

If you have a FFP scope, or a reticle with drops that you know at each magnification setting, then a magnification range like this is not the worst idea.

The test shoot was a success, and we provided Kerry with our feedback, which we were happy to see was integrated into the final course. The feedback was around timing, clarity of course of fire, etc. In other words, exactly why you have a test run.

PSNZ22

The day of the shoot we all came prepared with wet weather gear, wondering if it would be called off. Spoiler: it wasn’t.

Although it absolutely bucketed down, we never got to a point where it would have been unsafe to continue. The only thing the rain affected was how we carried and covered our equipment and rifles, and again, the score sheets got soaked, but each team came up with a way to keep track of their scores.

I was highly impressed with my equipment. I shot with a different set up this time around. I had an HK 416 D145RS .22LR, topped with a Vortex Strike Eagle 1-6 x 24mm with AR BDC reticle. The HK, manufactured under licence by Carl Walther, stood up to some serious abuse. I had only shot it once prior, which was the day before, when I tested ammo and sighted in. After chowing through 300 odd rounds of eight different types of rimfire ammo, I found CCI Standard to shoot very well and Winchester Target 22 shot almost as well. Hey, if the best ammo happens to be the cheapest one tested too, who am I to complain?

Both of the above brands shot less than an inch at 50 yards, off a bipod, with the butt stock unsupported. The CCI was closer to 0.8 inches.

The eight types of ammo tested in the HK 416 .22LR, with CCI standard coming in tops, and Stingers throwing the worst groups.

I didn’t clean the rifle thoroughly after testing, but ran a bore snake through twice, with a few drops of Hoppes No. 9. Generally speaking I leave a rimfire rifle for 500 – 1000 rounds before cleaning the barrel (or as soon as I notice accuracy starting to drop off). However, with a brand new rifle I didn’t want to take the chance.

I missed my cold bore shot on the first target, which was extremely disappointing, as it was worth 5 normal shots. The gun walked on to target within 5 rounds as the match grade barrel liner leaded up nicely. I shouldn’t have run the damn boresnake through. The course was roughly 90 rounds over about 4 – 5 hours, and even though the rifle was exposed to pouring rain almost the entire time, it never jammed once. The blowback mechanism did a fine job, and the magazines held up well, feeding reliably, and remaining super easy to load, thanks to the tabs on the side which hold down the spring and follower.

The scope performed beautifully. The AR BDC reticle is designed primarily for .223 Rem ballistics, and lines up nicely with average loads. It’s also pretty good with a .308 as well. To use the .22LR I used the Vortex LRBC to enter the data for CCI Standard ammo.

I did a different reticle print out for each magnification setting, and confirmed these at the range the day before. For some shots I used the full 6x magnification, but for most I used the 4x, as with a zero at 50 metres, I had convenient holdovers at each hashmark that approximated 75, 100, 130 and 170 metres.

This scope was way easier to use, but again highlights the need to either know your magnification, ranges and subtensions, or use an FFP scope for field shooting.

The only equipment failure I had was when my rail-to-stud adapter crapped itself, and my bipod fell off on the tank trap stage. I was annoyed, but it didn’t slow me down too much, and really, the rest of the shoot went fine. I went into Serious Shooters the other day to get a replacement (turns out the hole in the stud was a bit low, and the radius on the stud a bit high/wonky). They sorted me out with another stud, so that’s all good for next time.

Thanks Auckland Isuzu for thinking of us poor shooters out there in the wet, and providing brollies to keep us dry (...ish). Image credit: Precision Shooter
Thanks Auckland Isuzu for thinking of us poor shooters out there in the wet, and providing brollies to keep us dry (…ish). Image credit: Precision Shooter

The course was innovative and challenging, and kept everyone moving along at a reasonable pace. Some of the running stages highlighted how unfit we were, while the fine wording of the Course of Fire was tested by some of the more competitively natured among us. The obstacles and shooting parameters were a good test of skill, as shown by the vast range in scores at the end of the day. My advice – slow down. Finishing a stage with 15 seconds to spare doesn’t mean squat if you miss 4 or 5 shots (yes, that was me…).

The wet weather slowed us down a bit, but we reached the end of the course eventually. I came in around the middle of the field, which I was okay with, with a new rifle and a different style of shooting. As the scores were being tallied, the prize draws began.

Ridgeline had already provided every single shooter with a pack of goodies, including bright orange blaze gear for the ROs. In addition to these packs, they provided some awesome prizes too. The real draw card of the day was a Lithgow LA101 Crossover, which was done as a random draw. After the main event, shooters raided the table for swag from Ridgeline, Auckland Isuzu and Gun City (including $50 vouchers – thanks!). The Gun Rack proudly supplied some ammo as a prize.

The top shooters on the day were Hennie, Shane and Simon Gillice, with a tied first place, and only one shot making the difference between tied first and coming in third. If I recall correctly, all placing shooters used a bolt action rifle (I could be wrong, but I’m pretty sure!).

There were some pretty interesting rifles there on the day.
There were some pretty interesting rifles there on the day. Image credit: Precision Shooter

The day was a great success, and Kerry and the team who put it on deserve all the thanks and congratulations they received. It was an excellent time, ringing steel in the rain with inexpensive ammo and lots of good banter. The pub afterwards was full of stories from the day, as well as general shooting chatter and hunting stories, as you’d expect.

Hopefully the next one is not too far away, so keep an eye out on The Gearlocker website, and subscribe to their newsletter for regular updates!

Feature image credit: Precision Shooter

Can you put a BRNO Model 2E or CZ 452 in a JW-15 Stock?

In late June I had a question from Ken in Gisborne about whether or not you could fit a BRNO Model 2E in a JW-15 plastic after market stock. Immediately you probably have two questions.

  1. Why am I only answering this question now; and,
  2. Why would you put a beautiful European-crafted rifle in a cheap, ugly stock?

So, I’ll quickly answer those:

  1. I replied to his email, so don’t you worry!
  2. Ken is unable to obtain an original stock – and I imagine his beautiful rifle is pretty hard to shoot without a stock!
Comparing the JW-15 and BRNO Model 2, you'll see a lot of similarities, but even more differences.
Comparing the JW-15 and BRNO Model 2, you’ll see a lot of similarities, but even more differences.

Easy way to find out stock dimensions

If you ever come up against a similar issue yourself, you may need a quick work around to see if you can do something similar. The other question you often get is “Can you put a CZ 452 in a JW-15 stock?” Usually this comes from people who want a light, farm-ready 22LR, without having to ruin their wood stock or buy a new rifle. FYI, the CZ 452 and BRNO Mod 2E are practically identical. Here’s a nice little write up that someone has done on the BRNO, which saves me repeating a lot of the same points.

Essentially, as with many European brands, there was sharing of parts and designs, and eventually a merger. The rifle was largely unchanged. And the difference between the 2E and the 2 is that the 2E is the luxe version. Nicer stock, etc.

Anyway, I digress. A quick, easy way to confirm barrel and action dimensions for stocks? Head on over to the Boyds’ Gunstocks website. They give you the barrel dimensions and centre to centre measurements between action screws for all their house actions (that they base their aftermarket and OEM stocks on). While you’re there, you may be tempted to buy a whole new Boyds stock, and why not? They’re awesome quality, solid wood and modern designs!

So, using my little cheat, this is what the Boyds website reveals:

Boyds barrel measurements. Image from Boyds' website.
Boyds barrel measurements. Image from Boyds’ website.

BRNO Model 2E measurements:

Barrel Dimensions: Point A = 1 1/16″ and Point B = 15/16″

  • Center to Center of Action Screws: 6 1/8″
  • Over All Length of Part: 30″
  • Comes with Boyds’ 1/2″ Rubber Recoil Pad.

CZ 452 measurements:

Barrel Dimensions: Point A = 1 1/16″ and Point B = 15/16″

  • Center to Center of Action Screws: 6 1/8″
  • Over All Length of Part: 30″
  • Comes with Boyds’ 1/2″ Rubber Recoil Pad.

Norinco JW-15 measurements:

Barrel Dimensions: Point A = 59/64″ and Point B = 43/64″

  • Center to Center of Action Screws: 3 25/32″
  • Over All Length of Part: 31 1/2″
  • Comes with Boyds’ 1/2″ Rubber Recoil Pad

Other differences

The biggest barrier is the difference in action size.

While my quick cheat above provides a very useful starting point for stock comparison, there are other things to consider as well. When considering a rifle like the JW-15, which is essentially the cost-saving, poor cousin of the BRNO/CZ, you’ll usually get differences in dimensions where changes have been made in the manufacturing process to reduce costs. Often you’ll find this in stamped instead of milled parts, simpler contours, thinner barrels, etc.

Below are some of the basic differences that unfortunately make this stock swap a no-go.

Action shape

The BRNO/CZ action is longer, thicker and circumference and a little bit different where inletting is concerned (this last isn’t the biggest concern in stock swapping, as you can alter inletting). Somehow the Mauser-action origins seem more apparent in the lines of the BRNO, even though the JW-15 has a similar, but simplified, shape.

Barrel contour

The Chinese rifle has a much simpler barrel contour, while the Czech rifle follows traditional lines. The thickness of the barrel is a fair bit different, but where it meets the larger action is the biggest difference, as the BRNO barrel swells up to meet the threads.

The BRNO barrel is close to what we'd consider a bull barrel in a modern rifle, and the contour differs significantly to the JW-15.
The BRNO barrel is close to what we’d consider a bull barrel in a modern rifle, and the contour differs significantly to the JW-15.

Action screws

Another clever simplification in the Norinco is reducing the amount of screws and metal work by merging the forward action screw with the recoil lug. Looking at the image below you’ll see three screws on the JW-15 and four on the BRNO. The rear screw on both is a wood screw, which secures the trigger guard to the stock.

The next screw forward on both rifles is a simple action screw. In front of the trigger is the last action screw. In the JW-15, this screws up into a recoil lug dovetailed into the action. The BRNO has another screw, independent and forward of the floor metal. This screws up through a steel collar into a recoil lug that forms the hidden part of the rear sight assembly.

Differences in inletting and dimensions are indicated by the presence of fewer screws in the Norinco.
Differences in inletting and dimensions are indicated by the presence of fewer screws in the Norinco. Also notice the softer metal the screws are made of.

Bits and pieces

There are various other bits and pieces that differ, such as the mag well and the trigger unit. The trigger in the Model 2E is a fine example of a single stage trigger, with adjustable over-travel, and a clean break around 3 lb. This is streets ahead of the simple, but practical, trigger in the JW-15. These can be toyed with to produce more acceptable results, as detailed in this previous article on JW-15 trigger improvement.

Verdict

If you are considering swapping things up with either of these rifles, an aftermarket stock specific for the JW-15 or BRNO would be far better than trying to adapt one to the other.

Product review: Weaver 40/44 Series 6.5-20×44 scope

Every now and then you come across a product that presents you with the best of dilemmas. The problem I have with my new 40/44 scope is choosing which rifle to fit it to. Now, I may sound like a gushing schoolgirl at this point, but read on and let me explain why this scope’s versatility is a nice problem to have.

Price range

The ocular bells allows plenty of clearance for bolt handles and gloved fingers.
The ocular bell allows plenty of clearance for bolt handles and gloved fingers.

Let’s not kid ourselves, when you’re purchasing optics the first thought you have is, ‘How much is my wallet going to bleed to get the kind of clarity/magnification/quality I want?’

There’s a common saying that if you put a $300 scope on a $1000 rifle, then you’ve got a $300 rifle. I would argue that the 40/44 Series 6.5-20×44 is the exception to this platitudinal rule.

The manufacturer suggested retail price (MSRP) listed on Weaver’s website is roundabout $320-330 USD, depending on the specs you go for. If you’re lucky, you can catch it on special or find a store/site with free shipping and get it to your door for around that price. But! Does it shoot like it belongs in the $300 – $500 USD ($450 – $600 NZD) range?

Quality

Finish

The first thing I did when I unpacked the 40/44 was mount it on a Savage .243 to check out the fit and function. Unfortunately I installed it with rings that were a tad snug, and immediately had some long scratches after I pushed and pulled the scope around finding a comfortable fit.

The objective bell clears the rear sight on this Savage nicely.

Feeling pretty upset with myself for ruining a brand new scope (before I’d even had a chance to photograph it for this review too!), I tried to rub the marks out a bit with my thumb. And they lifted. The black, hard-anodized matte finish is built for such rugged use that even scraping it along in tight metal rings didn’t leave any permanent marks on the finish. I’ve had much more expensive scopes (especially with matte finishes) end up with unsightly scratches even from a trip to the range, let alone hiking through the bush.

Mechanical

If there’s one thing that’s a tell-tale sign of poor – or even average – manufacturing quality, it’s sloppy elevation and windage adjustments.

The fine gearing makes for smooth use and precise adjustments.

Even when I was just playing around with the scope before actually going to the range, I could tell that the 40/44 Series was just a little bit better made in this area than most. The clicks were tight and consistent, and there was no play in the adjustment turrets. After taking the turret caps off, adjustments can be made with your fingers, with no special tools or coins necessary.

The parallax and magnification adjustments have a bit of a longer throw than other scopes in the same price bracket. This is actually a good thing. What this indicates is finer internal gearing, which means more precise adjustments can be made. The movement of these parts is also smooth, but resistant enough to the point where you don’t have to worry about unintentional movement.

Optical

The optical quality is really what most people get giddy about when choosing a new scope, although I’d maintain that mechanical quality is just as important.

In my experience there are two major indicators of optical quality in a scope. The first (and most obvious) is light transmission. Is the scope clear, bright and easy to use? The answer in this case is yes. The second, and certainly equal, indicator of quality materials and craftsmanship is the ability of a high-magnification scope to continue to provide optimal light transmission at the high end of its zoom range.

In other words, if I were hiking around the back country with the magnification set around 10 for medium-range shots, but then decided to take a longer range shot requiring all 20x zoom power – at dusk – could I expect the same level of optical clarity?

Many competitor scopes at this level – and certainly the cheap no-name brand scopes on TradeMe – start to get murky towards the end of their range. I had a 6-24x power scope that I realistically couldn’t use beyond 18 or 20 without losing too much light. I’ve also owned an 8-32x scope that may as well have been an 8-24x for all the use the upper range was.

It may be a hunting scope, but it's perfectly at home on this rimfire rifle.
It may be a hunting scope, but it’s perfectly at home on this rimfire rifle, along with the aftermarket Boyds stock.

I’ve glassed tree-lined creek beds with this scope in failing light at maximum zoom, and also used it at maximum zoom at an indoor target range, and in both situations found the light transmission to be excellent. So much so that I would be confident in saying I could use the full potential of this scope, and not just stick to the lower ranges.

Specified use

Of course, how you intend to use any particular scope is up to you. However, certain optics are created with particular uses in mind. According to Weaver’s website, the primary use for the 40/44 in 6.5-20×44 with Dual-X reticle is as a large game hunting setup.

The 6.5-20x version of this scope comes with three reticle options – the Dual-X, Ballistic-X and Varminter. All are variations on the duplex reticle and the use for hunting is readily apparent. The thick posts draw your eye naturally to the finer crosshair in the centre, making for quick target acquisition.

The Ballistic-X version has some elevation holdover hashes for those who prefer to holdover rather than adjust their turrets – useful for shooting on the move, rather than from a prone position. The Varminter crosshair features a round dot in the middle of the reticle to form a natural point of focus for the eye.

If you choose the Dual-X (like I have) or the Varminter, you’ll likely be making elevation adjustments in the field. Using a ‘cheat sheet’ calculator, you can quickly figure out what adjustments you need to make and have these on a card taped to your rifle for quick reference. Alternatively, some time at a range with multiple distance options can help you figure out exactly what your load/rifle/optic combination requires.

Thankfully the 40/44 is designed with quick adjustments like these in mind. After removing the turret caps, you’ll notice the turret markings are easily visible from the shooter’s position.

The turret adjustments are easily seen from the shooter's position.
The turret adjustments are easily seen from the shooter’s position.

The ocular bell is also quite compact, which has multiple benefits. It’s easier to see past when making turret adjustments for starters. But more importantly it means more clearance between the bolt handle and the scope. This makes for easier mounting on older rifles, as well as convenient use with gloves when you’re in the mountains.

Overall impressions

It’s easy to see how this scope could be favoured by hunters the world over. It’s not a Super Slam, but for the budget-conscious shooter or the back-up rifle, it’s great value for money with many of the same features as the more expensive scopes. It’s no surprise that it’s a ‘best rated’ product on Optics Planet.

The ruggedness and mechanical reliability means a lifetime of use, while the optical clarity makes it perfect the times of day you really expect to be hunting in New Zealand. The uncomplicated reticle and ease of adjustment makes for more confident shooting in the field too.

While this scope was originally mounted on a .243 Winchester for hunting use, it’s found a new home on my bolt action .22LR along with a Boyds Pro Varmint stock for target shooting. While it may seem a strange application, indoor smallbore target shooting involves known distances without wind variation, making the simple reticle ideal. The high level of magnification also means precise shooting and knowing what your score is before you leave the mound. The large objective lens also means plenty of visibility indoors under artificial lighting. Lastly, the adjustable objective means you can shoot at high magnification at ranges as close as 25 yards.

But, as I mentioned at the beginning of this article, this scope could sit on almost any of my rifles and be fit for purpose. It could go on my 6.5×55 and be used for F-Class, or thrown onto my 7mm-08 for a light, bush-ready rig. Like I said at the start, it’s a good problem to have!

Voere 22LR Bolt Action

No bolt, no mag – what to do?

It’s not unusual for an older rifle to make its way through the family tree and lose its bolt or mag along the way – especially .22s which can be used and abused. The other way no mag/bolt guns fall into our hands is through Trademe auctions, usually run by gun stores that have used older rifles for parts, and no longer need the barrelled action and/or stock. So, is it worthwhile trying to restore these firearms to their former glory?

What’s the value?

If it’s a family heirloom, it could have enough sentimental value for you to undertake the project regardless of cost. However, if you’re eyeing up an auction, it’s probably because you want to get a rifle together on the cheap. Depending on your scenario, it may or may not be worth the time, money and effort to restore the firearm.

A word to the wise – thoroughly research your intended purchase before assuming you can find the parts to complete the project. As an example, I wanted to put together a cheap shotgun and bought an SKB semi action and stock, missing the forewood and barrel. I had seen some barrels online, and figured it would be easy enough to put this thing back together.

However, I found out (like an hour after the auction), that the SKB factory had been shut down, and that the barrels that I had found in the States were not ideal. There are some available locally – for over $900. There goes the idea of a cheap shotgun. So I paid $29.50 for something that probably won’t ever be used for anything, except perhaps testing out gun blue or stock reconditioning products.

What’s the cost?

Sometimes you can source the parts, but you have to be inventive to keep the cost down. The thing is, if it was cheap to do, the gun store would have bought the parts and sold a complete rifle for more – so you know it’s not going to be a walk in the park.

A good example of getting creative is a rifle I got from my father-in-law. It’s a .22LR bolt-action from sometime around the ’70s or ’80s. It was sold by a trading house by the name of Wischo Kg Erlangen in Germany originally, essentially assembled from parts provided by various European manufacturers. The rifle is basically a Voere.

The rifle came into my possession for the princely sum of a nice bottle of wine. It had a decent looking barrel and a crisp two-stage trigger. However, it was missing the rear sight, magazine and bolt. By keeping my eyes open, I managed to spot a Voere parts auction on Trademe.

The auction was for an action and bolt, with about 8 inches of barrel attached. See below video of me firing this weird thing, after fitting it to the stock from the rifle I had acquired.

Included in the “barrelled” action was the rear sight – a stroke of luck. Also in the auction I got a 6mm garden gun without bolt, which is just a wallhanger in my office. Oh well. I’m never even going to try solve that mystery.

The Wischo rifle sporting the Voere sight, pictured next to the Voere bolt, action/barrel and trigger group.

The issue then became whether the parts I bought on an (educated) whim for $40 would fit my rifle – as technically they were not from the same gun. Well, it turned out I was right with my assumption that the trading house rifle was a Voere in disguise, however the bolt wouldn’t close nicely and the rear sight was obviously different, as it had a larger dovetailed base.

A machinist/engineer friend of mine helped me take a small piece of metal off the action around the bolt, which got it cocking smoothly, and extended the dovetail to take the sight off the parts gun. This cost me a box of Heineken.

All that’s left to buy is a magazine, which I can get from here, or here, for between $100 and $150. So, all up, for the cost of a bottle of wine, a box of beer, $40 for parts and around $150 for a mag, I’ll have a nice wee shooter with a bit of character and a story worth telling. By throwing in some of my own time and effort, I can reblue the rifle and varnish the stock, and it will end up being a really good looking little gun too.

So, again, it can be worth it – but you’ve got have the time, and sometimes know the right people, to make it worthwhile restoring a non-functioning rifle.

Regular target at HSSRC

Auckland smallbore interclub

Smallbore shooting is both enjoyable and competitive, and never more so than during the interclub season. Hosted in turn by the various Auckland sporting clubs, it’s pretty much for bragging rights and continues through the winter and spring months.

The format

Each interclub shoot is completed on the target of the host club. This means every year you get shoot a few different targets from your usual, including groupings, application targets, snap shoots, silhouettes and all shot in various positions.

The nights are hosted at either the Howick or Waitakere ranges, and there is a Saturday shoot in Riverhead at the Auckland NZDA. Some years the North Auckland NZDA puts on a fun shoot as well.

All of the shoots held at Waitakere are shot in every position except standing, as the mounds don’t have much headroom. The Howick rifle range features shoots in all four positions (standing, sitting, kneeling, standing), as does the NZDA shoot. The Auckland NZDA shoot is the only one shot at 50 metres, while the others are at 25.

The 50 metre shoot (which happened to be today) is 40 rounds, ten each in the four positions mentioned above, with 2 minutes of sighters to start. Without the snaps and silhouettes to explain and call, it’s a pretty easy shoot, but the extra distance adds some challenge – especially for the standing. All of the shoots are between 40 and 50 rounds, so one box of ammo will be fine.

What’s on the line?

Each club puts together a team of five shooters (or tries to), and a team of juniors as well. The top four scores counting on the night. There is recognition for the top team, top junior team, top gun and top gun junior.

As mentioned above, it’s pretty much bragging rights. If we’re honest, Waitakere has some of the best shooters out there, so they take out the top spot almost exclusively, but it’s still a very competitive atmosphere and there’s certainly a lot of jostling for the other spots on any given night.

Usually there are pins or boxes of ammo as prizes, and at the end of the year there are trophies to dole out as well.

At the end of the day, it’s a great way to meet more of the shooting community, try different targets and shoot at a couple different ranges. If you’d like to find out more about the competition or smallbore in general, go along to a regular shoot at your local club and ask a committee member or the captain, or simply leave a comment below.