
Product review: Boyds Prairie Hunter gun stock for Swedish Mauser

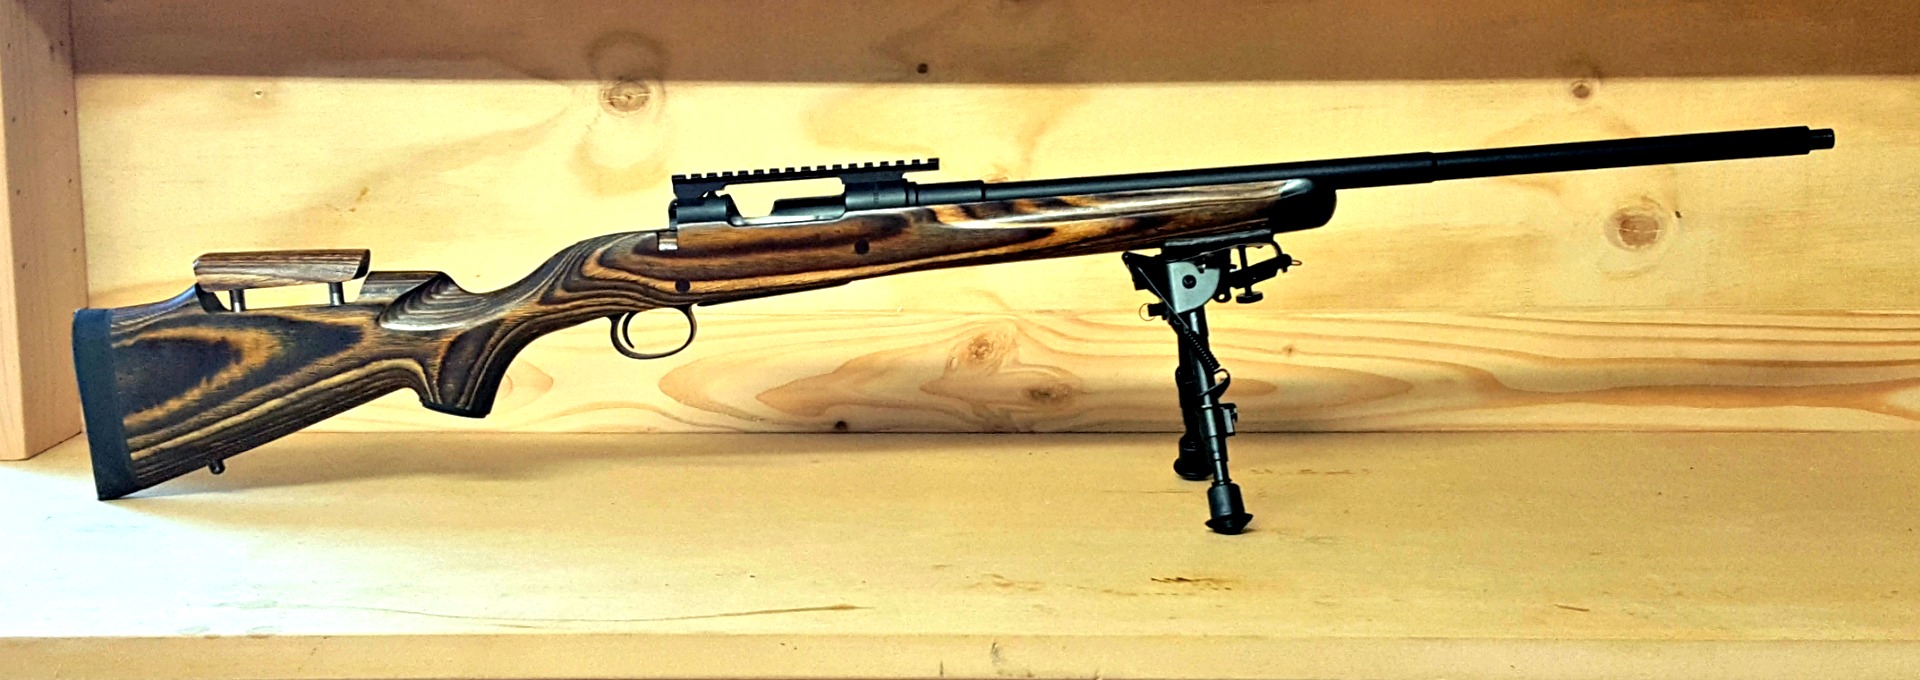
Sometimes you find a winning combination. Something that just works for you. This has been my experience with the Prairie Hunter rifle stock from Boyds, combined with my 1943 Husqvarna Mauser – a dream come true. What makes this such an epic combination? There are several factors that combine to make this gun incredibly shootable, but for now, let’s look at the fancy piece of wood it’s sitting in.

The looks

The old Mauser looks perfectly at home on the range in its Prairie Hunter stock.

The Prairie Hunter is a good looking stock, no doubt about it. The first time this rifle was on the range in its new configuration, an old time shooter said “such a pretty stock for such an old rifle!” And he wasn’t the only one. Laminates are known for being hardy, heavy and beautiful in an age of synthetic rifle stocks.

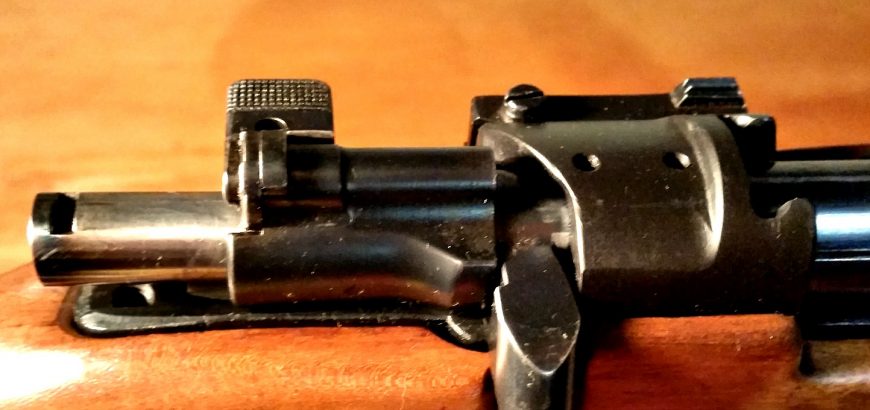
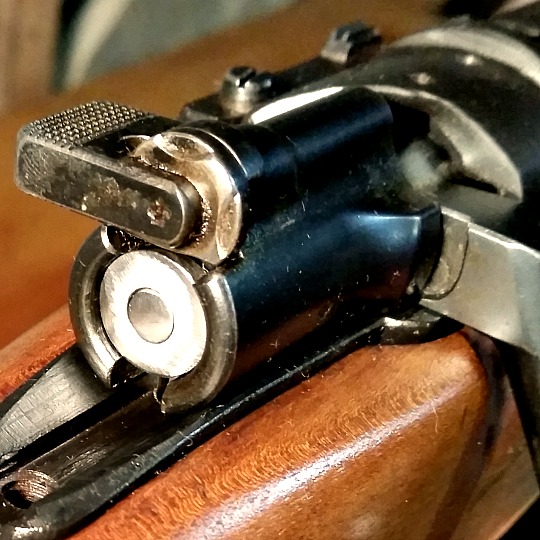
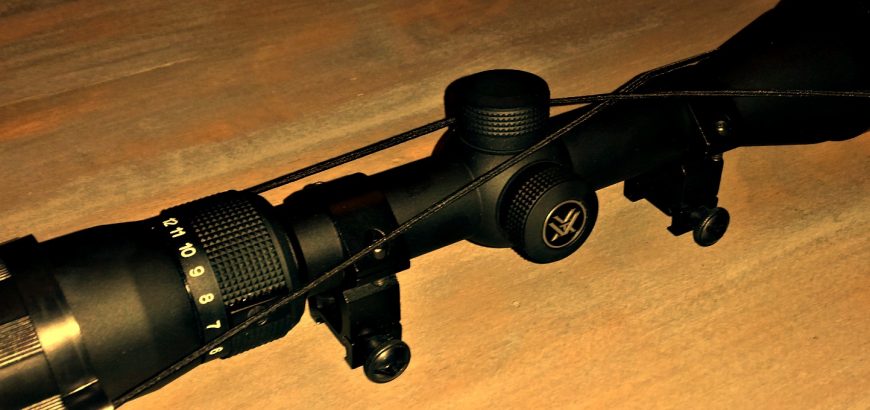
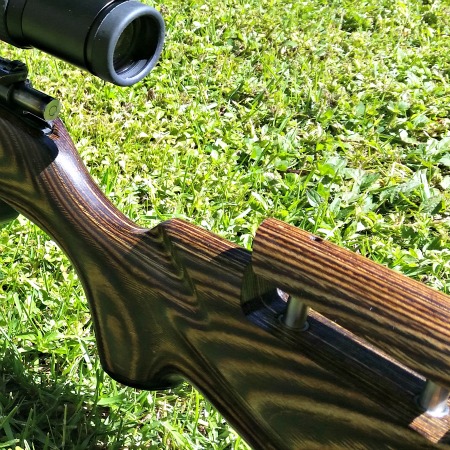
In the looks department, this stock was certainly helped along. Boyds provided this specimen with a nice, thick Limbsaver recoil pad and synthetic caps for the nose and grip. What adds to both the functionality and visual appeal of the rifle, is an adjustable cheek piece. The adjustments are made from the top, with an allen wrench, which means no adjustment knobs on the side of the rifle.

Full profile picture of the Boyds Prairie Hunter stock with adjustable cheek rest. This picture is here especially for Zach.

Final fitting needed

Boyds does advise that their stocks are made to their house actions (imagine how many actions they have!), so final fitting may be needed for your rifle. For this particular project, I received my stock in ‘unfinished’ condition. This means a final sanding and some polyurethane are needed. The reason for this, is that old Mausers come with several different bolt configurations, depending on the life they’ve had. This means that the channel that the bolt handle fits into should be determined by the end user, depending on their particular model. With a bit of work to do, Boyds doesn’t send you a finished stock, that you will then have to cut into and sand down anyway. Makes sense.

Some relieving of matriral was needed at the front of the mag well.
Some relieving of material was needed at the front of the mag well.

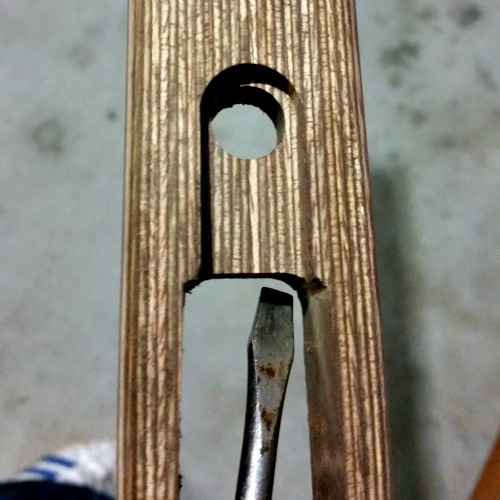
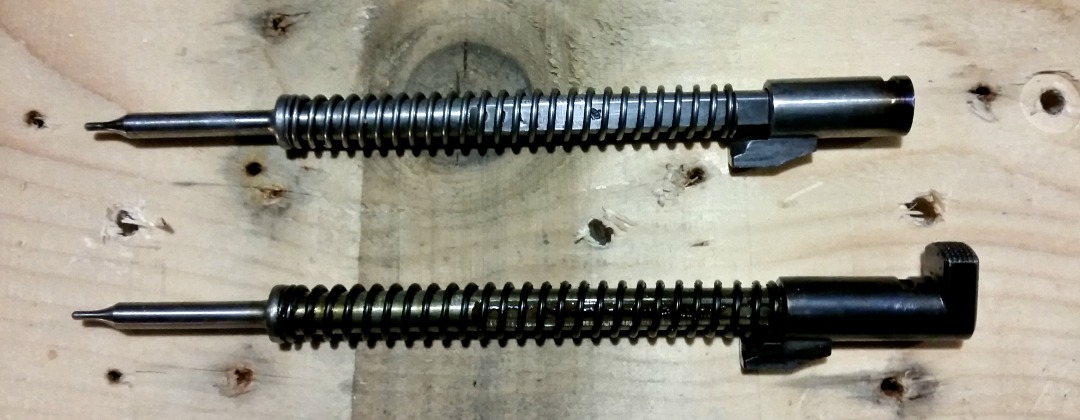
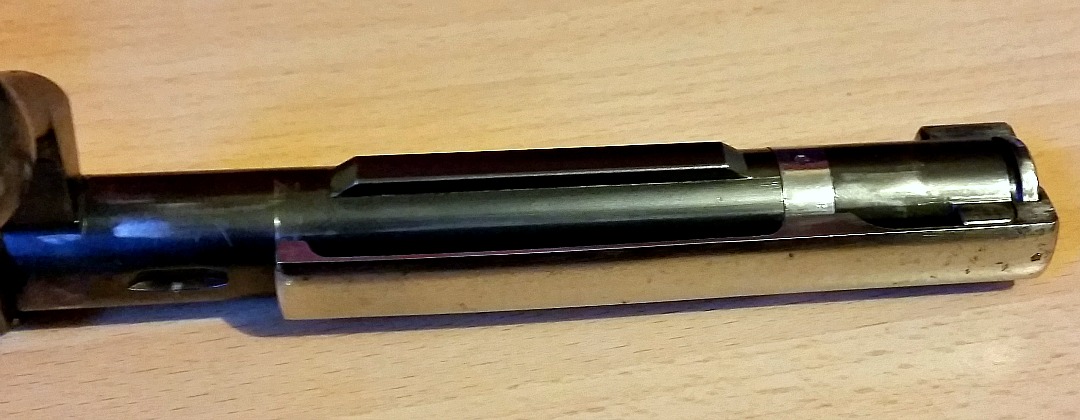
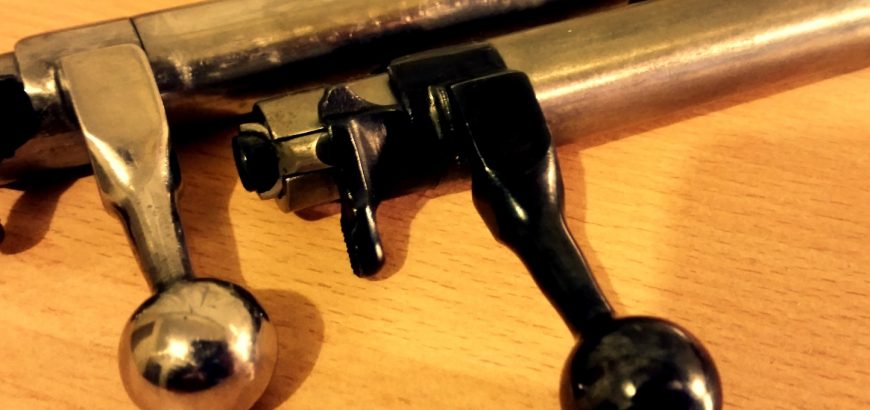
The bolt handle notching was easily done, and is covered in my series of articles on bedding and finishing stocks. With this particular stock, I found that the floor metal was a couple millimetres further back than I needed it to be. All I needed to do was to relieve some material from the front end of the mag well to get the metal sitting where it should, and mating up to the action.

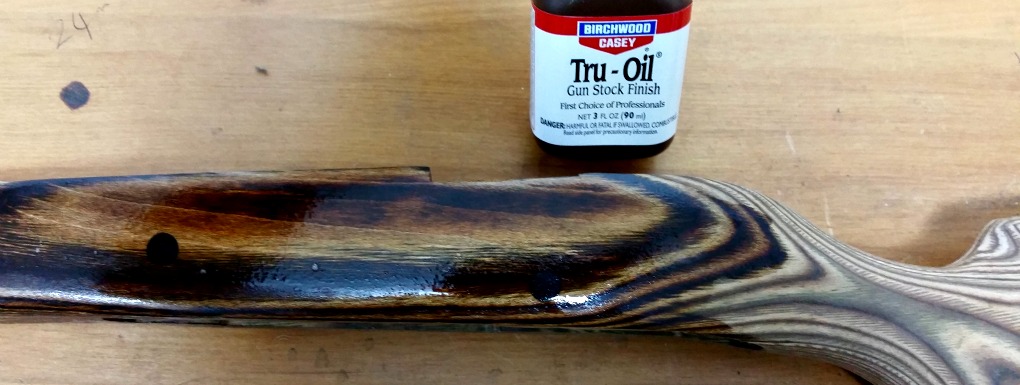
I chose to bed my action, which was a bit more work still, and instead of polyurethane, I opted for a hand-rubbed finish, using Birchwood Casey Tru-Oil and Stock Sheen and Conditioner. The oil even gave a nice gloss to the plastic bits on the stock as well. Learn my lesson without doing the hard yards though, tape off the recoil pad if it’s rubbery. The oil will make this super sticky, and you will get all sorts of fluff on your butt pad for a while. You will eventually be able to rub it all off.

The Tru-Oil immediately brings out the character in the laminate.

Performance

Oh what a joy. I couldn’t be happier.

And that’s not sarcasm!

The 6.5×55 is not known to have heavy recoil, but if you have a shortened barrel and sporterised stock, you feel every bit of it. Having purchased this rifle second-hand with the intention of restoring it, I was happy enough with the home-made sporter stock, but it was certainly made for a shorter person, and the lightweight nature of it didn’t do much to tame the kick of the old service round.

The extra weight associated with the laminate stock meant all sorts of recoil-reduction. I would definitely recommend going for this or a walnut stock over most of the synthetic options out there. The normal-person-sized length of pull also helped, along with the 1″ recoil pad. Don’t get me wrong, the stock isn’t overly heavy either. With a hollowed out barrel channel for free-floating and weight reduction, the balance and weight is nice. Most of the heft is around and behind the action – where you need it most.

Tall scope mounts are no problem with the adjustable cheek rest.

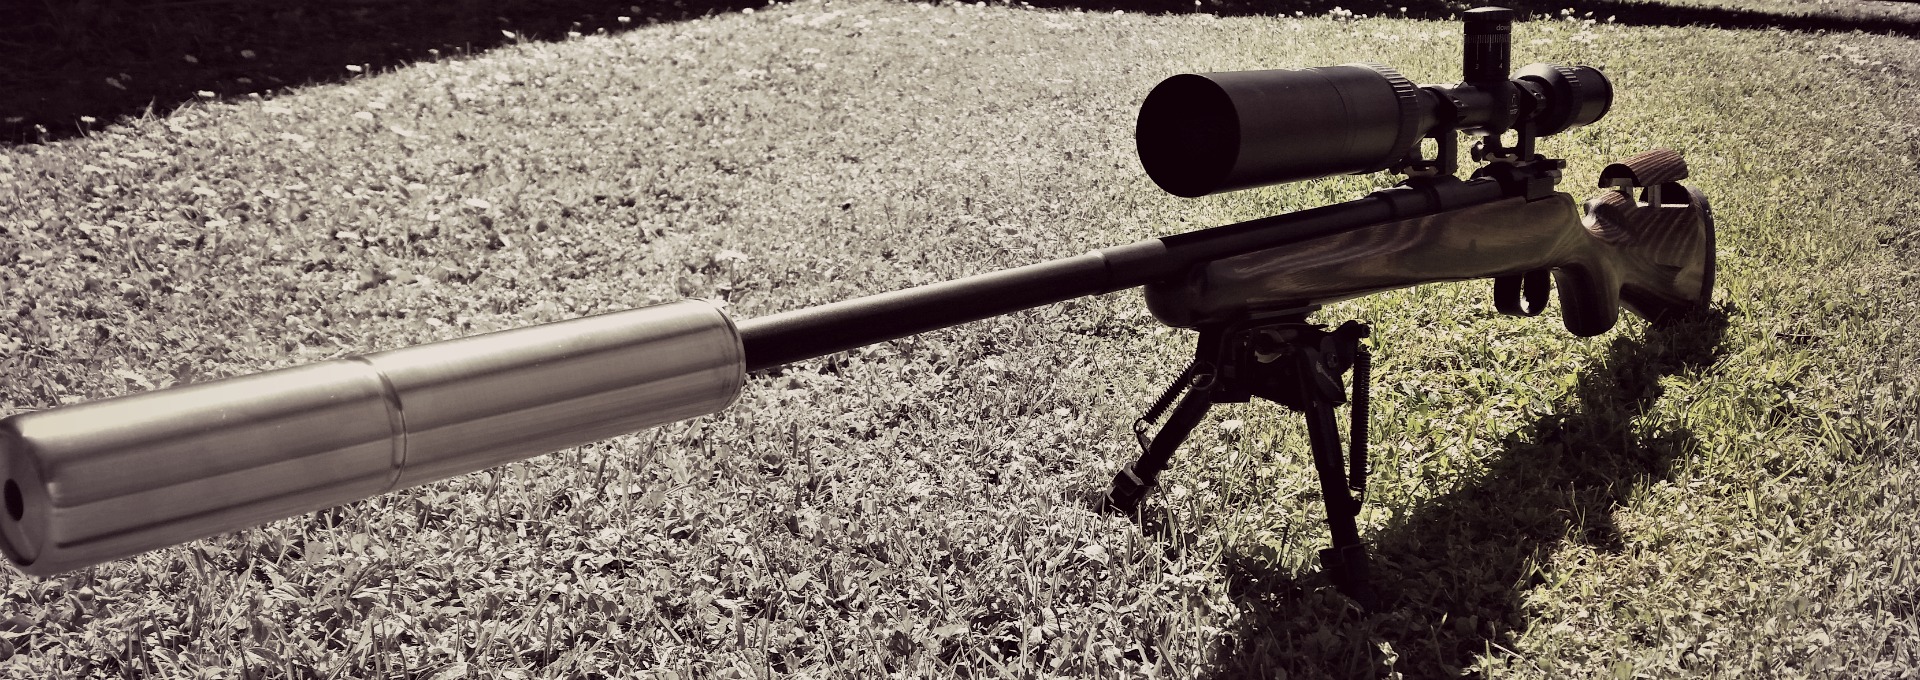
Combining this with my MAE 6-30 ST suppressor, recoil concerns are now a thing of the past. So much so, that I can shoot off the bipod with my off-hand under the grip as a stabiliser, instead of holding down the fore end to stop myself getting a scope in the face, as I had to do with the synthetic-stocked Mossberg ATR a month or so ago.

Shooting with this configuration and my wife’s Vortex 4-12X Diamondback with BDC reticle, my wife and I were hitting 9’s and 10’s at the 300 metre Swiss Club shoot a couple weeks ago – even a 10.1! And this is with factory loads (Norma-Sierra 144gr).

Adjustable cheek rest

One of the major selling points of the configuration I now have is the adjustable cheek piece on the Boyds stock, and I would highly recommend this option on the next stock you buy. Below are a few of the reasons I love this feature:

  • easily adjust for different users and eye-relief
  • raise your line-of-sight for scopes that are mounted high due to large optic bells, iron sights or bolt handle clearance
  • quickly lower the cheek piece when needed for cleaning rod access
  • ensure proper cheek-weld to maintain repeatable, accurate shot placement

Overall impressions

There is a lot to be said for keeping old military rifles in their original condition. However, if you’ve bought yourself a bit of a project, or inherited a less-than-perfect specimen, a great place to start with your customisation efforts is a replacement stock from Boyds.

You can get a stock that is more suited to varminting, target-shooting or tactical-style precision matches than the military wood. These old stocks were made to be shot with full winter clothing, and to be light as well. As such, they transfer a lot of recoil to a normal-size shooter. You can also help your sweet Swede look as good as it shoots. With a nice-looking stock, like the one I have in a Nutmeg finish, you won’t feel out of place next to the Howas and Tikkas on the range.

The Boyds stock completes the set up, along with an MAE suppressor and BOLD Trigger unit.

Bear in mind, when you order a stock from Boyds and you are not in the States, you have to keep your order under $100 to avoid costly permits which make the process impossible. If you or someone you know is making a trip to the USA, take advantage. Or get friends and family over there to help you out. Worst case scenario, you can still get an amazing stock, but you may have to forego some of the bells and whistles.

Modified M38 bolt.

Mauser bolt modification

Spend any time exploring gun forums and corners of the internet dedicated to military surplus firearms, and you’ll quickly encounter the opinion that Mauser’s bolt design is the standard by which all other bolt actions should be judged, and that most subsequent “improvements” were purely cost-saving modifications.

As a big fan of the small-ring Mauser variants, especially in the super-accurate Swede, it was only a matter of time before I started pulling apart my Husqvarna M38 to see what I could improve. Most Mauser bolt mods are bent handles to allow for scope clearance – something which has been covered ad nauseam all over the place.

So, instead of going over the same ground about oxy-acetylene torches, vices and hammers to get your military Mauser into sporting condition, I’m instead going to look how to reduce lock time by shaving some material off the cocking piece and firing pin. As always, remember that modifying your firearm is dangerous/irreversible/stupid, etc.

What is lock time?

Lock time is the minuscule period of time between when you pull the trigger and when the firing pin crushes the primer to set off the powder inside the cartridge. In other words, how long it takes the firing pin to travel to the primer from the time it is released by the pull of the trigger and the disengagement of the sear. The term lock time comes from the age of muskets – flint locks and wheel locks – the time it it took for the lock to work.

Essentially, the longer the lock time, the more likely it is that the shooter’s natural movements will move the rifle off target. The other period of time that is quite significant is how long it takes the bullet to leave the barrel, as again, the shooter can move slightly during this time.

So, naturally, it’s in a shooter’s best interests to have as short a lock time as possible. Modern bolt actions are incredibly quick compared to old military surplus rifles, and the chief ways in which lock time can be decreased are through eliminating excess material which causes resistance, friction or drag, and making modifications to the main spring, or replacing it and/or the firing pin. There are a few “speed lock” products out there, which are kits aimed to help you reduce the length of travel of the striker, and usually the trigger pull as well. Often, they will also convert your cock-on-closing Mauser to a cock-on-opening action.

Personally, I quite like the cock-on-closing action on older rifles, as it allows you to “feel” more of the chambering and extraction process – a real plus for reloaders.

Removing material

This is something you can’t afford to do wrong, especially if you’re working on a rifle with hard-to-replace parts. Fortunately for me, I had recently bought a replacement bolt due to a different issue and had some good parts on the old bolt to work with.

If you’ve spent any time on Mauser-related forums, you’ll have come across Dutchman, or Dutch. A very knowledgeable gentleman with his own website dedicated to everything Mauser. I came across one of his posts, in which he showed the modifications that were made to cocking pieces and firing pins in order to produce the bolts for the super-accurate CG63s and CG80s. With this as inspiration, I set off on my own bolt-modification adventure.

I removed the thumb piece on the back of the cocking piece to reduce weight and drag, and made the firing pin short enough to match. As you can see in the picture below, the previous owner of this rifle cut down the main spring to decrease cocking effort on the rifle, but this can lead to unreliable firing and pierced primers, so I’ll be swapping that spring for the one on the blued bolt I recently bought.

Modified Mauser firing pin.

As you can see in Dutchman’s post, there is more material that can be removed in order to reduce friction, as he shows some rifles with scalloped bolt sleeves. Whether I attempt this or not is still yet to be seen, I’d like to see the difference this makes first before going any further. The sear engagement on the cocking piece can also be altered according to his pics, but it looks like a welder would be needed to reinforce the sear engagement section. There’s also the fact that you’ll need to case harden this section again, as a cut-up sear piece will quickly wear away, creating a dangerous firearm.

I’ve opted to leave this bit for now, as I’m planning on replacing the factory trigger with a Timney trigger in the near future. I want to see what it’s like with the new bang button, before I go and make any permanent changes.

It’s all about the looks

The flush fit of the cut firing pin is much more attractive than the thumb piece.

Well, not all about the looks, but it does play some part. I’ve got to admit, the cut down cocking piece looks a lot more modern and svelte than its military-style counterpart. I’ll take this opportunity to remind you that this rifle was not in collectors condition when I got it from the previous owner, so it is purely a project – no one is cutting up a pristine M38 here!

Another thing I wanted to do was break up the solid black of my rifle. The “new” bolt I bought had been blued and combined with the matte black paint job I did on the action and barrel, it was starting to look pretty boring. For a bit of contrast I took the un-blued extractor and extractor collar from the original bolt and added it to my new hybrid monster. The end result is a little bit of flair, with no real practical relevance. Be warned though, that while the extractor is easy enough to remove, the collar does not spring back into shape nicely for you to put teh extractor back on. You’ll need to hold it shut while sliding the extractor over – which isn’t easy without the armourer’s tools. I used a pair of circlip pliers, which while tricky to do, managed the job in the end.

The blued bolt body creates a contrast for the polished extractor and extractor collar.
Vortex Diamondback scope

Product review: Vortex Diamondback 4-12 x 40 BDC

Firstly, buying this scope was a mistake. But it’s a mistake I’m very glad I made. I intended to buy the adjustable objective version of the Vortex Diamondback 4-12 x 40 BDC, but ended up with the fixed-parallax type. I couldn’t return to the store and swap it, because I had just left the country where I purchased it.

With the AO version, my idea was to use it at its maximum zoom at a 25 yard range on a rimfire target rifle. However, without that AO bell, the scope just won’t focus at 25 yards at any magnification greater than 8 x or 9 x. So, I reluctantly told my wife we’d need to take this brand new scope off her rimfire rifle and put it on my 6.5 x 55 that was in need of some glass. This is the point where I’m glad this happened.

The technical specs

The parallax setting on this scope is 100 yards – perfect for getting sighted in at the range, and more than adequate for the average hunting shot in the New Zealand bush. The adjustments go out  60 MOA in elevation and windage. With my 6.5 x 55 it was pretty much bang-on at 100 yards, maybe a total of 7 clicks left and a few up or down, I can’t remember. If you’re aiming to shoot long distance (600 – 1000 yards) you’re probably going to want to mount this on a 20 MOA rail.

The Bullet Drop Compensation (BDC) points are graduated in MOA, and so is your turret adjustment. How many times have you bought a mildot scope and found out later it has MOA turrets? So, this is nice to know right off the bat.

Vortex Diamondback scope with caps off.
The turret markings are easy to see from behind the gun.

The turrets are capped and resettable. This is nice, as now that I have my zero I can use the windage or elevation adjustments to my heart’s content without worrying about getting my 100 yard zero perfect again. The caps are nice and low and are easy to grip. Be careful when resetting the zero that you don’t damage the turrets, as I found them to be very tight and had to hold them in place with vice grips while I used a screwdriver to loosen the turret. Any extra pressure while doing this and you could have tool marks on your nice new scope. I covered the surface of my grips with masking tape to prevent teeth marks.

You have a total of 5 points of vertical aim, including the crosshairs and the top of the post. You also have 3 hash marks either side of the crosshairs horizontally, as well as the post edges. How to use the BDC? Check out this video from Vortex.


Quality and ease-of-use

The scope has the usual things that manufacturers claim, such as fog-proof, shock-proof and weather-proof everything. Except, this scope really does. I have mounted two scopes on this rifle – the other I won’t name. The unnamed piece-of-junk was used on one range trip for about 3 hours. Yes, there was wind, rain and sun. When I took it off to mount the Diamondback I noticed that the unnamed scope’s exterior coating was peeling off. After one trip!

Subjected to the same conditions, the Vortex scope still looks brand new. That’s probably why they provide an unlimited, unconditional warranty. Which, to be honest, is half the reason I bought it – that shows confidence!

The clarity was exceptional, and the lense coating wasn’t just for show. I had plenty of light, no glare and just a great shooting experience. The scope also features a fast focus adjustable eye-piece with a decent amount of range on it. This was perfect for when different shooters wanted to try it out. Also, the markings on the turret are easy to see without changing your shooting position much – which is not something I can say for every scope in my safe.

Vortex Diamondback scope on M38 Husky.
Adjustments on the range are done with ease.

Quality of manufacture is something that really shows when you shoot at an outdoor range. It’s also something that greatly determines how long a scope will last and whether you’ll enjoy shooting with it or not. In my humble opinion, the Vortex range is excellent. They are also reasonably priced. In the USA (where I bought mine) they were very affordable. In NZ, they are probably middle of the road. Either way, still worth it for the high-quality optic you’ll be getting. I would definitely purchase another scope from their range.

You also get some handy extras with your scope. There are the standard removable lense caps and a *really nice* cleaning cloth. I would suggest making use of Vortex’s incredibly intricate Long Range Ballistics Calculator. Not only will you be able to figure out your elevation and windage hold, but you’ll probably convince yourself to buy some new rifle while you check out all the ballistics tables you can produce for just about every calibre known to man.

You know the old addage of spend as much on your glass as you do on your rifle? Well, this is one scope that breaks that rule. I would happily mount Vortex optics on rifles that would generally be seen toting the latest Swarovski or Leupold glass.

JW-15 bolt with and without factory bluing.

Removing bluing from your rifle

Bluing does a couple things for a rifle. It provides some level of protection against the elements, and it helps achieve a classic styling that other coating systems can’t achieve. However, there are some situations where you might want to remove the bluing from your rifle, including polishing your steel to a high shine, or preparing your rifle for another type of coating.

You can strip the factory bluing off your rifle with a very rudimentary list of kitchen/garage supplies. Here’s a look at this simple process:

1. Completely disassemble and clean firearm

Every metal part that you are going to be removing bluing from needs to be detached from the firearm. For my last project I removed the bluing from the floor metal, trigger and bolt handle. Even if you are doing your entire rifle, it still needs to be taken down. And I shouldn’t need to say this, but make sure the thing is unloaded before you do anything.

Once you have all of your bits and pieces ready, do a thorough degreasing with brake cleaner, degreaser, dish soap and water or something similar.

2. Time to get cooking

So, there are blue removal products out there made by many fine manufacturers. You could even try sandblasting your parts if you have the equipment. However, the method I’m going to focus on is cheap, reliable and effective – and probably better for the environment too. Instead of using harsh chemicals, you can simply use a couple bucks worth of vinegar.

Most people say to just leave the parts in vinegar for 30 minutes, check to see if the bluing has been removed, rinse and repeat until done. What I like to do is to heat the vinegar in the microwave (with no metal parts in it) until almost boiling. Try not to breathe it in as you move the dish to the garage, as it’s acrid and will set you off coughing. Nasty stuff.

Drop your parts in the hot vinegar and watch as the bluing literally bubbles off of the metal in spectacular fashion. It will only take a few minutes before you notice changes in the colour of your metal. When the metal looks clear, pull it out so you don’t start it oxidising again.

If you’re doing a barreled action you probably won’t have a big enough container to completely cover it in vinegar. What you can try is wrapping it in paper towels soaked with vinegar. This may be a little slower and could require a bit of extra cleanup to get it just right.

3. Attack the metal

So now you have some bare steel completely free of bluing and rust. Make sure to thoroughly clean and degrease again, removing all traces of bluing, vinegar and anything else that shouldn’t be there. Now it’s time to pull out the ultra-fine sandpaper and steel wool, and remove all of the factory imperfections and slight bluing residue that you can spot.

It’s your call from here. Some people like to coat their firearms with ceramic or paint-on applications, while others like to try more exotic metal finishes. I’m a big fan of matte colours on rifles – usually black. For firearms that spend 99 per cent of their time on the range and seldom see adverse weather or bush conditions, you can afford to go for looks over protection.

My JW-15 which is only used at an indoor smallbore range, has had the bluing removed from the bolt handle, trigger and floor metal as mentioned above, and was polished thoroughly with autosol. I do have to make sure the humidity level in my safe is under control and that the metal surfaces are oiled when not in use for long periods, but realistically I find that the same applies to my factory blued firearms. I’ve got to admit though, that shiny metal is pretty sexy!