Removing and disassembling the bolt of a Swedish Mauser is a pretty simple affair and may need to be undertaken for any number of reasons. Most commonly, you’ve picked up a rifle nearing a century in age, and there’s a lot of gunk and crap in there that needs to be cleaned out. The other scenario is that you could be modifying your bolt to cock on close, or reduce lock time with lighter materials and a stronger spring.
Hopefully if the latter is your reason for stripping a Mauser bolt, you’ve inherited or bought a sporter – there are fewer and fewer whole specimens left.
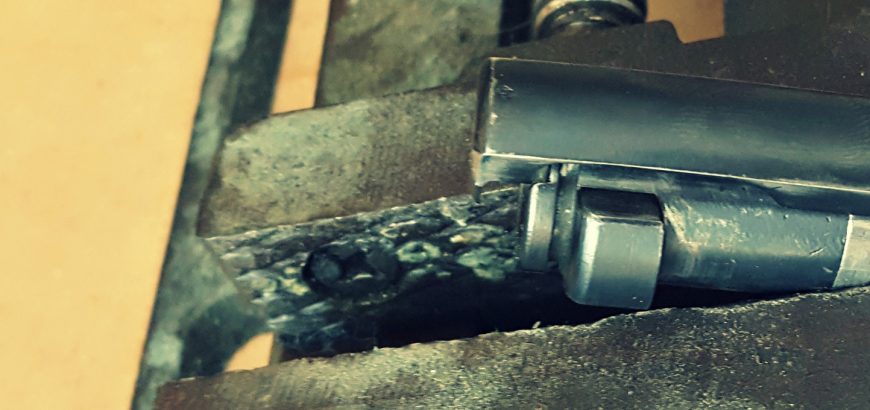
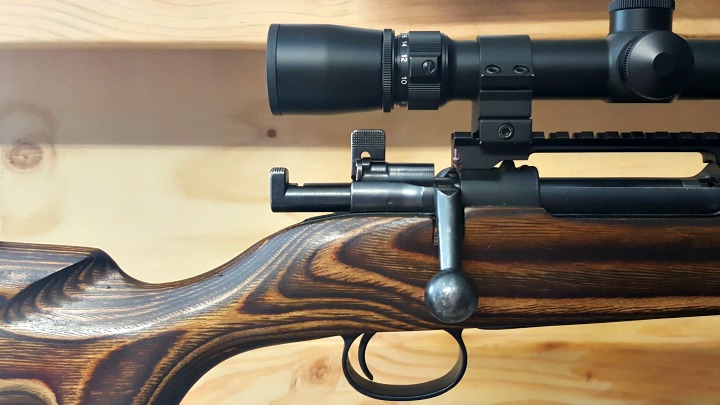
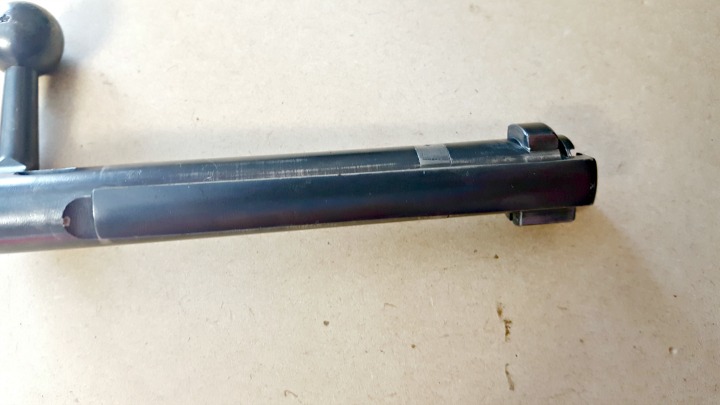
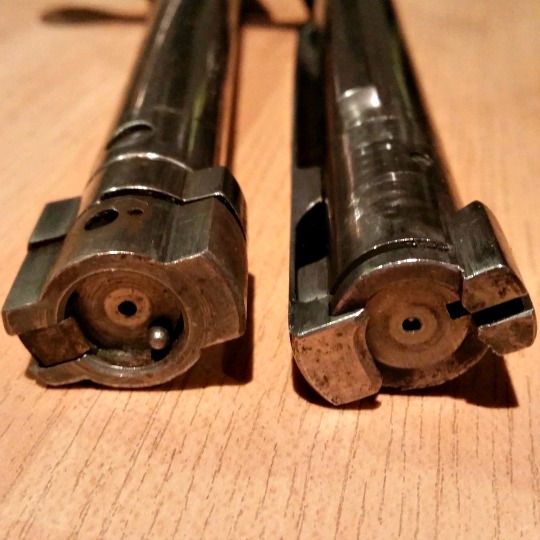
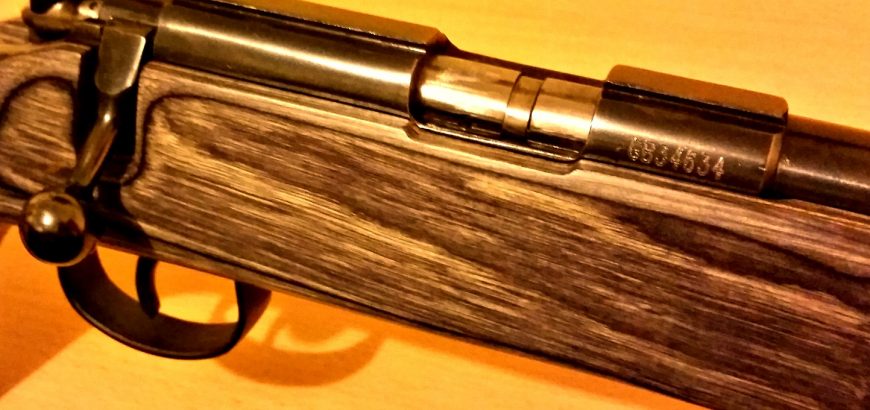
Below are a series of pictures showing how to disassemble a Mauser bolt (small ring, not a K98). If your bolt looks different, don’t fret. This is from a commercial rifle, not a military conversion. It has a blued finish and a bent bolt handle, which thankfully clears my Weaver 44/40 scope, thanks to an EGW 20 MOA rail. If you’re wondering how the extra height affects consistent cheek weld and sight lines, a Boyds stock with adjustable cheek rest helps out there.
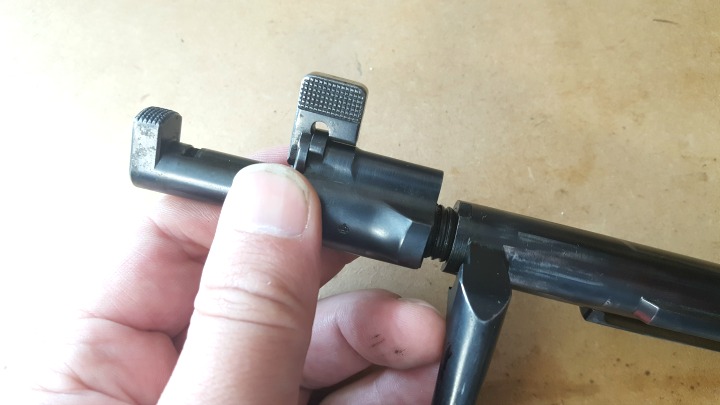
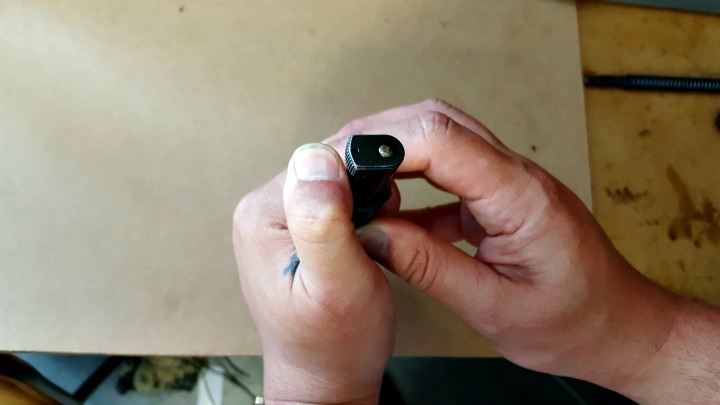
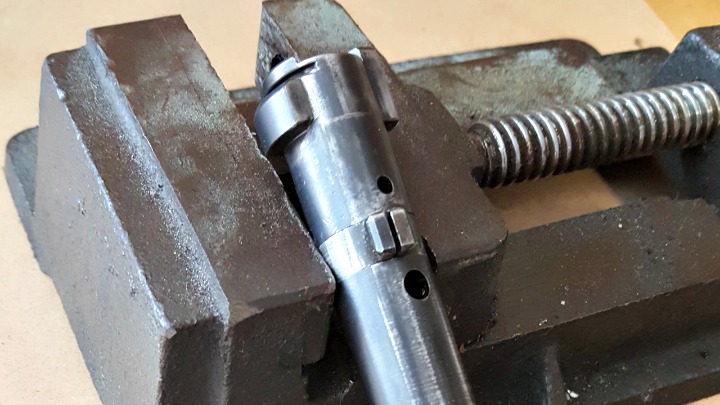
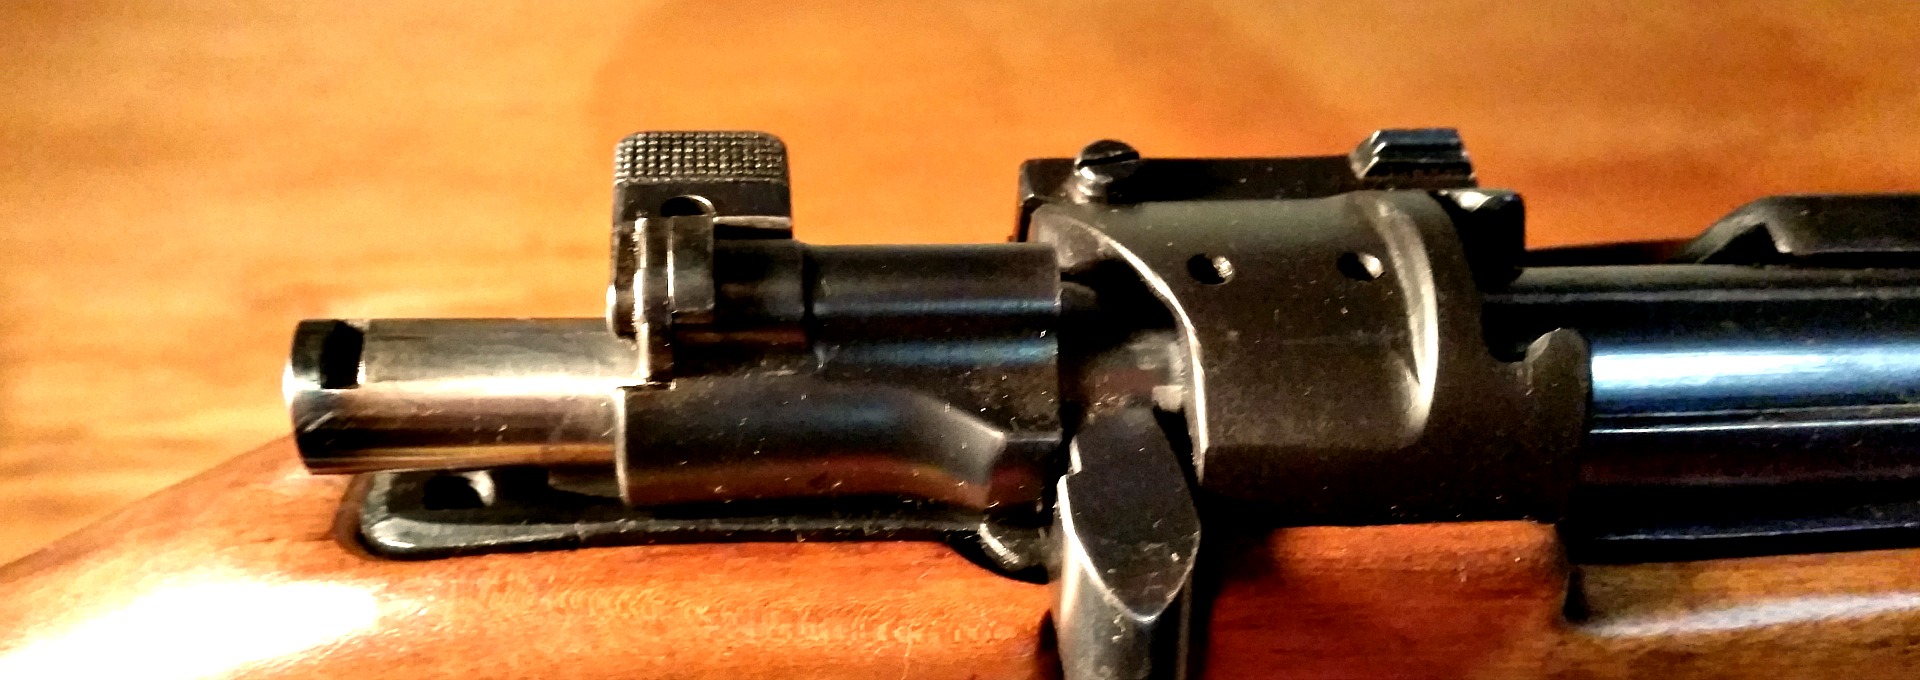
Step 1 – Get the firing pin out of the bolt body
After checking the rifle is unloaded, close the bolt fully.Lift the safety lever into the upright position and remove the bolt without lowering the safety. You may need to remove your scope if the safety won’t clear it.The bolt shroud should easily unscrew from the bolt body now. Note the cocking piece is held under spring tension by the safety lever.The firing pin separated from the bolt body. Again, note the spring and firing pin are locked back – if you don’t do the next step carefully, the spring, cocking piece, and firing pin could separate with a fair amount of speed and force.
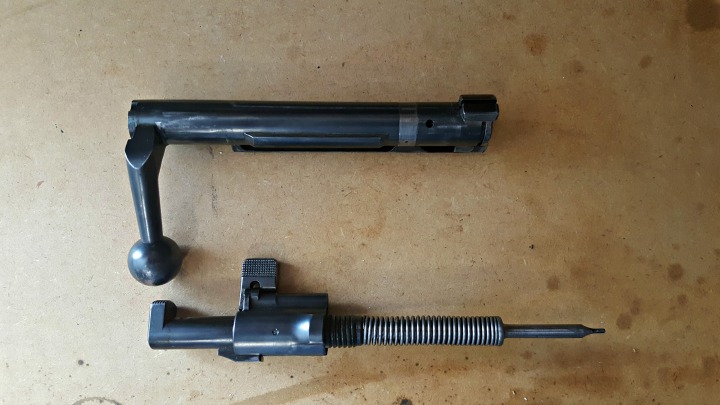
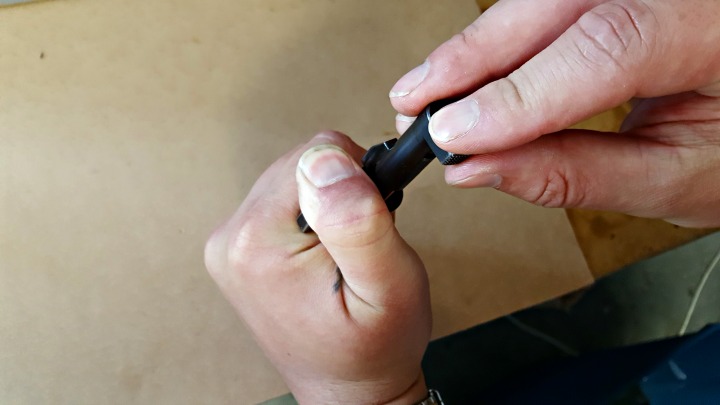
Step 2 – Separate the firing pin from the bolt shroud
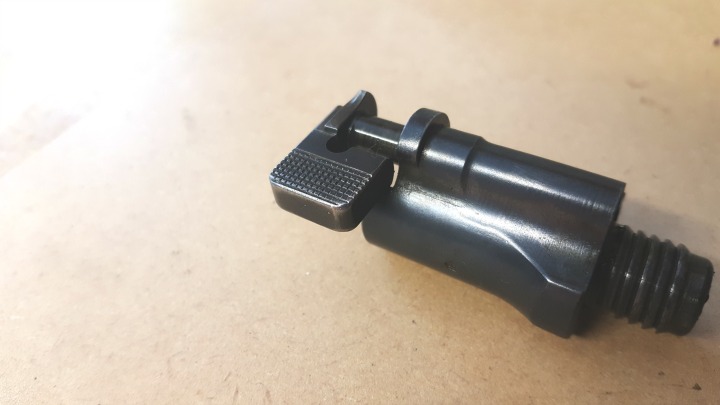
Find a hard surface you don’t mind denting. Or, if you have an original stock with brass disc, you can use the indent for this step. With the firing pin against your hard surface, force the bolt shroud downward. The safety lever provides a good amount of purchase.Twist the cocking piece 90 degrees. At this point make sure you have a firm grip on the bolt shroud and firing pin, and slowly release the spring tension to avoid sending pieces flying.Fold the safety lever all the way over and pull it back to separate it from the shroud.Shroud, cocking piece, spring, safety lever, and firing pin.
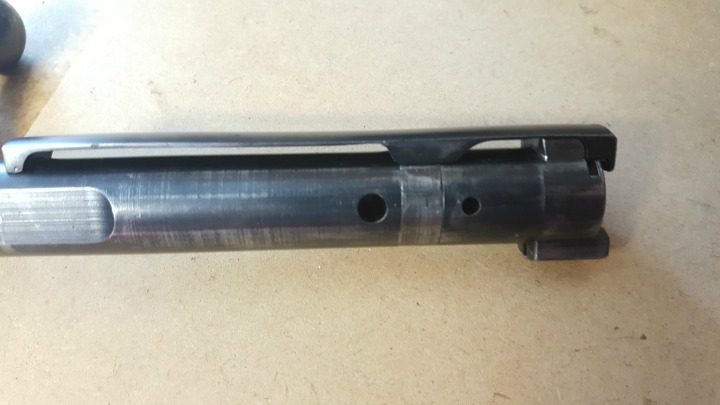
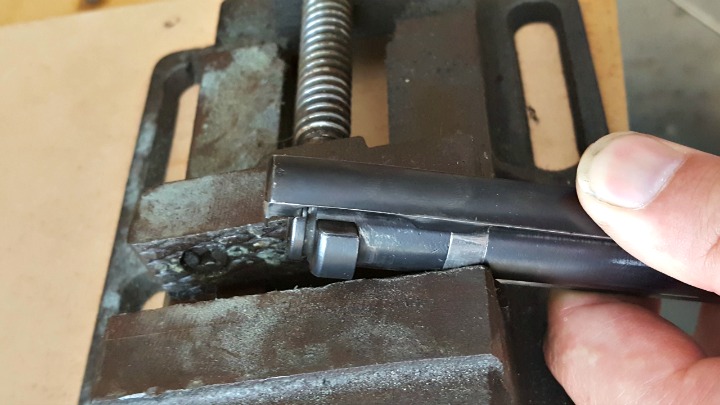
Step 3 – Remove the extractor from the bolt body
Note the extractor sits in a groove just before the bolt face.Rotate the extractor about 90 degrees so that it exits the notch.Apply downward pressure with your thumb, as you slide the extractor forward. Remember this sweet spot, as you’ll need to apply pressure in the same spot to get the extractor back on.Getting this collar off is easy, but you will stretch it as you do so. A flat screwdriver can be used to pry it open if needed. Getting it back on once it has been taken off is harder, and a vice of some sort will be handy, as you’ll need both hands to get the extractor back on.When reassembling the bolt, getting the extractor onto the collar is probably the hardest bit. If you have locking pliers or a small vice, it shouldn’t be hard to slide the slot on the underside of the extractor onto the collar. Remember where you applied downward pressure to remove the extractor – this is the same spot you need to apply pressure to as you slide it back on.
From here on, the rest of the reassembly is easy, and is simply the reverse of the above.
Whenever there is more than one option, shooters around the world will have vastly differing opinions for and against each. The same could be said for push vs controlled feed bolt action rifles. However, after over a hundred years of having both on the scene, it seems a sort of stalemate has been reached.
So, what’s the big deal?
People still have their preferences, but realistically, there are much more important factors to consider when choosing a bolt action rifle, and the feed/eject mechanism is almost ancillary to other concerns. That being said, there are differences.
The double feed
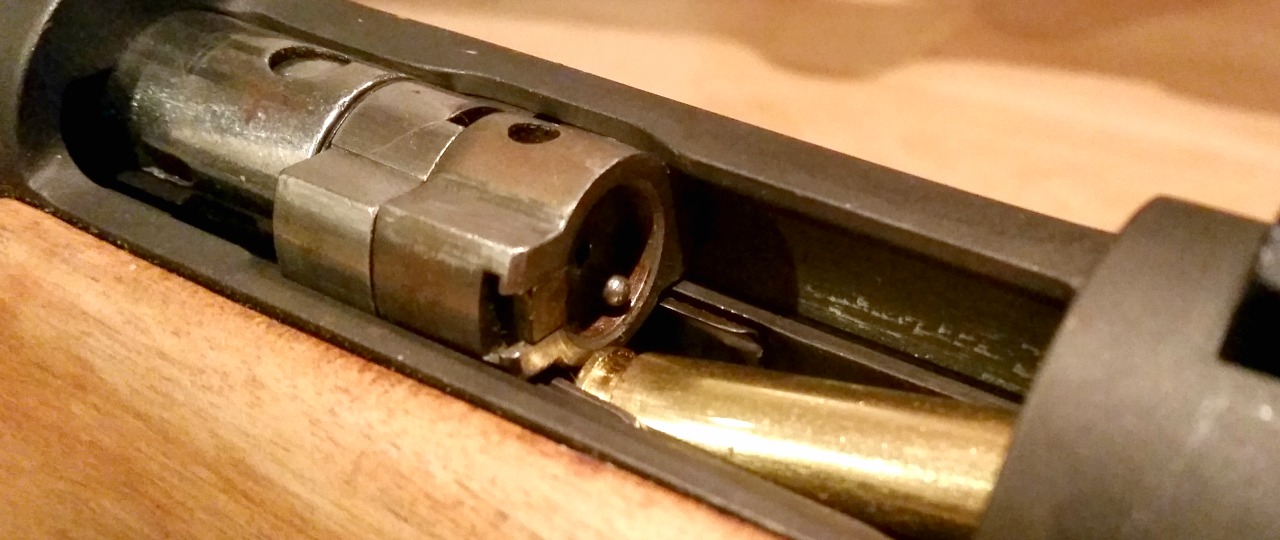
A push feed action is exactly what it sounds like. The round is pushed by the base of the bolt into the chamber. Once the bolt is fully closed the extractor claw will engage the rim of the cartridge, so that the ejector plunger can push it out when it’s clear of the chamber again (once the bolt is pulled rearwards).
The oft-quoted push action double feed can occur if you do not fully close the bolt upon chambering a round. This means the round will not eject as the extractor claw has not engaged the cartridge. If you move the bolt forward again, you’ll feed a second round into the base of the first.
The bolt in this .243 Stevens literally pushes the round without grabbing onto the rim until the action is fully closed.
This situation is very unlikely to occur, except through clear operator error. We all like to think we’re beyond such simple mistakes, but stress can cause us to do funny things. When might you be this stressed? Hunting dangerous game, or perhaps in fast-paced action matches like the Precision Rifle Series. However, most competitors use modern push feed actions without any issues. Big game hunters on the other hand, are probably the biggest proponents of the Mauser-style controlled-round feed.
Making life easier
The main reason for the proliferation of push feed rifles is that they are cheaper and easier to manufacture. Having said that, some very expensive, reliable and accurate rifles use push feed actions.
There’s one thing that just makes like easier with a controlled-round feed. You don’t have to push the bolt fully closed, or completely work the action, to pick up and eject a round. And no, this isn’t the same point above worded in a different way.
This Mauser action with its large claw extractor grips the round upon picking it up out of the magazine.
If you spend a lot of time on the range drilling small holes into paper, you’ll come across plenty of situations where you have to clear your rifle so someone can go forward. This may be for a change of targets, a ceasefire in a match or some other situation where rifles need to be made safe.
If you have a box magazine, no issues either way. However, if you have a blind magazine, emptying a full mag with a push feed action can be annoying and time consuming. A good example of this is the Mossberg 100 ATR which I recently reviewed. A nice, slick bolt action, but you can’t pull the magazine out or drop a floorplate if you want to quickly empty your rifle.
With the Mauser-style actions built by CZ, Winchester (some model 70s), Ruger, Kimber and others, you can simply move the bolt a fraction of the way forward and pull it back again to solidly pick up and eject a round. I do also find that the bolts are generally less sloppy in the action, as the long extractor acts as another guide to keep the bolt going forward and not sideways.
These sound like silly points to favour one rifle over another, and they are. Although it’s a feature I really like, it wouldn’t influence which rifle I bought if I was choosing between two (unless they were otherwise identical, which isn’t going to happen).
If you want to dig a bit more into the subject, there’s plenty on the web, including this well-illustrated article at Lucky Gunner.
Properly bedding and finishing your rifle will not only help it look a million bucks, but will seriously enhance your accuracy as well. In this blog series I’ll be looking at bedding and finishing my Boyds Prairie Hunter stock for my Swedish Mauser.
The stock
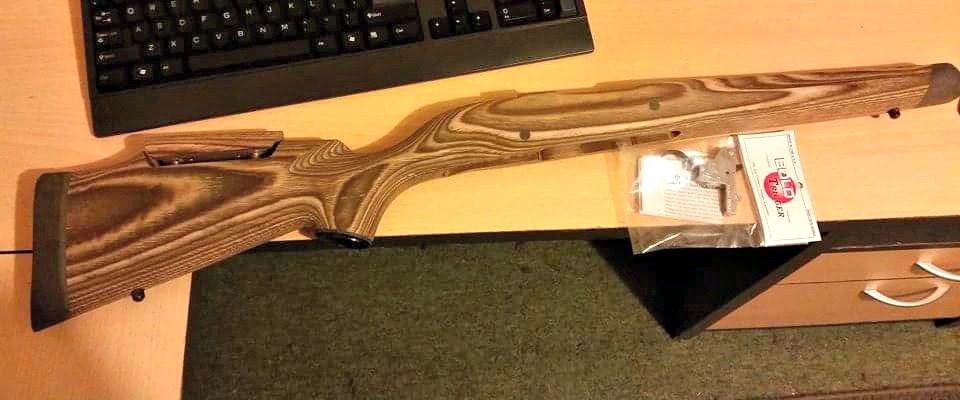
The stock I’ve chosen for my small ring Husqvarna chambered in 6.5×55 is a laminate from Boyds Gunstocks, in their Prairie Hunter shape with a nutmeg finish. The stock has more weight than my current one, absorbing some more recoil, but also balancing well against the almost half a kilo of suppressor on the other end. It also has a more appropriate length of pull, and a nice recoil pad that not only reduces kick, but also gives me that little bit of extra length.
This stock has been provided with a few nice extras, including an adjustable comb and synthetic pistol grip and forend caps.
The Boyds stock and BOLD Trigger made a nice care package to come home to.
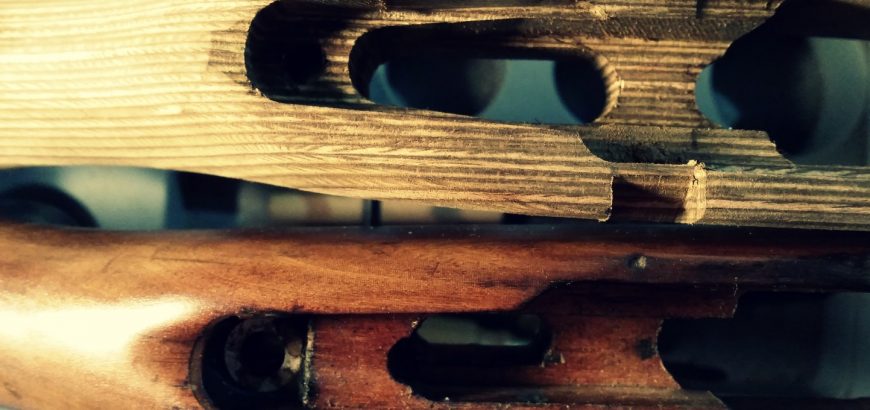
For some stocks, Boyds only provides their products unfinished, which is the case here. This is because some rifles come in so many variations of configuration, that they will necessarily require some fitting by the user. In this case it’s differences in bolt handle that make it a must for users to complete their own stock. Many older Mausers still have their straight bolt handles, but increasingly if you come across an old Swede, the bolt handle will be bent back, or you could even have an M38 bolt – or similar – which comes turned down from the factory.
After finishing this, and any other inletting adjustments needed, you can then apply your choice of protective coating. While Boyds recommends a polyurethane, I really like the hand-rubbed oil look, so that’s what I’ll be trying with this project. My Pro Varmint stock from Boyds does have the polyurethane finish from the factory, and I must admit, it looks good and is very hard-wearing. But hey, since I’m doing this bit myself, I may as well try something different.
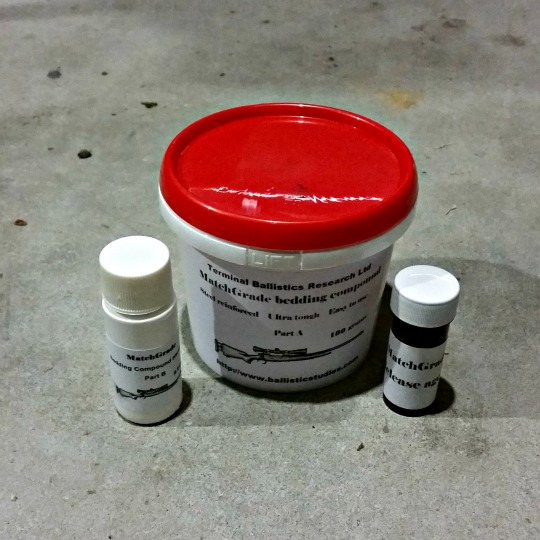
The bedding compound
There are various bedding compounds and systems on the market, and you have some serious research and decision-making to do. Some newer factory rifles will come with an aluminium bedding block, while others are pillar-bedded.
Rifles that are bedded after the fact can be done in several ways, depending on your capability, tools, budget (if your smith is doing it), desired application and the needs of your rifle’s action.
Terminal Ballistics Matchgrade Bedding Compound – release agent, component A and component B.
Generally people choose between pillar or glass bedding, or both. Then there’s also a full, front or front-and-rear glass bedding job. Pillar bedding uses metal pillars, such as aluminium or stainless steel, to eliminate the risk of compression or crush when tightening the king screws.
The pillars are tubes that are epoxied in the action screw holes, for the screws to go through. This way, when the wood expands and contracts, or is put under pressure between the floor metal and action, the screws can always be done up to the same point, as the metal is pretty much impervious to these stresses.
Glass bedding is the process of using a compound, that is pretty much an epoxy in most cases, that is reinforced in a fibreglass-like way. The compound I prefer is Nathan Foster’s Matchgrade Bedding Compound, which is steel reinforced, and easy to apply.
Check back in for Part 2, where I’ll go over the first steps of the stock prep and bedding process.
Let me preface this by saying… How long is a piece of string? If you’re looking for the definitive guide on the all-time showdown between factory and custom rifles, you’ve got a long wait ahead of you. There’s no way to say one is categorically better than the other, but depending on your needs, one will suit you more than another. Here’s a quick run down on the two options.
Custom vs “Custom”
Well, maybe there are three options. There are rifles that are custom built by fantastic gunsmiths, or even several different people (i.e. barrel manufacturer, suppressor builder, stock maker, etc), and they can run into the tens-of-thousands of dollars. Chances are you’re not comparing a $35,000 rifle built on a Surgeon action to a Weatherby. So, realistically, these types of custom rifles fall outside of the scope of this discussion.
There are even the customised Remington 700s, Sakos and others you can buy direct from a gun store, which have been assembled with a host of accessories and a non-factory stock, etc, which offer “custom” rifles at lower costs and with a lot less effort. This a kind of middle-ground which, again, falls outside of the debate of custom vs factory.
Factory rifles
There are a host of incredibly good choices out there when it comes to factory target or hunting rifles. And the fact of the matter is, with modern production techniques and better quality control standards, many of these rifles are incredibly accurate out of the box.
Sako guarantees the Tikka T3 line to produce an MOA 3-shot group out of the box, and they boldly make the same claim with their T3 varmint and tac and 5-shot group. That’s pretty impressive. However, that doesn’t mean your new Tikka T3 Lite in stainless/synthetic will do that with any ammo you feed it. Bear in mind, Sako tests rifles with ammunition they produce themselves.
So, you may need to find just the right brand of ammunition, or even reload your own to get that level of accuracy.
The great thing about factory rifles is that if you look after them and keep track of how many rounds you put through them, you’ll generally get a pretty good resale value if you decide to switch calibres or clean out the safe down the line. Selling firearms is just foreign to me – I want more, not less – so I couldn’t really relate personally. However, for some, it’s a major benefit.
Another aspect of factory rifles, and this is one that I can understand, is that you have warranties and guarantees form manufacturers and retailers. If something goes wrong with a stock-standard rifle, you’re usually okay. Again, this comes down to incredibly efficient modern materials and processes – a lot of manufacturers are so confident, they will give you a lifetime warranty, even with their base models.
Custom rifles
A lot of firearm owners like to try and get more for less. They’ll buy a rusty old milsurp and try restore it, or even convert a P14 action from .303 to a .338 Lapua long-distance shooter. It’s this undeniable urge to make something better and more accurate – but cheap.
Many people try, and many people fail. The old adage “cheap, accurate, reliable – pick two” still stands true. However, not all is lost. Many backyard tinkerers find that they learn more about gunsmithing, rifle maintenance and internal or external ballistics by working on their own firearms than if they bought an out-of-the-box MOA-shooter. It gives you a more holistic view and respect for firearms, and generally makes you a better shooter. The more you know about how your rifle works, the better you can work with it.
This modified Mauser bolt action was a lot more work, but is a joy to shoot.
What I have found with my own projects, from JW-15s to Swedish Mausers, is you’ll probably spend enough money in the end to have bought a tack-driving factory rifle. So why would you do it?
The initial outlay is low. Three or four hundred for an M38 in 6.5×55 which might need a lot of work to be great, but at least in the meantime, it’s still good.
It’s a project. If you yearn to create your own sub-MOA rifle and constantly look up the latest Boyds’ rifle stocks or DPT muzzle devices, then this probably for you.
It’s unique. Hey, it’s the gun you built, not the one Howa, Marlin or Remington made. There’s a certain amount of pride in this, and you can make it look and feel the way you want.
Individual needs. Hey, if you need a bush gun – cut down a .303. If you want an odd-looking F-Class gun, try your hand at “improving” an old Mauser. The best part is never feeling bad about cutting into the steel – coz it only cost $250.
Who wins?
Well, if you want a reliable, dependable and accurate rifle to take hunting or to the range, you could go and get yourself a Tikka T3 Lite in stainless/synthetic for less than $1200. Chances are your home-improved P14 or Model 1896 is going to end up costing you more with a new/improved stock, bedding, barrel and chambering, suppressor, bases drilled and tapped, etc, etc.
Floor metal from 1943 looking fresh and ready to go.
However, if you want something unique that you can enjoy working on for months – or even years – pick up a donor action to work with. Even an older (pre-1964) M70 or Remmy 700 is fun to use. And the best part is if you buy a complete milsurp, you can probably enjoy shooting it “as is” to start with for very little outlay.
I’ve heard many Tikka T3 owners say their rifle is “boringly accurate”. And that is high praise for any manufacturer. So, at the end of the day, if you want to drill tiny holes into paper or leave gaping exit wounds in deer at 400 yards – get the factory rifle. If you want to feel like you earned your way to shooting sub-MOA or making long-distance kills, a project might be on the cards.