
How to: Disassemble M305 magazine

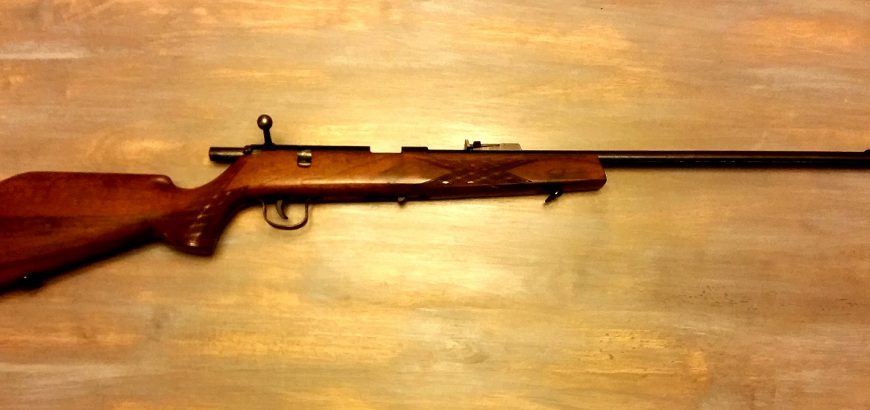
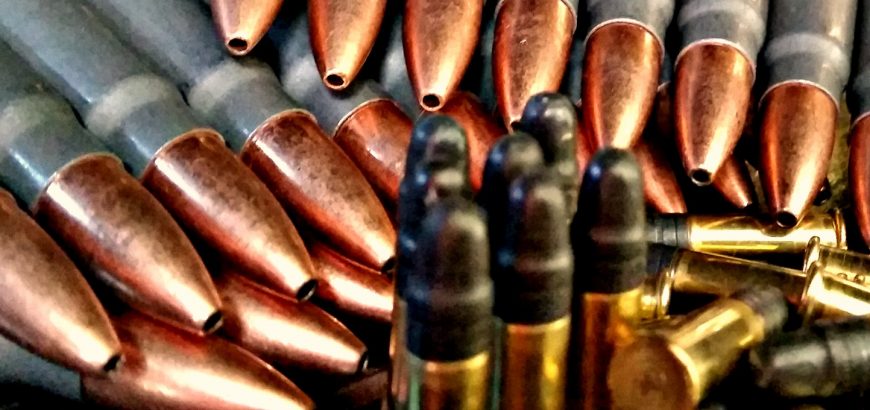
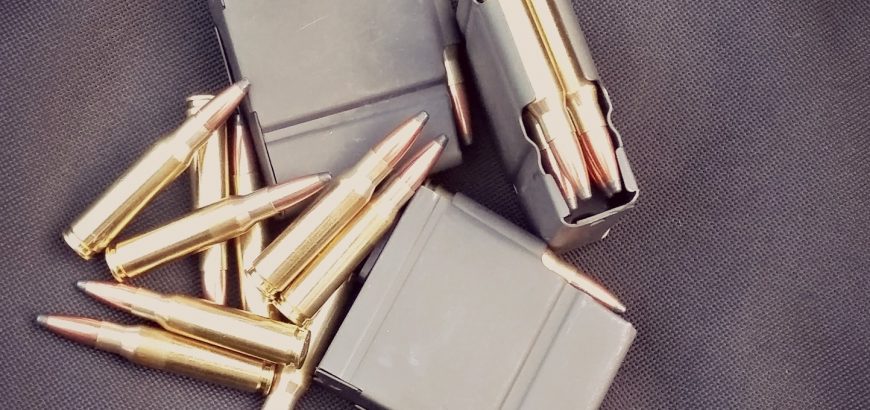
The MI4 or M1A is a mainstay in most military rifle collections, alongside its predecessor the M1 Garand. The M1A even sees frequent use in Heavy Metal classes of 3 Gun competition. The Norinco M305 is a damn good copy of the Springfield M1A (and the newer ones are even better). They’re also 4 or 5 times cheaper than their American cousins.

However, Chinese guns often come dripping in cosmoline, requiring a proper birthday before heading to the range. Even parkerized magazines in sealed bags will be dipped in cosmo to keep rust at bay. If you’ve bought a rifle that’s been stored in an armory for a while, you’ll notice that cosmo and parkerized finishes interact and create a greenish-grey finish. Anyway, I digress…

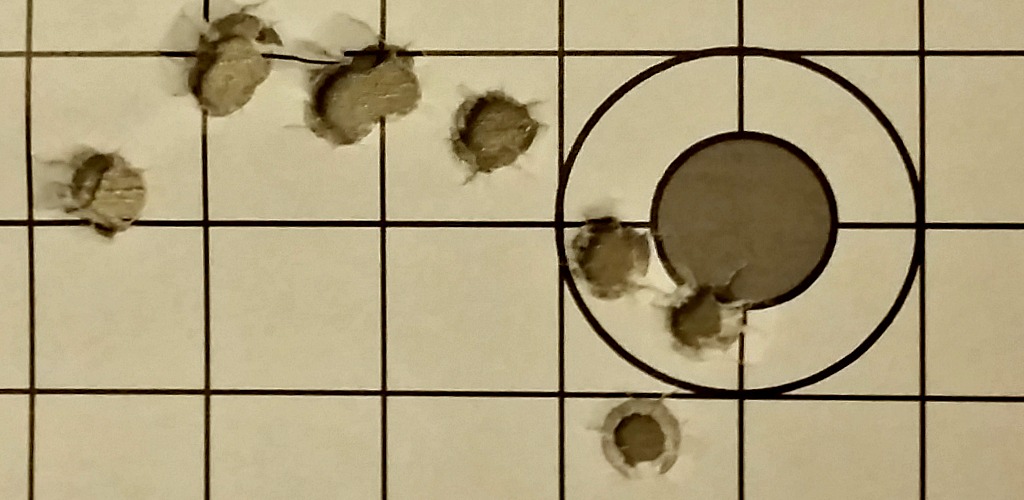
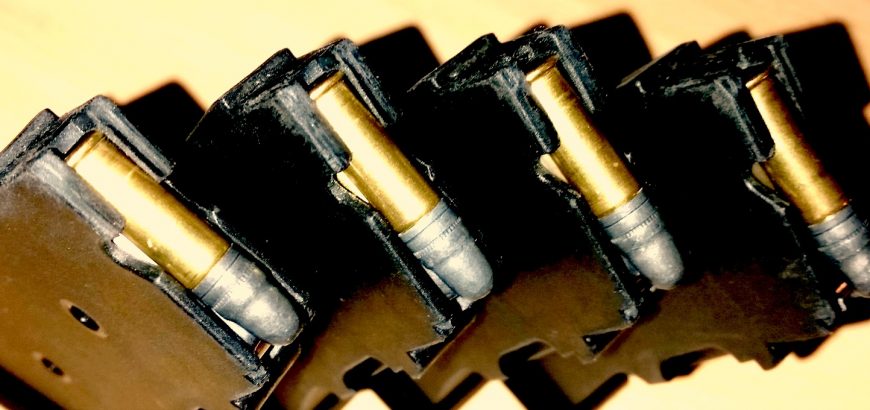
If you’ve bought one of these Chinese knock-offs, chances are you’ve got a magazine or two full of cosmoline. This will mean stiff functioning and potential jams when they get dirty as well, leading to failure to feed situations. Disassembling one of these mags is easy to do, and highly recommended for cleaning purposes.

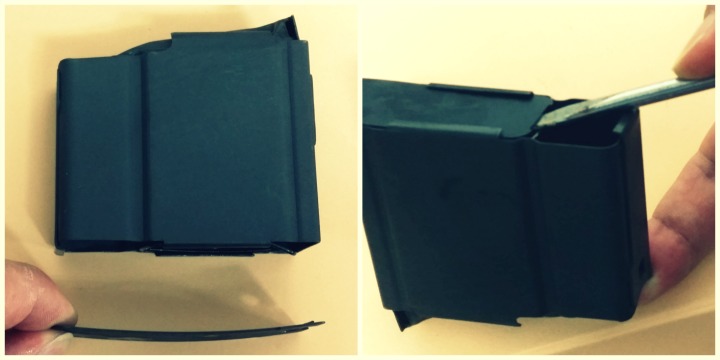
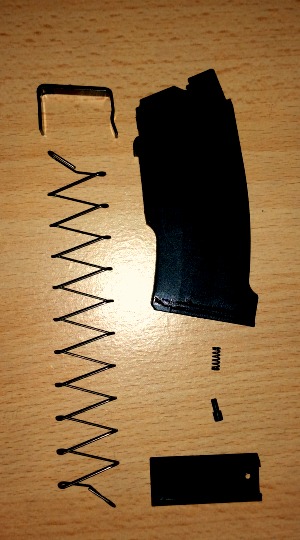
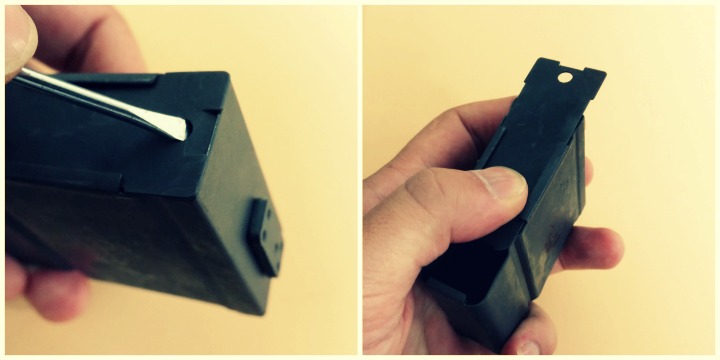
Step 1 – Remove the floor of the magazine

Unlike older magazines like the Lee Enfield’s 10-rounder, where the spring and follower come out of the top of the mag with some wiggling and creative angles, the M305 magazine has a floor plate that can be removed.

A screwdriver or something similar can be used to pry the locking tab up. Once this is over the magazine wall, you can slide the floor of the magazine forward.

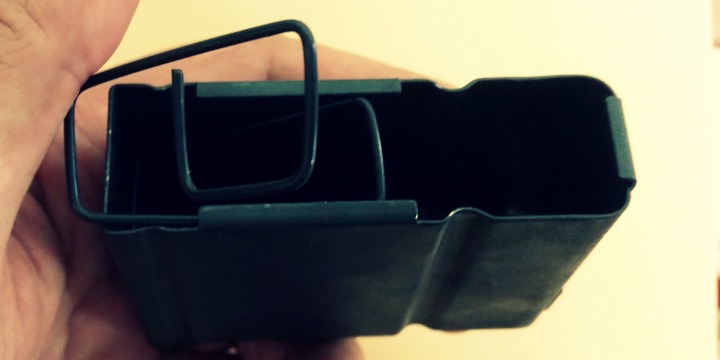
Step 2 – Take it apart

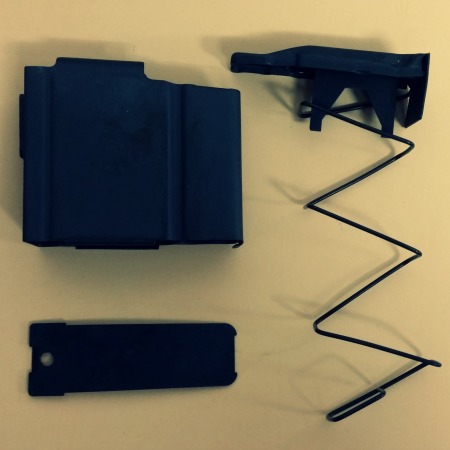
Unlike rimfire magazines, there are no small springs or buttons that leap out at you when you open the magazine up. Once the bottom is removed, you’ll probably find the square spring is pressed against the tabs that were keeping the floor in place.

It’s quite easy to remove the spring by lifting a coil at a time, and then giving the follower a bit of a wiggle to get it out. Take care not to cut yourself, as these mags don’t have the best finish in the world.

The spring shouldn't jump out at you and there are no small parts to lose.
The spring shouldn’t jump out at you and there are no small parts to lose.
With so few parts, it's easy to keep track of everything and clean it. Make sure to watch out for sharp edges.
With so few parts, it’s easy to keep track of everything and clean it. Make sure to watch out for sharp edges.

Step 3 – Degrease everything!

Norinco is nothing if not liberal in their application of cosmoline. The preservative gunk is everywhere. Make sure you get your cleaner/degreaser inside and outside the magazine, and over all of  the parts you have removed. I personally prefer a degreaser in an aerosol can to make sure I get everywhere. Most of the time I use Wurth’s Industrial Cleaner, which is a citrus-based aerosol, and highly effective.

Give the magazine a good wipe, inside and out, with a clean rag. Again, make sure to watch out for sharp edges – maybe even debur them if necessary.

Step 4 – Oil and reassemble

A bit of lubrication of the spring/follower is not a bad idea. Not enough to get dirt and debris stuck in there, but enough to relieve some of the friction as the follower contacts the walls of the magazine.

With this particular magazine I used some aerosol Ballistol. However, a few drops of Remoil or Hoppes Lubricating Oil would do the trick too.

After you’ve applied some lubricant to the inside of the magazine and put the follower and spring back in, it’s time to close up the floor.

The curved floor metal means you'll need your screwdriver again to lift it into place. Seal the deal by tapping it closed with a rubber mallet or tap it on your bench.
The curved floor metal means you’ll need your screwdriver again to lift it into place. Seal the deal by tapping it closed with a rubber mallet or tap it on your bench.
Voere 22LR Bolt Action

No bolt, no mag – what to do?

It’s not unusual for an older rifle to make its way through the family tree and lose its bolt or mag along the way – especially .22s which can be used and abused. The other way no mag/bolt guns fall into our hands is through Trademe auctions, usually run by gun stores that have used older rifles for parts, and no longer need the barrelled action and/or stock. So, is it worthwhile trying to restore these firearms to their former glory?

What’s the value?

If it’s a family heirloom, it could have enough sentimental value for you to undertake the project regardless of cost. However, if you’re eyeing up an auction, it’s probably because you want to get a rifle together on the cheap. Depending on your scenario, it may or may not be worth the time, money and effort to restore the firearm.

A word to the wise – thoroughly research your intended purchase before assuming you can find the parts to complete the project. As an example, I wanted to put together a cheap shotgun and bought an SKB semi action and stock, missing the forewood and barrel. I had seen some barrels online, and figured it would be easy enough to put this thing back together.

However, I found out (like an hour after the auction), that the SKB factory had been shut down, and that the barrels that I had found in the States were not ideal. There are some available locally – for over $900. There goes the idea of a cheap shotgun. So I paid $29.50 for something that probably won’t ever be used for anything, except perhaps testing out gun blue or stock reconditioning products.

What’s the cost?

Sometimes you can source the parts, but you have to be inventive to keep the cost down. The thing is, if it was cheap to do, the gun store would have bought the parts and sold a complete rifle for more – so you know it’s not going to be a walk in the park.

A good example of getting creative is a rifle I got from my father-in-law. It’s a .22LR bolt-action from sometime around the ’70s or ’80s. It was sold by a trading house by the name of Wischo Kg Erlangen in Germany originally, essentially assembled from parts provided by various European manufacturers. The rifle is basically a Voere.

The rifle came into my possession for the princely sum of a nice bottle of wine. It had a decent looking barrel and a crisp two-stage trigger. However, it was missing the rear sight, magazine and bolt. By keeping my eyes open, I managed to spot a Voere parts auction on Trademe.

The auction was for an action and bolt, with about 8 inches of barrel attached. See below video of me firing this weird thing, after fitting it to the stock from the rifle I had acquired.

Included in the “barrelled” action was the rear sight – a stroke of luck. Also in the auction I got a 6mm garden gun without bolt, which is just a wallhanger in my office. Oh well. I’m never even going to try solve that mystery.

The Wischo rifle sporting the Voere sight, pictured next to the Voere bolt, action/barrel and trigger group.

The issue then became whether the parts I bought on an (educated) whim for $40 would fit my rifle – as technically they were not from the same gun. Well, it turned out I was right with my assumption that the trading house rifle was a Voere in disguise, however the bolt wouldn’t close nicely and the rear sight was obviously different, as it had a larger dovetailed base.

A machinist/engineer friend of mine helped me take a small piece of metal off the action around the bolt, which got it cocking smoothly, and extended the dovetail to take the sight off the parts gun. This cost me a box of Heineken.

All that’s left to buy is a magazine, which I can get from here, or here, for between $100 and $150. So, all up, for the cost of a bottle of wine, a box of beer, $40 for parts and around $150 for a mag, I’ll have a nice wee shooter with a bit of character and a story worth telling. By throwing in some of my own time and effort, I can reblue the rifle and varnish the stock, and it will end up being a really good looking little gun too.

So, again, it can be worth it – but you’ve got have the time, and sometimes know the right people, to make it worthwhile restoring a non-functioning rifle.

Should I clean my .22LR barrel?

There are many opinions, myths and vagaries about rifle cleaning. Some will tell you to clean and polish your bore after every trip to the range, others will tell you cleaning your rifle is a waste of time or a bore snake will do the trick. However, one thing’s for sure – maintaining your .22 is completely different.

What’s the difference?

Whether it’s rimfire or centrefire, some fouling is often needed to get a barrel shooting to the same, reliable point of impact. Lead rimfire projectiles are much softer copper-jacketed bullets, doing minimal damage to the bore, and the lead deposits left in the barrel don’t do any harm either. Copper not only wears down the barrel, but leaving it in the bore can lead to quicker deterioration of the rifling after subsequent shots.

So, the question then becomes – if fouling is good and lead isn’t harming your barrel, why would you clean your .22?

This picture shows how a clean barrel walks to its point of impact once it fouls up.

How often to clean your .22LR barrel

I don’t personally clean my barrel very often. The standard is “when accuracy starts dropping off”. And to be honest, I’ve never got to that point. I give my .22 a couple pulls through with the bore snake and some Hoppes No. 9 after a couple thousand rounds – give or take a few. But, lead crud is nasty on the action.

I mainly shoot bolt action when I’m shooting rimfire, which means I can feel when the bolt starts getting stiff or it doesn’t feed nicely. Semi-autos tend get gummed up a bit more, as gasses from firing come back into the action. What to do? Use some bore solvent and angled brushes, cotton swabs or cloth to clean the gunk out. Every now and then disassembling the bolt or action could be necessary to ensure reliable functioning. Some shooters also like to clean up the crown, however, I shoot with a suppressor, so I’m not super-fussed on that score.

If you have any questions or tips for cleaning your rifle – share them in the comments below.

Choosing a calibre for a secondary AR-15 upper?

Best upper for AR-15

So you’ve bought your first AR-15 and you’re super excited by the fact that you can swap in just about any upper you want to create a whole new weapon. But which is the best upper to choose? While the .223 is a great round, it’s not the be-all and end-all of rifle shooting (nothing is), so what about about a different calibre?

Here’s my take on what you can achieve my swapping out the upper on your AR-style rifle.

How about a .22LR Upper?

Well, not the worst idea actually. If you want a cheap way to practice with your AR or to introduce younger shooters to the sport, using 22LR ammo is a great and inexpensive way to do it. However, there are some conversions that use your 5.56 barrel – don’t do it. It can work, but it won’t be a satisfactory way to shoot either caliber, and it requires more work.

Rather, spend the money on a full upper and magazine, like this one from gunsupplies.co.nz, which will work with any milspec receiver. Although, to be honest, for not much more you could buy an entire .22LR AR-type rifle.

7.62×39 anyone?

Okay, let’s be honest, I’m a big fan of the humble 7.62×39 Soviet cartridge. It’s cheap and dirty and does the job. But, would I put it through an AR upper? Not really to be honest. While the AR platform is great. there’s not much reason to get it to shoot cheap Russian ammo.

If you want a cheap way to shoot this calibre, you can get a Chinese SKS for a third of the price of a 7.62×39 upper, and again, you have a whole new rifle to enjoy. You also won’t feel nearly as bad using it as a knock-around bush gun.

AR-15 in .300 BLK

If you want 7.62×39 ballistics in an AR-15, .300 BLK might be the way to go. Developed for spec-op military applications, this round is AR-friendly. It feeds from a standard STANAG magazine with no modifications, and without reducing the capacity, so at least you can use your current AR mags.

If you’re looking for something novel and interesting to shoot, which is designed for the platform and actually useful, the .300 AAC Blackout could be the answer. It is more expensive to shoot than any of the other rounds, and would probably necessitate reloading to make it a viable addition to your safe.

Which AR-15 upper should I choose?

Well, my personal preference would be to have one completely milspec rifle for service rifle competitions, a 20 inch barreled set up for 3-Gun, and perhaps a .300 BLK upper to enjoy shooting something a bit different.

But hey, that’s just me! What would you choose as your ideal black gun set up?

Four loaded CZ 452 magazines.

Disassembly of CZ 452 Magazines

Any smallbore range across New Zealand will have a few CZ 452 magazines floating around. Whether they’re attached to a Brno Model 2 or Norinco JW-15, these magazines hold up to thousands and thousands of rounds being put through them. Occasionally – you might even think about cleaning them.

How often to clean your CZ 452 magazine

Disassembled CZ 452 Magazine
The spring-loaded button needs to be handled with care.

Simply put, not that often. There’s lots of discussion around how often you should clean a rimfire rifle. Some like to clean after every trip to the range, but I personally prefer not to clean that often.

I find that that once a rimfire barrel has been fouled it shoots more consistently. That’s my experience anyway. Cleaning every trip undoes this fouling and means wasting ammo before every shoot getting it fouled again. So, when do I clean? When accuracy drops off, or when feeding becomes slightly tougher. Usually, the latter strikes first.

I take the same approach to my magazines. I clean when feeding becomes an issue. I usually use multiple magazines and consequently they don’t get fouled that quickly. If I haven’t had any issues by the time I give my rifle a birthday, then they get a clean too. Might as well.

Disassembly and reassembly of the magazine

Pulling apart the CZ 452 magazine is very easy. They’re well made and there are no sharp parts or difficult processes involved.

At the base of the magazine there is a small dimple. Inside here is a spring loaded button. Press is down with a pen, nail or punch and slowly slide the base off the magazine. I say slowly because if you’re not careful, the spring will shoot that little steel button out. Good luck finding that again.

To get the spring and button out, cover them with your thumb while you slide the magazine floor off, and slowly release them into your hand. Next, pull the main magazine spring and the follower out. Take note of which way the follower is facing – it needs to go back the same way.

Cleaning is simply a matter of wiping everything down. You can dowse the spring and follower in Hoppes No. 9 if you like. A quick squirt of gun oil once everything is clean and dry isn’t the worst idea either.

Assembly is pretty easy, it’s the exact opposite. Again, be careful you don’t lose the spring or steel button.

Any questions? Post a comment.

CZ 452 and Norinco JW-15 magazines with 22LR rounds.
Because CZ and Norinco mags are quite common, I marked mine with my wife’s red nail polish to make them easily identifiable.